A/B Testing in Java with ConfigCat and Amplitude

Knowing what your customers expect is one of the most difficult challenges when developing a product. Your team may prefer a particular color scheme, whereas your customers may prefer a different one. Fortunately, even if you're updating as you go, you don't have to read customers’ minds.
Including A/B testing in your development process can help you ensure that you're always in sync with your customers and never have to second-guess your decisions. Furthermore, it is simple and inexpensive, and it has the potential to significantly improve the success of your work.
What is A/B testing?
A/B testing, also known as split testing, is a method of polling your customers by giving them the option of choosing between two versions of the same app. The best part? Because they are unaware that they are taking part in a test, all bias is removed.
In practice, this type of testing consists of having two versions of your app, called control and variant, that differ by only a minor change. You serve the variant to a subset of your users and track which version performs better. Once you've decided, you can make that version your default.
Always strive to incorporate only one change because the variant should be a slightly modified version of the control. You won't be able to determine which difference actually affected the performance if there are several.
Now, let’s see how to A/B test a Java app using ConfigCat’s feature flag management system. For context, ConfigCat is a cloud-based service that lets you release features without code deployments.
The Sample App
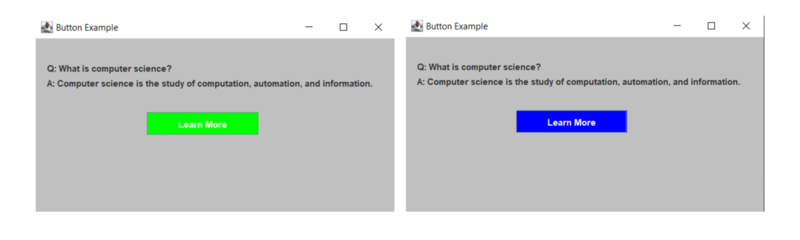
Java is typically thought of as a backend language, so for this tutorial, I kept the user interface (UI) relatively straightforward. If you look at the picture below, you can see that I created a simplistic page with information about computers.
What I really want to test is the button that says Learn More. Which color would inspire my readers to learn more about the topic? I'm not exactly sure. Green has been the color I've used up till now, however blue might improve my performance because it fits the general theme better. Since I can’t know for sure if changing the color will indeed make the page better, I’ve decided to A/B test it.
First, I’ve set up my Java application by creating the page and the button. I connect a feature flag to the button using ConfigCat so that when the flag is off the button is green and when turned on the button changes to blue. You can take a look at my code below, but if you’re new to feature flags, I strongly suggest you take a look at this article before, as it’ll walk you through connecting a flag to your Java app. For quick reference however, Feature flags let you launch new features and change your software configuration without (re)deploying code.
public class Main {
    public static void main(String[] args) {
        GUI gui = new GUI();
        String userID = "user100";
        ConfigCatClient client = ConfigCatClient.newBuilder()
                .build("YOUR-SDK-KEY");

        User userObject = User.newBuilder()
                .build(userID);

        //get flag value
        boolean greenbutton = client.getValue(Boolean.class, "greenbutton", userObject, false);

        System.out.println("greenbutton's value from ConfigCat: " + greenbutton);
    }
}

class GUI{
 public void showGUI(boolean flagValue, String userID, Amplitude client) {
     //setup for JFrame
     JFrame frame=new JFrame("A/B Testing");
     frame.getContentPane().setBackground(Color.lightGray );
     frame.setSize(500,400);
     frame.setLayout(null);
     frame.setVisible(true);

     JButton btn=new JButton("Learn More");
     btn.setBounds(150,100,150,30);

     if(flagValue) {
         btn.setBackground(Color.GREEN);
     }
     else{
         btn.setBackground(Color.BLUE);
     }
     btn.setForeground(Color.WHITE);
     btn.setFocusPainted(false);

     JLabel question = new JLabel("Q: What is computer science?");
     question.setBounds(15,30,500,20);

     JLabel answer = new JLabel("A: Computer science is the study of computation, automation, and information.");
     answer.setBounds(15,50,500,20);

     frame.add(btn);
     frame.add(question);
     frame.add(answer);

     btn.addActionListener(e -> {
        System.out.println("button clicked")
     });
 }
}
I've first created the page and the button for my Java application. Using ConfigCat, I linked a feature flag to the button so that it changes from green to blue depending on whether the flag is on or off. You can take a look at my code below, but if you’re unfamiliar with feature flags, I strongly suggest you take a look at this article before, as it’ll walk you through adding a flag to your Java application.
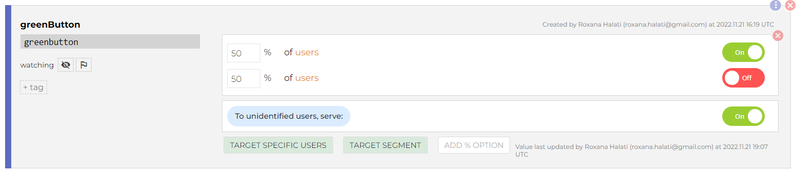
Now that the app is set, we need to prepare to segment our user base. I am aiming to serve the blue button to half of my customers and the green one to the other half. As you can see in the screenshot below, I’ve configured my flag in the ConfigCat dashboard using the TARGET % OF USERS setting.
The way it is configured, 50% of users will have the flag turned off, making the button blue, and the other 50% will have the flag on, making the button green.
Setting up Amplitude
So far, we’ve got an app with a button connected to a feature flag that segments users. Great! But how do we actually see which color is preferred? In order to do that, we need to use an analytics platform that allows us to track individual users' actions.
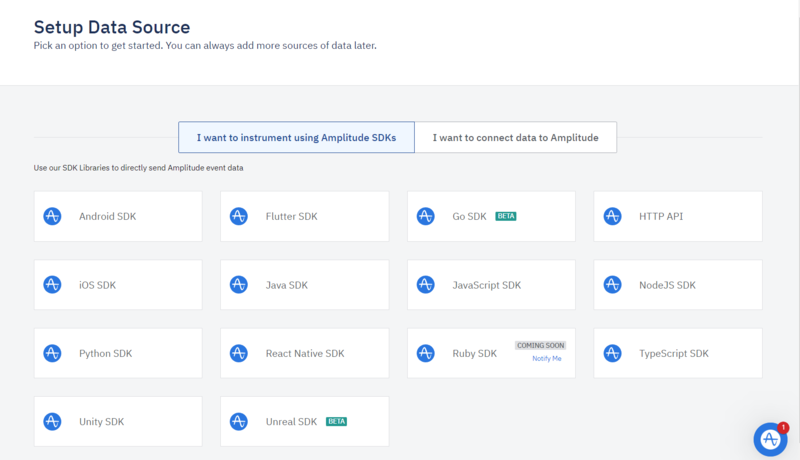
Head over to Amplitude and register for a free account and then log in. On the following page, you will be given the option to choose an SDK. After selecting the Java one you can view a tutorial on how to include it in your app. However, don’t worry; I’ll also walk you through it.
First, you need to add the amplitude SDK. I’ve done that using Gradle by adding the following dependencies to my build.gradle file, but you can also download the JAR file and add it to the project’s path.
implementation 'org.json:json:20201115'
    implementation 'com.amplitude:java-sdk:1.10.0'
Next, go to your project and create an amplitude client and initialize it by adding your API key. You can find the API unique key by going to Settings -> Projects -> Select your project -> API Key.
//Connecting to amplitude via API
    Amplitude amplitude = Amplitude.getInstance();
    amplitude.init("368edc3423dac769c19a872ad57d65bf");
Now, we need to log the event. To only log when the button is pressed, we’re going to add the log command inside the button listener. Logging an event to Amplitude is as easy as typing up:
log.event(new Event(“Learn More Button Clicked”, “user-id”))
The name of the event, in this case Learn More Button Clicked can be anything you’d like, while the user_id should be the unique ID of each user, which I’ve already declared in my code.
However, doing so will only allow you to see every user that clicked the button. How does the Amplitude app know how to separate my user segments into different groups? It doesn’t - so, I must "tell it." To do this, we need to add the feature flag value to the event, and then split users into groups based on its value.
btn.addActionListener(e -> {
    //creating event
    Event event = new Event("Learn More Button Clicked", userID);

    JSONObject userProps = new JSONObject();

    //adding User extra props
    try {
        userProps.put("feature_flag", flagValue);
    } catch (JSONException err) {
        err.printStackTrace();
        System.err.println("Invalid JSON");
    }

    event.userProperties = userProps;

    //log event
    client.logEvent(event);
     });
You can check out the completed code here. For now, run the code once and then head over to the Amplitude page.
Setting up the analytics page
The app is set, so now it’s time to prepare Amplitude to receive and segment the data.
Click on New in the left menu and choose Analysis -> Segmentation. In the Event section, choose the Button Clicked event. Then, in the right panel rename “All users” into “Blue Button Clicked” and add a second Segment named “Green Button Clicked”.
Now, add to both these segments the WHATEVER “feature-flag”, making the first one “= false” and the second one “= true”.
If you’ve done the settings right, your page should look like this:
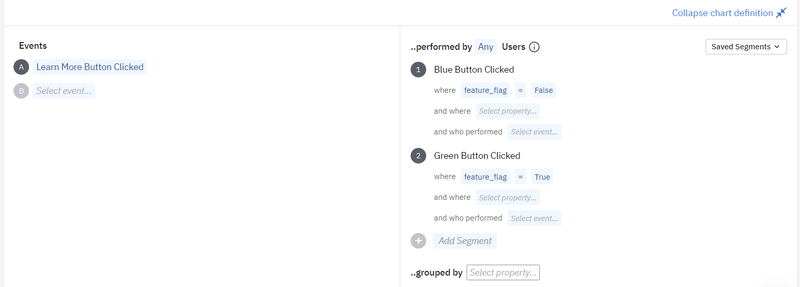
Note: The custom event and segment might not appear unless you run the app at least once before.
Analyzing the results
Note: I had to simulate the results because no one has yet used my app. To achieve this, I've run the app several times while changing the userID. Since an ID should be distinct and immutable, the amplitude app considers each ID to represent a new user.
Now that the data is available, you can switch between modes and visualize it in a variety of useful ways. Looking at the picture below, you can see that the green button was clicked more times. That simply means that the green color makes my users more interested in finding out more information about computers.
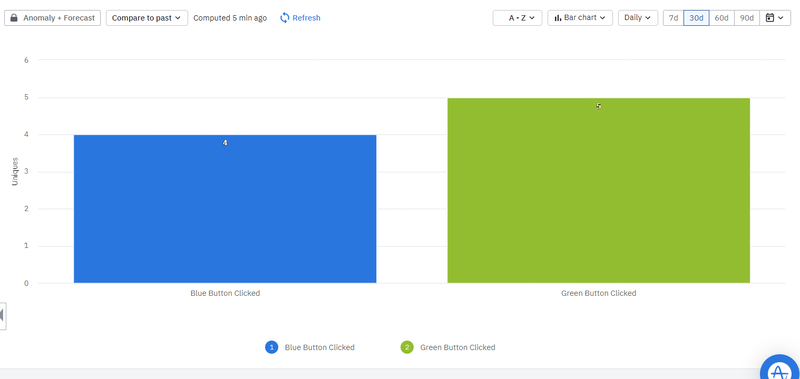
When implementing A/B testing in real life it would be a good idea to wait a few days before interpreting the results. The more user data you gather, the more you’ll be sure of the right answer. As soon as you have the answer, go back and remove the feature flag from your code, leaving only the best implementation.
Key Takeaways
It is obvious that A/B testing is a fantastic technique to enhance your software while simultaneously listening to your consumers. You can make sure that your clients are happy and get the greatest alternative by gradually implementing tiny changes.
In this tutorial, I've taught you how to use ConfigCat feature flags to ensure a seamless procedure while implementing A/B testing in Java in a straightforward application.
Since there’s plenty more you can do with feature flags, be sure to take a look at ConfigCat's Facebook, Twitter, Linkedin and GitHub to stay up to date with the power of feature flags.