How to Use Feature Flags in Unity

Game development is a complex process that requires constant updates and testing to ensure all ongoing projects run smoothly. When developing games, developers must decide what features to include in their games. However, deciding which features to include can be difficult when there are bugs or other issues with the game. A good way to fix this problem is by using feature flags. By enabling temporary artificial limits on gameplay, game developers can quickly test out changes without affecting their current games. This allows them to quickly fix any issues with the new functionality before making larger updates to their games.
In this tutorial, I will demonstrate how to set ConfigCat flags in Unity.
What is Unity?
Unity is a cross-platform game engine developed by Unity Technologies. It's used to develop games, interactive simulations and other experiences. The engine has been adopted by industries outside video gaming, such as film, automotive, architecture, engineering and construction. It can deliver products for desktop, mobile, console and web platforms. Unity supports C# scripting language and provides a lot of tools that can be used to create three-dimensional (3D) and two-dimensional (2D) products. It is particularly popular for iOS and Android mobile game development. It is considered easy to use for beginner and independent developers.
Why use Feature Flags in Unity?
Feature flags let you launch new features and change your software configuration without (re)deploying code, and a perfect way to control what your users see and how they interact with your app. They allow you to turn on or off certain features, or only show them on specific devices. Feature flags are an excellent tool for effective game development. They enable effective testing by allowing developers to test new builds without impacting live game play. In addition, disabling feature flags after testing ensures that no bugs slip through into the live version of the game.
Typically, each game has at least a few features that are enabled or disabled at the developer's discretion. For instance, a game may have a server flag for enabling or disabling the game's multiplayer mode. This is particularly helpful when updating games for new operating systems or hardware platforms. Since live game play can't be interrupted, enabling feature flags allows developers to test new features without affecting gameplay.
Either way, using feature flags effectively benefits both developer and player alike!
I’ll be using ConfigCat’s .net SDK feature flag service to handle my flag, and I’ll walk you through every step of the way. Essentially, I will show you how to make a button behave differently by the change of the feature flag state (true or false), and direct the game from the game menu to two different game scenes (where one scene can be an unchanged original, while the other scene is open for all sorts of changes and tests).
You can find the completed code on GitHub.
For this tutorial, I'm using:
Prerequisites
- basic understanding of C#
- basic knowledge of UnityEngine
There is no one-click solution to import ConfigCat into Unity. To prepare ConfigCat we will use the NuGet packet manager inside Visual Studio.
Make sure you have the .net multi platform app UI development kit installed in your Visual Studio.
Setting things up
Preparing Visual Studio
- Open Visual Studio and start a New Project
- Select the Class library as the type of the project
- Rename the project name to ConfigCatPlugin
- Select .NET Standard 2.1 as the framework
- Click Create
Now you should have an empty project ready for generating the needed ConfigCat files for Unity.
Preparing the ConfigCat’s SDK for Unity
In the Visual Studio top menu, navigate to:
- Tools/Nuget Package Manager/Manage Nuget Packages for Solution.
A window should pop up with the installed plugins.
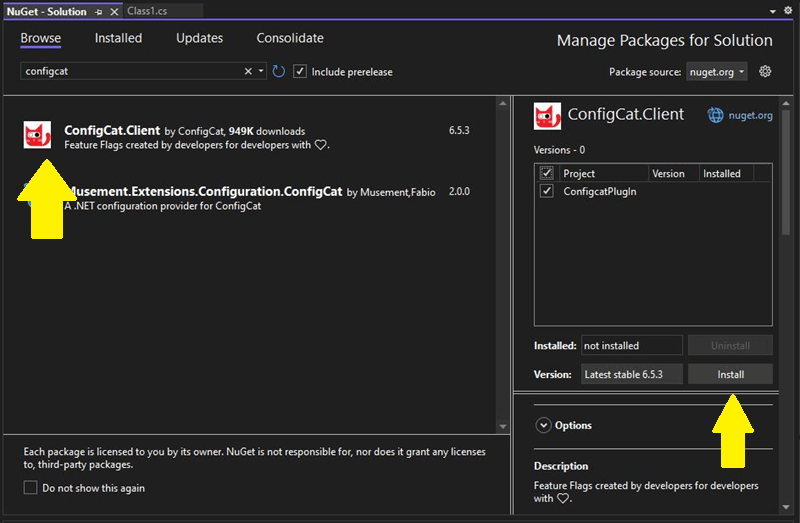
- In the search bar, type in configcat and click on the Browse tab.
Find the ConfigCat.Client and Install it as shown in the picture below.
- Navigate to Tools/Nuget Package Manager/Package Manager Console
- In the console type dotnet publish and press the Enter key. There should be a new folder generated containing the files needed for Unity.
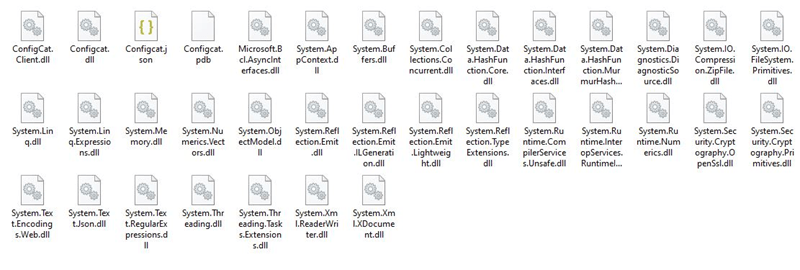
- Open the project folder window and go to \bin\Debug\netstandard2.1\publish
You should have a lot of files in there containing ConfigCat's .dll files and all the required dependencies as shown in the picture below.
If you are running into trouble with getting the necessary files, try saving the project by navigating to File/save or by pressing Ctrl+s. Then run the dotnet publish command again.
Setting things up in Unity
- Open a new project in Unity
- In the top menu, navigate to: edit/project settings/player/configuration
- Make sure the API Compatibility Level* is set to .NET Standard 2.1 (see the picture below).

- In the Assets folder, create a new folder and make sure it is named plugins.
- Go back to the previously made publish folder and select all the .dll files. You don't need the other file types (.json, .pdb, or any other).
- Copy and paste the selected files into the plugins' folder in Unity.
- Let Unity recompile for the new plugin.
Creating the scenes
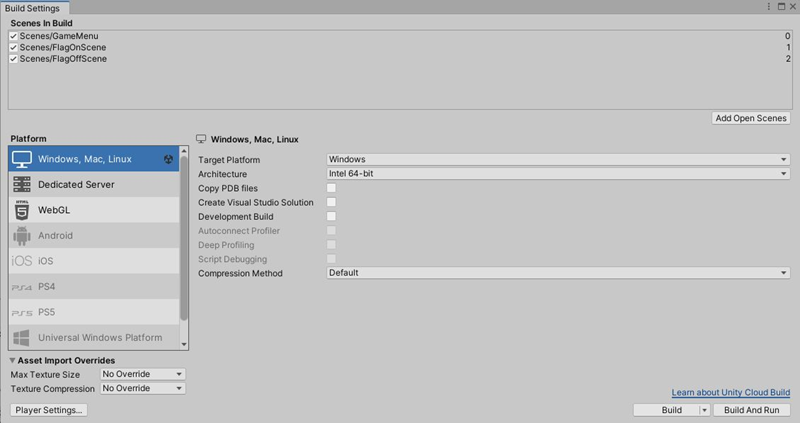
- In the Scenes folder create three scenes like in the picture below. I named mine: FlagOnScene, FlagOffScene and GameMenu.

- Add the scenes to Build Settings
- Open the GameMenu scene
- I created a simple UI panel in the FlagOnScene and the FlagOffScene containing a text element describing which scene is open
Creating a Feature Flag
We want our button to be controlled with an easy switch. For that, we first need a flag. Head over to the ConfigCat's Dashboard, create an account, or log in. On your dashboard, click the “Add Feature Flag” button and create the new flag like in the picture below:
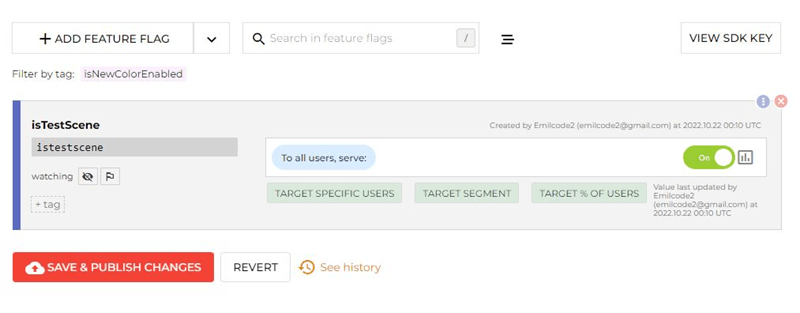
Grab your SDK key from the right-hand side of the screen. You’re going to need this key to connect your application with ConfigCat.
Save and publish the changes.
Creating a demo App
- Create a empty game object in the game hierarchy window, rename it to FeatureFlagManager
- In your Assets folder create a new folder and rename it to Scripts
- Open the folder and inside create a new c# script file.
- I named mine FeatureFlag.cs
- Attach the FeatureFlag.cs file to FeatureFlagManager game object.
- Open the FeatureFlag.cs file in Visual Studio
Getting the Flag
In the C# script create a singleton. It is recommended to have a single instance of the ConfigCatClient per SDK key in your application. If you want to use multiple SDK Keys in the same application, create only one ConfigCatClient per SDK Key.
I named mine "FeatureFlag" and attached it to an empty object named FeatureFlagManager. If for some reason there are duplicate instances of the same object with this SDK key in the application then the script will auto-destroy all previous instances and leave on the newest one. I also overwrote the constructor, so it is not possible to create a new instance elsewhere.
public class FeatureFlag : MonoBehaviour{

    public static FeatureFlag instance;

    // Overiding the constructor so it can't create a new instance in other scripts.
    private FeatureFlag(){}

    void Awake () {
		MakeSingleton ();
    }

    void MakeSingleton() {
		if (instance != null) {
			Destroy (gameObject);
		} else {
			instance = this;
		}
			DontDestroyOnLoad(gameObject);
	}
}
Using the ConfigCat SDK in the script:
- Import the ConfigCat.Client in the script.
- Create a function that will return a result based on the flag configuration.
- Set the ConfigCat key.
- Get the flag with client.GetValue and add a default state in case the flag can't be received.
- Program the function to return a value
using ConfigCat.Client;

public class FeatureFlag : MonoBehaviour{

    public static FeatureFlag instance;

    // Creating the ConfigCat client instance using the SDK Key
    private static ConfigCatClient client = new ConfigCatClient("<ADD YOUR SDK KEY HERE>");

    void Awake () {...}
    void MakeSingleton(...)

    // Called when the button is clicked
    public bool FetchFlag(string flagName){
    bool isFlagOn = client.GetValue(flagName, false);
        if (isFlagOn)
        {
        print("Feature is ON");
            return true;
        }
        else{
        print("Feature is OFF");
            return false;
        }
    }
}
I made a universal function that can be called when attached to other components and can be used with different flag names.
You can test this function by running it in the onStart method and write a string to the console. Just comment out the return statement and assign the feature flag name directly instead of passing it as an argument. Save the file and hit the play button to run the game in Unity engine. Try to duplicate the object in the hierarchy window and see what happens.
Creating the UI button
- In the hierarchy window create a new empty object, rename it to ButtonManager
- Create a new c# script and attach in to the Button Manager
- Open the script and code the button
public class ButtonControler : MonoBehaviour{

    public FeatureFlag featureFlag;
    public string flagname = "istestscene";

    public void playButton()
    {
        var flag = featureFlag.FetchFlag(flagname);
        if (flag)
        {
            SceneManager.LoadScene("FlagOnScene");
        }
        else if (!flag)
        {
            SceneManager.LoadScene("FlagOffScene");
        }
    }
}
As you can see in the code, I am calling the FetchFlag function in the script and I am using the flag to control which scene will be loaded by the playButton() function.
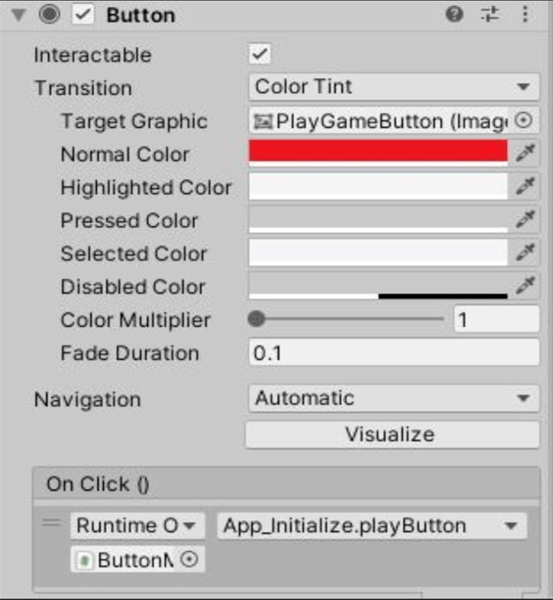
The final Step is to create the actual UI button, I will be using TextMeshPro for this. Once again go to the hierarchy window and:
- Create a new UI panel.
- In the panel create a new button - I named mine Play
- Go to the Inspector window and under the Button card find the onClick section.
- Click the + at the bottom and drag in the ButtonControler from the hierarchy.
- Go to the No Function menu and click on it. Find the ButtonControler and select the playButton() from the sub menu.
That's it. It's time for testing.
Run the project and click on the button. Based on the value (on/off) of the feature flag in the ConfigCat's dashboard, the button will load different scenes. To change the flag go to the ConfigCat dashboard, toggle the feature and save (deploy) the change. Then, rerun the project.
You can see the full project on GitHub.
TL/DR
To set up a feature flag, create a new scriptable object in the Unity editor. Then, in each component where you want to use the feature flag, use the singelton of the flag object. Add the flag value to the object you wish to be controlled. You can then enable or disable the project feature by setting the behavior programmatically.
Conclusion
Feature flags are a powerful tool for managing large Unity projects. By selectively enabling or disabling any kind of functionality in each scene, you can easily test new content and make sure that everything is working correctly before making changes to the live game.
ConfigCat supports simple feature toggles, user segmentation, and A/B testing and has a generous free tier for low-volume use cases or those just starting out. ConfigCat also supports other libraries/programming languages. The full list of supported SDKs can be found here.
Useful links
In case you want to see other ConfigCat integrations check out this page.
In case you need additional help with ConfigCat, please visit the ConfigCat docs.
Checkout ConfigCat's main GitHub repository here.