How to Use ConfigCat's Feature Flags with Elmah

With a well-implemented feature flagging solution in place, your end users' experience should not be interrupted during feature rollouts. If unforeseen bugs are later discovered in the new feature, you should be able to easily roll it back without redeploying your application. In my opinion, feature flags are most useful in situations like these and are becoming quite popular in the software industry for releasing and controlling existing features throughout many applications. Because of their flexible nature, feature flags can be integrated and used alongside existing technologies to enhance day-to-day operations.
To get started, let's take a look at some prerequisites we need to meet before starting out.
Pre-requisites
- A code editor (e.g. Visual Studio code)
- NodeJS (version 16 or higher)
- Basic knowledge of JavaScript and logging platforms
How do feature flags work?
A feature flag is a boolean value that can be used in a conditional statement within your application to show or hide a feature based on its value.
Feature flags have proven helpful in many scenarios. Here is the one in which I intend to use it: let us say a user sign-up process requires retrieving a list of current promotions from an API endpoint. I may only be interested in doing this during peak business hours while simultaneously logging an error when the API cannot be reached. The feature flag is a boolean value, so I can use it as a wrapper around the function that triggers the error logger. This will prevent errors from being logged when the flag is disabled.
Using the sample app
You can follow along with me by following these instructions for setting up the sample app. It is a fictional website for a marketing company made with Vue.js.
1. Clone the GitHub repository.
2. Run the following commands to install the required NPM packages and run the app:
yarn add package.json
yarn dev
3. You should be able to view the app in your browser by visiting http://localhost:5173/.
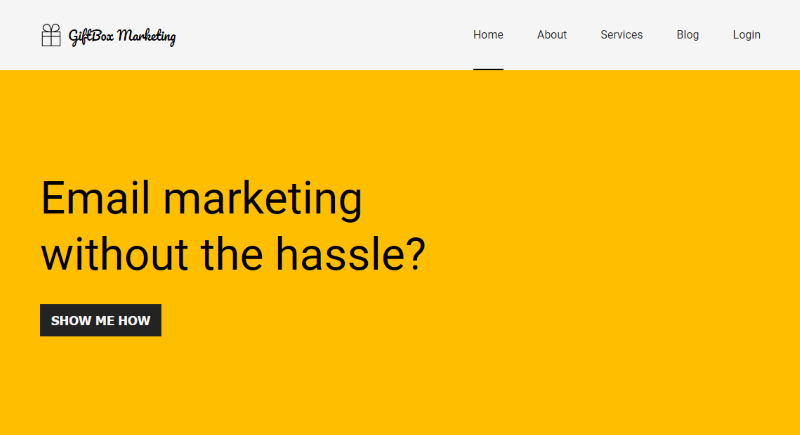
4. Here's what it should look like:
Let's now examine Elmah and see how we can set up a logger that we will later integrate into our application.
Getting up and running with Elmah
Elmah is a logging platform for .NET applications with support for other logging frameworks. It allows developers to log errors and other information to a central dashboard for easy monitoring.
1. Sign up for a free Elmah.io account
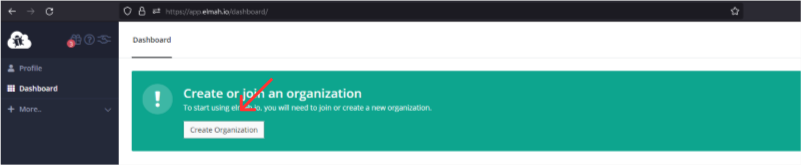
2. Create an organization in Elmah:
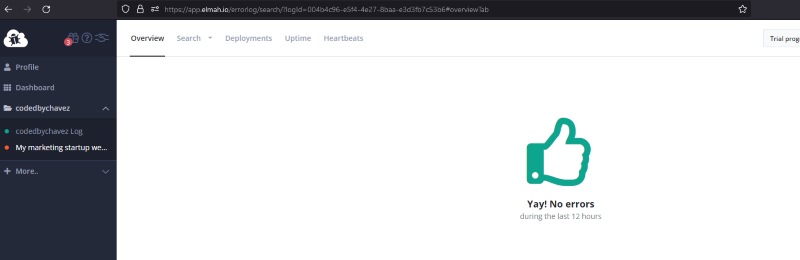
3. Visit the dashboard and create a log collection. This will store all the logs coming from the application and display them visually.

4. Go to the log collection, and you should see a message that indicates there are no errors.
With that set, let's integrate Elmah into the app to start logging errors.
Integrating with Elmah
1. Install Elmah and its dependencies with the following command:
npm install elmah.io.javascript
2. I'll import Elmah into the component to log errors. In this case, it's the Banner component.
// Banner.vue
import Elmahio from 'elmah.io.javascript';
3. Instantiate Elmah using your API key and log ID as shown below:
// Banner.vue
export default {
  setup() {
    const logger = new Elmahio({
      apiKey: 'YOUR_ELMAH_API_KEY',
      logId: 'YOUR_ELMAH_LOG_ID',
      application: 'My marketing startup site',
    });

    return {
      logger,
    };
  },
};
4. I'll use the logger returned within my handleUserSignup method to log an error to Elmah if fetching data from the promotions API fails.
    handleUserSignup() {
      const url = "https://my-promotions-api/get-promotions";

      const { error, data } = useFetch(url);

      if (error) {
        console.log(error);
        // This error along with its message string will be logged to Elmah
        this.logger.error("Could not fetch sale promotions");
      }
      // ...
    },
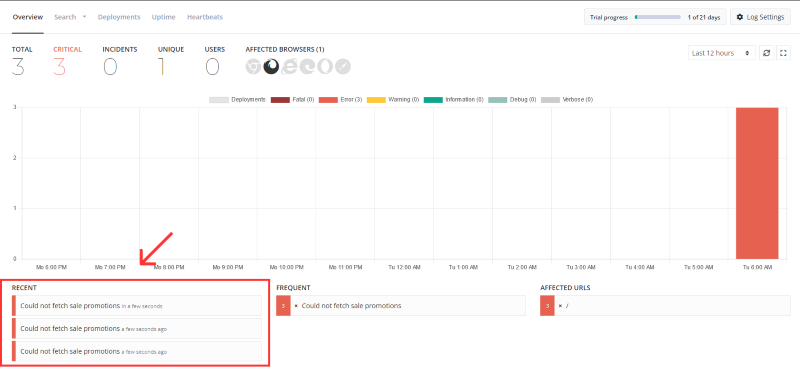
5. Because the URL above is invalid, when I click on the button in the banner it will log the error to my Elmah dashboard as shown below.
To toggle the logging functionality on or off at will, I'll create a feature flag in ConfigCat’s feature flag platform. ConfigCat is a feature flag and remote configuration service that empowers developers to control and customize the functionality of their applications. With ConfigCat, you can easily toggle features on and off, alter their settings, and roll out updates to specific users or groups. Targeting is supported through attributes, percentage-based rollouts, and segmentation. ConfigCat is available for all major programming languages and frameworks, and can be accessed as a SaaS or self-hosted service. Additionally, we are fully compliant with GDPR and ISO 27001 standards.
Integrating with ConfigCat
1. To use ConfigCat, you'll need to sign up for a free account.
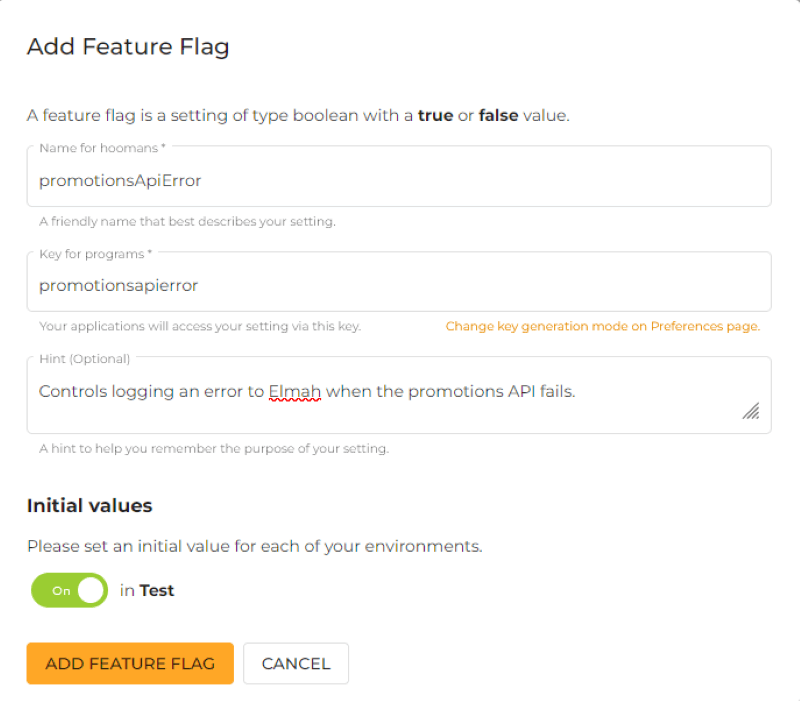
2. In the dashboard, create a feature flag with the following details.
3. Install the ConfigCat JavaScript SDK into your app with the command below. With this SDK, the app will be able to access your ConfigCat dashboard and probe the feature flag status.
npm i configcat-js
4. I'll create a reusable Vue store. Here, I'll import and use ConfigCat's JavaScript SDK client. Importing and creating the ConfigCat client in a central place within your app is necessary as the documentation recommends using it as a singleton object.
// store.js
import { reactive } from 'vue';
import * as configcat from 'configcat-js';

let configCatClient = configcat.createClient('YOUR_CONFIGCAT_SDK_KEY');

export const featureFlagStore = reactive({
  getPromotionsApiErrorFlagStatus() {
    return configCatClient.getValueAsync('promotionsapierror', false);
  },
});
As a side note, it is generally recommended keeping your SDK key private and outside your code base.
5. I'll then import and use the store in the Banner.vue component:
// Banner.vue
import { featureFlagStore } from '../store';
6. In the handleUserSignup method, I'll call the getPromotionsApiErrorFlagStatus() from the store, then use the value it returns in an if statement to decide whether to log the fetch error to Elmah:
// Banner.vue
async handleUserSignup() {
  // ...
  if (error) {

    const isPromotionApiErrorFlagEnabled =
      await featureFlagStore.getPromotionsApiErrorFlagStatus();

    if (isPromotionApiErrorFlagEnabled) {
      this.logger.error("Could not fetch sale promotions");
    }
  }
  // ...
},
You can find the completed code here.
Putting it all together
Head over to the ConfigCat dashboard and turn off the feature flag.

If you try clicking the button in the banner again, the error will not be logged to Elmah even though the fetch request is failing.
Within your ConfigCat dashboard, you can also choose to narrow feature releases to specific user segments based on their demographics and personal characteristics. In this example, I could have chosen to log errors originating only from users in the United States when the feature flag is switched on.
Final thoughts
Feature flagging can be used in creative ways alongside existing technologies within software applications. Adopting ConfigCat's feature flagging services and using it is fairly simple allowing you and your team can get up and running quickly. In my experience, feature flags are becoming the de facto standard when it comes to feature releases. They are incredibly useful in development workflows with steady feature roll-outs, canary deployments, and A/B testing. Using them can save you valuable time, and they can be integrated into many languages and frameworks you already know and work with.
Stay tuned
For more posts and other announcements, be sure to follow ConfigCat on Twitter, Facebook, LinkedIn, and GitHub. The most lovable feature flag service, ever.