A/B Testing in iOS with Feature Flags and Amplitude

Have you ever rolled out a new feature only to discover it is problematic? Situations like this can be costly for your users and organization. Is there a way to avoid this? This is where A/B testing comes in handy. An A/B test involves releasing two variations of your app to a limited number of users to see how they react to them. As part of this process, metrics and feedback from each variation are collected to figure out which one is better.
In order to manage and streamline your A/B testing experiments, it is beneficial to use an effective feature flagging tool. With such a tool, you can quickly release and test experimental features with a click of a button. In a later demonstration, I'll use ConfigCat's cloud-hosted feature flag management service to conduct a demo test experiment. For context, ConfigCat is a developer-centric feature flag service with unlimited team size, awesome support, and a reasonable price tag.
Prerequisites
- A Mac computer is required as this won't work on Windows
- The latest version of Xcode
- Basic Swift knowledge
- The latest version of Cocoapods
A/B testing in a nutshell
A/B testing is also known as split testing or bucket testing. If we come to think of it, a bucket in this case is a term used to help us differentiate between each variation. The first bucket is called the control bucket - it represents the state of the application without the new improvements or updates and can be considered a benchmark when making later comparisons. The second bucket is called the variation bucket and includes the new features or improvements to be tested. By using this concept, we can easily group and divide metrics collected during the test into their respective buckets. Let's put this into practice in a test experiment.
Identifying each bucket is the first step in conducting the test. To facilitate this, I have created a sample app that will guide us along the way. Here's a screenshot of it:
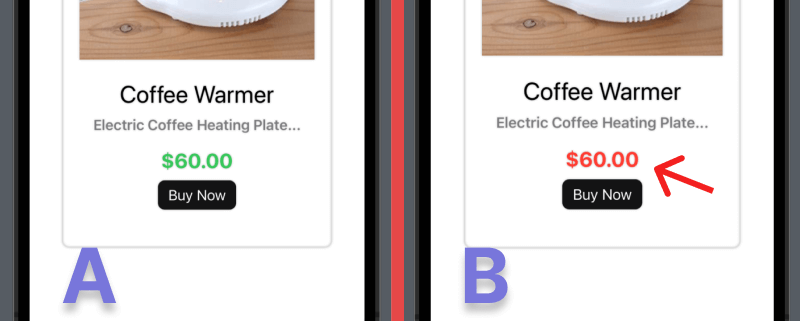
The variation bucket is labeled B (the one I want to test), and the control bucket is labeled A. As an example, let's say the control bucket generates about 100 sales from 20% of my users every month. My next task is to release the variation bucket to another 20% of users to collect metrics. In my ConfigCat dashboard, I'll need to set up a feature flag and configure a user segment.
Using feature flags in A/B testing
To seamlessly switch to the variation bucket while the app is running, I'll create a feature flag to control the color of the price text. When the feature flag is on, the price text will change to red, and when it's off, it will revert to its original green color. Using a feature flag has the added benefit of allowing you to specify a subset of users to display the new feature to, which is needed for collecting metrics for the variation bucket.
Here's a short overview of how to do this:
Creating a feature flag
1. Sign up for a free ConfigCat account. ConfigCat supports simple feature toggles, user segmentation, and A/B testing and has a generous free tier for low-volume use cases or those just starting out.
2. In the dashboard, create a feature flag with the following details:
Name: canShowRedPriceText
Key: canshowredpricetext
Description: Changing the price text to red
Make sure to turn on the feature flag in your environment.
3. Click the ADD FEATURE FLAG button to create and save the feature flag
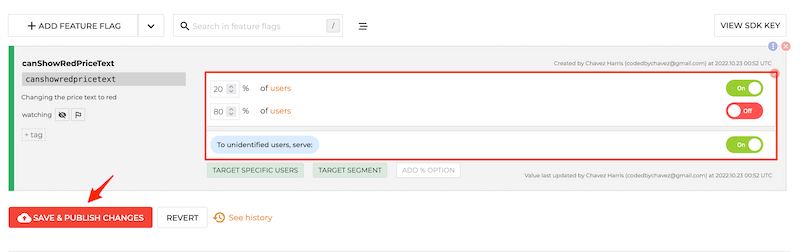
4. To create a user segment for testing, click the TARGET % OF USERS button and configure a fixed percentage. In this example, I plan to release the feature to 20% of my user base as shown below. With this set, when the feature flag is turned on the variation bucket will only be available to 20% of my user base.
5. Integrate the feature flag into your iOS application
To track and collect the tap events from users for the variation bucket, I'll be using a product analytics tool called Amplitude. In the end, I'll show you how to compare the collected number of taps collected to the control bucket.
Setting up Amplitude
1. Sign up for a free Amplitude account
2. Switch to the Data section by clicking the dropdown at the top left
3. Click the Sources link under Connections in the left sidebar, then click the + Add Source button on the top right
4. Select the iOS SDK from the SDK sources list and enter the following details to create a source:

5. You should be automatically redirected to the implementation page. We'll get back to this soon, but first, let's add an event:
Adding an event
By creating an event, we are instructing Amplitude to specifically listen for that event and collect it. Later, our code will trigger this event whenever the Buy Now button is tapped.
1. Click the Events link in the left sidebar under Tracking Plan to access the events page
2. Click the + Add Event button at the top right to create an event and fill in the following details:
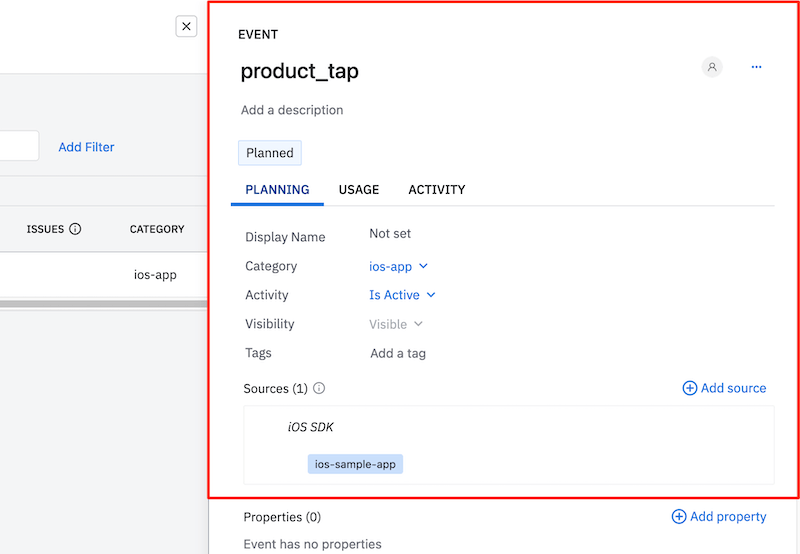
In the above, I named the event product_tap, added a category, set it to active then added the source.
3. Click the Save changes button in the left sidebar
Integrating with Amplitude
Click the implementation link in the left sidebar to see the integration instructions page.
1. Install the amplitude CLI with the following command:
npm install -g @amplitude/ampli
2. Close Xcode, create a file called Podfile in the project root folder (the one with your .xcodeproj), and edit it to contain the following:
platform :ios, '10.0'

# NOTE: Update the target below to your project
target 'ab-testing-ios-sample' do
  use_frameworks!

  pod 'Amplitude', "~> 8.10.0"
end
3. Run the pod install command.
4. At the project root run the pull command in your terminal:
ampli pull
In the above command, Amplitude will create the file ampli/ampli.swift and download all the required settings from the previous steps into it. You'll need to close any current Xcode sessions and use ab-testing-ios-sample.xcworkspace for this project from now on.
Sending an event from iOS
Let's look at how we can trigger and send the event we created from iOS.
1. To initialize Amplitude when the view loads, add the following to the view's .onAppear method:
struct ProductCard: View {
    var product: Product

    var body: some View {
        VStack{
          // ...
        }
        .onAppear{
            Ampli.instance.load(LoadOptions(
            environment: AmpliEnvironment.production,
            client: LoadClientOptions(apiKey: "YOUR_AMPLITUDE_API_KEY")))
        }

    }
}
2. Add the following action to the Buy Now button. Here, I am sending the product_tap event to Amplitude whenever the button is tapped.
Button {
  Ampli.instance.productTap()
} label: {
    Text("Buy Now")
}
Click here to view the complete code on GitHub.
Let's check for logged requests to verify that the iOS app is connected and is logging the events to Amplitude.
Checking for logged requests
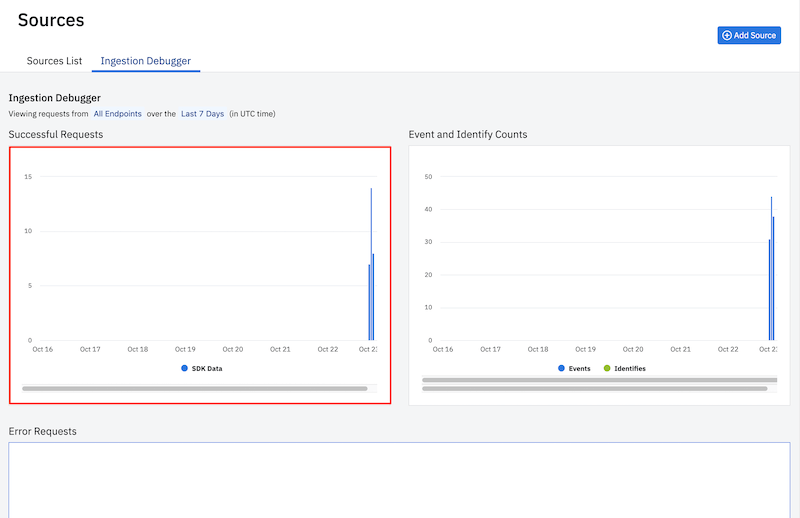
1. Under Connections in the left sidebar, click on Sources
2. Tapping on the Buy Now button will log the event to amplitude as shown in the Successful Requests graph on the left:
Setting up an analysis chart
1. Switch to the Analytics dashboard, by clicking the dropdown arrow on the top left next to Data
2. In the analytics dashboard, click the New button in the left sidebar
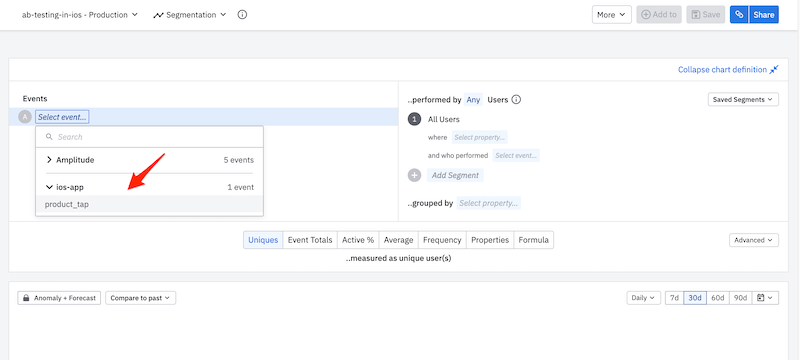
3. Click on Analysis and then Segmentation. Segmentation is a mechanism used by amplitude to collect and create charts from user-initiated events. Amplitude will create and set up a chart to collect data from the event we had previously created.
4. Select the event as shown below:
5. Click Save on the top right to save the chart
Analyze the test results
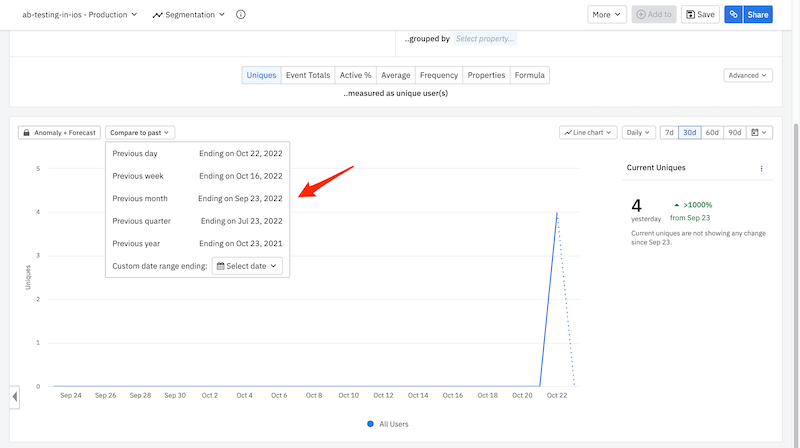
To compare and analyze the results between the two buckets, you can click the Compare to past dropdown at the top of the chart as shown below. Start by selecting the appropriate time interval. For example, since the control bucket influences 100 sale transactions on average per month, I can compare that to the current month to determine if the variation bucket is performing better. If it is, I can choose to deploy it to everyone.
To keep a log of when you enabled and disabled your feature flags during testing you can add it to your charts on amplitude.
Summary
In the previous sections, I discussed the concepts of the control and variation states and identified them in my application. With the help of a feature flag, I configured a user segment for testing. Later, I looked at how we can use Amplitude to track and collect user events, and finally, I examined how to use Amplitude's Compare to past feature to compare the two buckets.
Final thoughts
A/B testing is useful for gathering feedback from a small percentage of users before fully deploying a new feature. By using ConfigCat's feature flag service, you can quickly toggle features and set up user segmentation using their 10-minute trainable interface. If you’re eager to integrate feature flags within your applications, I highly recommend signing up for a free account.
To see more awesome posts like this and other announcements, follow ConfigCat on Twitter, Facebook, LinkedIn, and GitHub.