Using Feature Flags in a React.js Application

In this post, I'm going to be demonstrating how to integrate ConfigCat's feature flags in a React application. I will build a simple, pretty easy-to-understand application that simulates a race between three cars. Let's get started!
What are feature flags exactly, and why are they used?
A feature flag is a switch that allows specific features in an application to be turned on or off via a remote interface without needing to redeploy the entire codebase. Feature flags are useful in a variety of scenarios, such as releasing a feature gradually, displaying an application extension only for users in a specific country, or limiting a feature to a specific number of users.
How will the app use the feature flag?
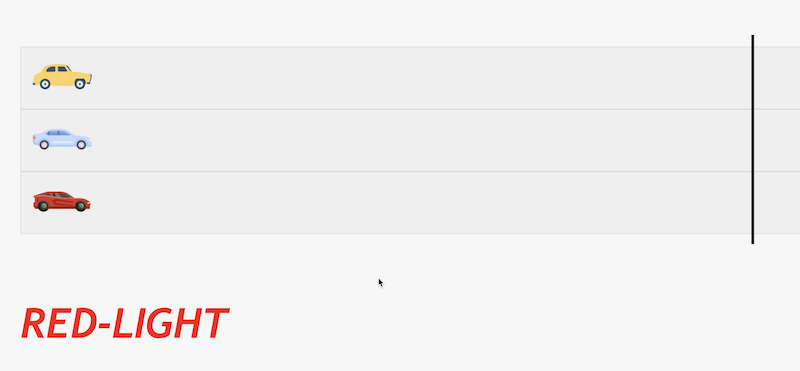
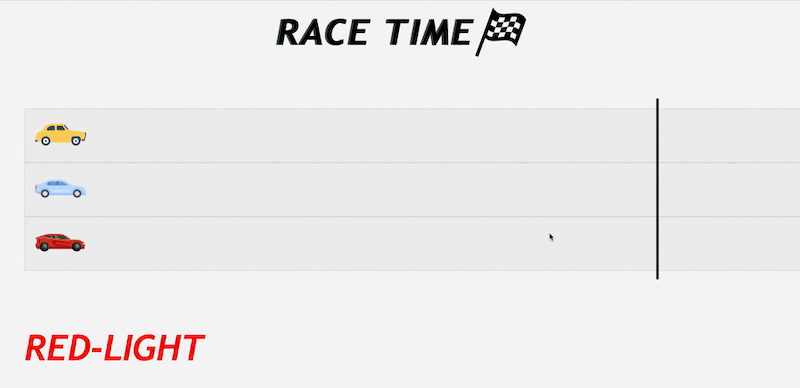
I'm going to present a working demo of how to use a feature flag to enable a race simulation between three cars to see which one reaches the finish line first. The feature flag will work like a stoplight: when the flag is on, the light turns green, and the cars will race; otherwise, they will remain still.
Note: In case you want to follow along from the beginning, here's the full app.
Hooking up ConfigCat to React
But first thing's first — let's start a new React project. The Start a New React Project section in the official React documentation recommends choosing one of the many React-powered frameworks, which is a common approach in modern React web development.
- Create a new Next.js React app and navigate to the generated project folder and install the configcat-react SDK:
npx create-next-app@latest

npm install configcat-react
The package uses React's Context API to expose a provider for wrapping your app's root component. In our case it's the src/pages/_app.tsx file:
import '@/styles/globals.css';
import type { AppProps } from 'next/app';
import { ConfigCatProvider, PollingMode } from 'configcat-react'; // Import the ConfigCatProvider and PollingMode

export default function App({ Component, pageProps }: AppProps) {
  return (
    <ConfigCatProvider
      sdkKey="YOUR-CONFIGCAT-SDK-KEY"
      pollingMode={PollingMode.AutoPoll}
      options={{
        pollIntervalSeconds: 5,
      }}
    >
      <Component {...pageProps} />
    </ConfigCatProvider>
  );
}
In the code above, I've used the ConfigCatProvider with the following props:
-
sdkKey: This is a string that links the application to your ConfigCat account. You can find your SDK key here. It is recommended to use secure methods for adding your SDK key to your source code, rather than including it directly.
-
pollingMode: By default, the React SDK downloads the latest values automatically and stores them in the local cache. With this prop, you can choose the polling mode that best aligns with your specific use case.
-
options: This prop can be used to further configure the SDK. You can read more about it here. In this case, specifying the
pollIntervalSecondsoption configures the SDK to poll your feature flag values from your account at the specified interval in seconds.
The ConfigCatProvider allows you to use feature flags throughout your application or just for a specific component, in this case I'm going to be using it in the Cars component which is used in src/pages/index.tsx. First, I need to import the useFeatureFlag hook from the configcat-react package to reference the value of the feature flag and the loading state:
// ...
import { useFeatureFlag } from 'configcat-react';

export const Cars = () => {
  const { value, loading } = useFeatureFlag('YOUR-FEATURE-FLAG-KEY', false);

  const images: TImage[] = [
    // ...
  ];

  return loading ? (
    <div>Loading...</div>
  ) : (
    <>
      <div className="cars-container">
        {images.map((image) => (
          <Car carImage={image} key={image.link} raceMode={value}></Car>
        ))}
      </div>
      <div className="finish-line"></div>
      <RaceStatus raceMode={value}></RaceStatus>
    </>
  );
};
I've passed raceMode down to each car, along with the car image. Now, let's get to the fun part where we make the cars race based on the feature flag's value.
Using the feature flag value
Initially, the app shows three cars aligned on a road, ready to race each other to the finish line. To let them race, I will add some CSS animations to each car, which will animate them when the flag is switched on.
Next, let's add a raceMode prop on every car to get the value when it's changed - based on that, the car will have the racing animation class.
export const Car = ({ carImage, raceMode }: CarProps) => {
  let customClass = raceMode ? `car-image ${carImage.class}` : 'car-image';

  return (
    <div className="car-container">
      <Image
        src={carImage.link}
        alt={carImage.class}
        className={`car-image ${customClass}`}
        width={100}
        height={100}
      ></Image>
    </div>
  );
};
Based on its value, different styling will be applied to each car. With a little string interpolation magic, the CSS class is now dynamically changed every time the feature flag is toggled. In the dashboard, I will switch the flag value to 'on' and see the light turn green. The cars are now racing! I'm betting on the red one.
Summary
As a quick recap, what were the key steps in this demo? First, I installed the ConfigCat React SDK and wrapped the app's root component with the ConfigCatProvider. Next, I fetched the flag value and loading state using the useFeatureFlag hook. Finally, when the flag is switched on, some CSS classes are added to the cars' containers, and a race is simulated.
Conclusion
Feature flags can be used in a variety of ways in all kinds of applications. ConfigCat's feature flag solution is so easy to use that even non-technical team members can easily use them, with its 10-minute trainable user interface. I hope you've found this article useful, and if you want to implement a feature flag with React yourself, the source code from this demo is available in this public repository on GitHub.
Don't forget to explore more about ConfigCat on Github, Facebook, X, and LinkedIn.