A/B Testing in Next.js with ConfigCat & Amplitude

Scenario: You’ve thought up a small change for your app. You write and test the code, and everything looks good. As you’re about to push it into production, you stop and ask yourself, “Will the users like this?”
You start having doubts, that maybe the idea isn’t as good as you previously thought. Still, you continue to have a strong feeling that it’ll make your app better.
One solution to this dilemma is to gradually introduce the change to a portion of users and track its impact on them. This is called A/B testing, and it’s a simple, low-risk way of letting your users pick which variant yields better results.
How A/B Testing Works
In an A/B test, you serve users a slightly different version of a page on your app or website. Half of your users will see this new version, called the variant. The other half will see the version they’re used to, called the control.
You track user activity on that page, and if the variant produces better results than the control, you make it the new default page for all users.
There should only be one difference between the control and variant. If there is more than one difference, it will be harder to know what change caused the improvement.
A/B testing is effective because users don’t know they’re participating in a test and because the versions are randomly distributed among them, leaving little room for bias. These two properties make A/B tests natural.
Let’s see how to implement A/B testing in a Next.js app with ConfigCat.
My A/B Testing Use Case
You can find the sample app’s code on Github.
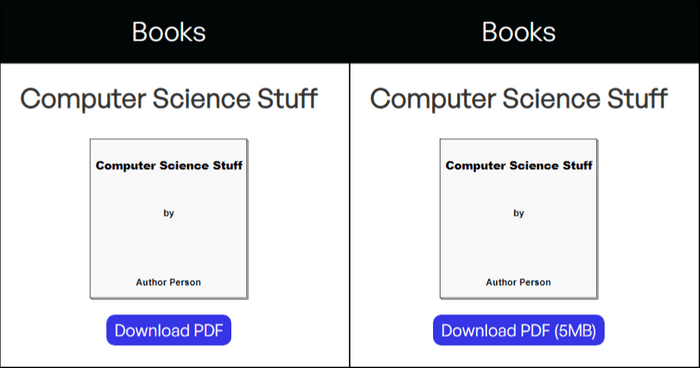
This sample website allows people to download a free e-book. The website does its job well, but I believe that there’s room for improvement. I want to know if more people will download the book if they see its size on the download button. My target audience is conscious of download sizes, so I think they’ll appreciate this change.
Let’s take a look at the button’s code:
<button id="download" onClick={handleClick}>
  Download PDF{showSizeEnabled && <span>(5MB)</span>}
</button>
The feature flag’s value is stored in showSizeEnabled. The website currently doesn’t display the download size on the button because the feature flag is turned off for all users.
Note: I’ve already connected ConfigCat to my Next.js website. You can find out how to do that in this tutorial
To kick off the A/B test, I’ll segment my site’s visitors with ConfigCat.
Segmenting Users in ConfigCat
ConfigCat offers user segmentation features through targetting. I’ll use percentage targetting because I want 50% of users to see the download size on the button.
Here’s how you can set it up:
- Navigate to your ConfigCat dashboard.
- Turn on the feature flag.
- Select "TARGET % OF USERS".

- Type 50% in any of the text boxes.

- Save changes
ConfigCat’s targetting feature requires a unique identifier for users when fetching the value of a feature flag. I’ll set that up in the website’s code:
export async function getServerSideProps() {
  const configcatClient = configcat.createClient('YOUR-SDK-KEY');
  // feature flag key
  const ffKey = 'showdownloadsize';
  // ConfigCat requires a unique identifier when using targetting; I'm using a made-up number here
  const userId = 343467;
  // set userId as the identifier
  const showSizeEnabled = await configcatClient.getValueAsync(ffKey, false, {
    identifier: userId,
  });
  // add userId to the props object, we'll use it in the 'HomePage' function later
  return { props: { showSizeEnabled, ffKey, userId } };
}

export default function HomePage({ showSizeEnabled, ffKey, userId }) {
  //...
}
Done! Now, if people visit the website, some of them will see the control and some of them will see the variant. I need to know how many users are clicking the button and what segment they belong to. For that, I’ll need an analytics platform.
Setting Up Amplitude
Amplitude is an analytics platform used for tracking user interactions in websites and applications. I’ll use Amplitude to collect and analyze data from my website for the A/B test.
If you don’t have an Amplitude account, create one here and follow the sign-up process until you reach the SDK selection page:
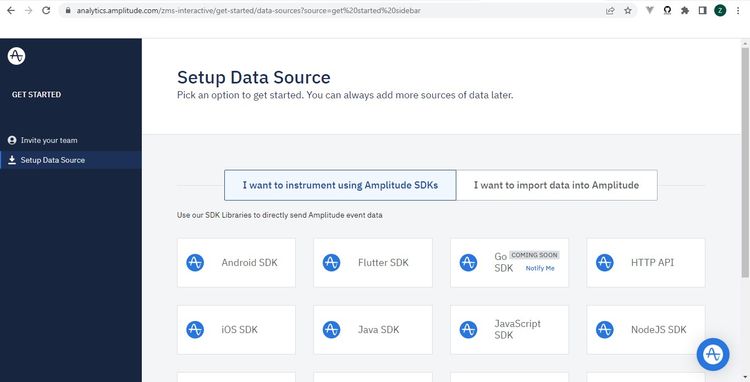 Select "JavaScript SDK" and you’ll be taken to the next page. There, you’ll have to set up Amplitude in your code and log a test event.
Take the following steps to log an event:
- Open your command line application in your project’s root directory and run the command below.
npm install amplitude-js
- Import amplitude-js in the
index.jsfile.
import amplitude from 'amplitude-js';
- Create an Amplitude instance in the
HomePagefunction.
const amplitudeInstance = amplitude.getInstance().init('YOUR-API-KEY', userId);
Note: Make sure to replace YOUR-API-KEY with the key from your Amplitude account. You can find it under the Settings > Projects > ‘Your Project’ page.
- Create an event handler to send data to Amplitude when a user clicks the button.
function handleClick() {
  amplitude.getInstance(amplitudeInstance).logEvent('Download Button Clicked!');
}
- Click the button in your app to log the event to Amplitude.
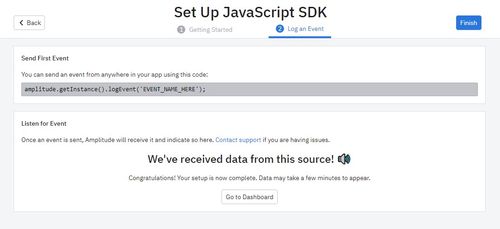
Note: Make sure to turn off any adblockers you have. They might prevent you from logging the event to Amplitude.
ConfigCat offers official Amplitude integration. It’s not required for working with Amplitude but it’s recommended. Check out how to activate the integration here.
I’ve now connected Amplitude to my site. Let’s see how to send event data over to Amplitude.
Sending Data to Amplitude
Amplitude does not automatically know what my user segments are. I’ll have to send the status of the feature flag to Amplitude for each user that clicks the button. To do this, I’ll need to create a custom user property with Amplitude’s Identify API.
Add this code under the Amplitude initialization in the HomePage function:
const identity = new amplitude.Identify();
// custom Amplitude user property
identity.set(ffKey, showSizeEnabled);
amplitude.getInstance().identify(identity);
The set() method receives a key-value pair as its argument. It creates a custom user property with the key as the name, "showdownloadsize" in this case. The value for this user property will be true or false, depending on what segment the user falls under.
If you’re following along, your code should look similar to this:
import Head from 'next/head';
import Image from 'next/image';
import Layout from './components/layout';
import * as configcat from 'configcat-js-ssr';
import amplitude from 'amplitude-js';

export async function getServerSideProps () {
    const configcatClient = configcat.createClient("YOUR-SDK-KEY");
    // feature flag key
    const ffKey = "showdownloadsize";

    // ConfigCat requires a unique identifier when using targetting; I'm using a made-up number here
    const userId = 343467;
    // set userId as the identifier
    const showSizeEnabled = await configcatClient.getValueAsync(ffKey, false, { identifier: userId });

    return { props: { showSizeEnabled, ffKey, userId } };
}


export default function HomePage ( { showSizeEnabled, ffKey, userId } ) {
    const amplitudeInstance = amplitude.getInstance().init("YOUR-API-KEY", userId);

    const identity = new amplitude.Identify();
    // custom Amplitude user property
    identity.set(ffKey, showSizeEnabled);
    amplitude.getInstance().identify(identity);

    function handleClick () {
        amplitude.getInstance(amplitudeInstance).logEvent('Download Button Clicked!');
    }
    return (
        // markup here
        <div>
        </div>
    )
That’s all the code we’ll need for the A/B test. All that’s left is to set up a chart in Amplitude and view the results.
Setting up Segmentation Charts in Amplitude
Amplitude offers several charts for analysing events. For this A/B test, I’ll use the Event Segmentation chart to view how many users have clicked the button depending on the segment they fall under.
Let’s create an Event Segmentation chart:
- Click the "New" button on the sidebar.
- Select the "Analysis" option.
- Click "Segmentation".
Once you’ve created the chart, you should see this area with several input fields:
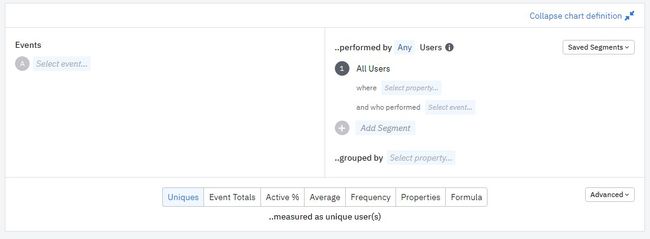
You can select events from the Events module on the left. You can use the Segmentation module on the right to categorise your users based on the conditions you want. My site’s visitors are segmented based on who sees the download size and who doesn’t.
Let’s reflect this in the chart:
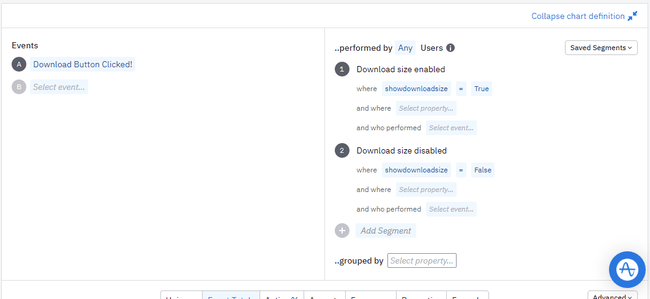
- Select "Download button clicked!" from the "Select Event" dropdown.
- Rename "All Users" in the Segmentation module to "Download Size Enabled".
- Click "Add Segment" and name the new segment "Download Size Disabled".
- Click the "Select property" button under each segment and pick the custom "showdownloadsize" property sent from the website. Set the property values to "True" and "False" respectively.
- Give your chart a name and click "Save" in the top right corner.
You should now see the chart populated with data. Click the "Uniques" tab so you can see the number of unique users who triggered events in your app. You can also change the chart view to "Bar chart" for a more straightforward look at things.
That’s all for setting up, now it’s time to analyze the data.
Analyzing the Results
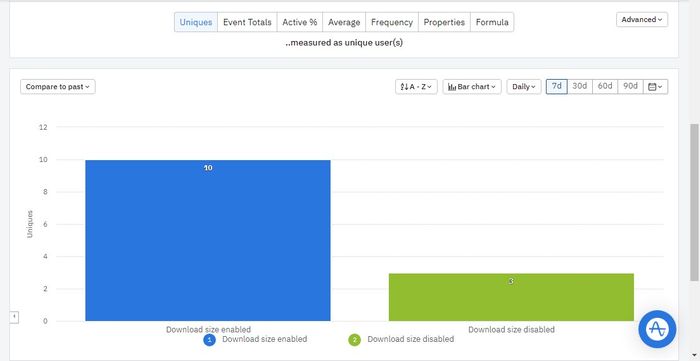 From the chart, we can see that more users clicked the button with the download size enabled. This means that the change was a positive one. I’d still however have to wait a little while and get more data before I come to a conclusion.
When you’ve completed the A/B test, there’s no need to keep the feature flag logic in your code anymore. Make sure to remove the logic from your code and delete the feature flag from your dashboard. Check out this post for more A/B testing best practices.
Note: Since this isn’t a live website, I don’t have any users (except myself). I mimicked different users by changing the value of the identifier that I initialized ConfigCat with. This way, Amplitude thinks that it’s receiving unique user events from the website.
// old userId - 343467
const userId = 55555;
Summary
A/B testing helps you clear the doubts you have when introducing small changes to your apps. Feature flags simplify the A/B testing process, making it easier for you to improve your app’s user experience and grow your business.
To recap, we learned how to conduct an A/B test by:
- creating user segments in ConfigCat.
- installing the Amplitude SDK in a Next.js app.
- sending event data to Amplitude.
- analyzing user event data in Amplitude.
You can find the complete code for the sample app here.
You can stay up to date with ConfigCat on Twitter, Facebook, Github, and LinkedIn.