Feature Flags in a .NET6 Application

Autumn of 2021 saw the release of the newest .NET version, .NET6. This new release brought some updates that could potentially make a developer’s life easier, such as improved performance and a simpler development process. With less code to write and productivity tools like hot reloading, the new .NET was quickly adopted by developers all over the world.
Even before the new release, .NET had a wide range of utilities and has risen to become of the most popular frameworks available. Whether you’re migrating from an older version or just getting started on a new project, you may be wondering what feature management solutions are available to you. I wondered as well, so in this tutorial, I’ll go over one of the best - using feature flags.
What are feature flags?
If you’re unfamiliar with the concept, feature flags are remotely-controlled variables that enable developers to manage features much more easily than previously. If you had to change your code to turn a feature on or off before, these flags could become your new best friends.
In other words, you can use them to manipulate values from “the outside” by simply incorporating them into an if condition and letting them do their thing. Aside from managing a feature, these flags can help with user targeting and segmentation, in-production testing, canary releases, and A/B testing.
Prerequisites:
- An IDE (e.g. Visual Studio)
- .NET6
- Previous knowledge of C#
- Basic knowledge of HTML and CSS
The Sample App
To demonstrate how simple using feature flags in .NET is, I’ve created a sample app which you can consult here. If you’d like to see what’s going on step by step, stick around as I’m going to explain in greater detail.
Scenario: A user has just registered on our website, and we want to display a success message. This user is clearly interested in our services, so we’d like to give him or her the opportunity to subscribe to our mailing list, where we send out the coolest newsletter. However, after a while, we’d like to limit the number of new users who join our list, and the simplest way to do so is to remove the subscription button from the page.
In essence, we’re just making a button disappear, but in reality, we’re solving a real-world problem. When the mailing list reopens, our marketing department will notify us, and instead of getting to work and editing the code, we’ll simply push a button.
Creating the Flag
First things first, we need to choose a feature flag management system. I’m using ConfigCat because it’s very user-friendly and simple to integrate. ConfigCat is a feature management service that lets you decouple feature releases from code deployments.
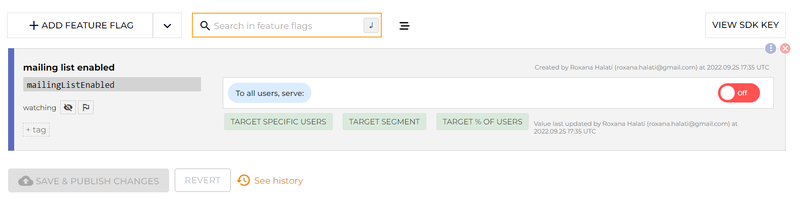
Go to ConfigCat and follow the instructions to sign up. After that, log in, and you’ll be met by your dashboard, where you can create a new feature flag - we’ll call it mailingListEnabled.
Creating the .NET6 application
Now, using your preferred IDE (I used Visual Studio), create an MCV .NET6 application. I’m using an MVC architectural pattern for this app, which stands for Model-View-Controller. This means that responsibility is distributed across three layers that communicate with one another. For this tutorial, we’ll concentrate on View and Controller.
If you’re using Visual Studio, you should already have a Controller (MainController.cs) and a View (Index.cshtml).
Connecting to the SDK
Before we begin writing code, we must first connect the ConfigCat SDK. To do so, open a terminal in the project folder and enter the following command:
Install-Package ConfigCat.Client
Then, import it in HomeController.cs.
using ConfigCat.Client;
We must now create the ConfigCat client. You can do so by copying and pasting the code below.
 public ActionResult Index()
        {
            var client = new ConfigCatClient("YOUR-SDK-KEY");

            var mailingListEnabled = client.GetValue("mailingListEnabled", false);

            Console.WriteLine("mailingListEnabled's value from ConfigCat: " + mailingListEnabled);

            return View("Index");
        }
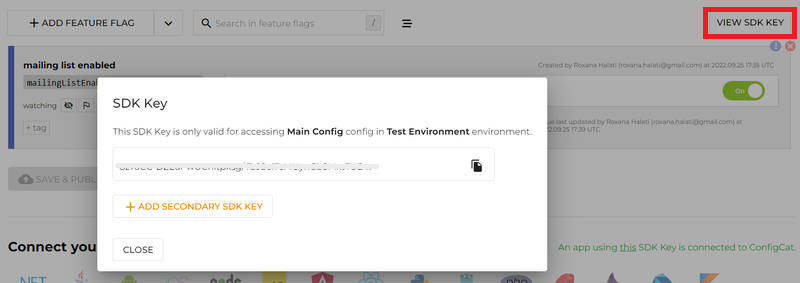
What this code does is to create a client, create a variable that stored the feature flag value locally and log this value, so we can check everything is running smoothly. You'll notice that an SDK key is required. Head over to ConfigCat dashboard and locate your key in the upper right corner and then replace it in its designated spot in the code.
Node: There are a few options that you can employ when using ConfigCat, such as setting the interval at which the flag's value is refreshed or target specific users. You can learn more about that in the documentation or directly in your dashboard.
Now, navigate to Index.cshtml and paste the code below. This is just some simple HTML code that adds a few elements to the page, including a button. I’ve also added a bit of CSS to style things.
@{ Layout = null; }
<!DOCTYPE html>
<html>
<head>
<meta name="viewport" content="width=device-width" />
<title>MainPage</title>
<style>
.button {
color: white;
border: none;
text-align: center;
font-size: 16px;
padding: 10px;
}
body {
text-align: center;
}
</style>
</head>
<body>
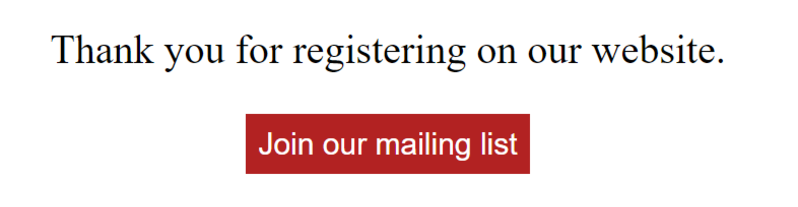
<p>Thank you for registering on our site.</p>
<button class="button">Sign up to our mailing list</button>
</body>
</html>
If you run the application now, you’ll see a simple static page
It's finally time to put the feature flag to good use. Add the following lines to your Controller:
 if (mailingListEnabled == true)
            {

                ViewBag.display = "display:inline-block";
            }
 else if (mailingListEnabled == false)
            {
                ViewBag.display = "display:none";

            }
 return("Index");
In this section, I've used a conditional statement to wrap the feature flag and created a ViewBag that takes different values depending on the flag. As you may know, display:none causes our button to disappear, whereas display:inline-block places it beneath the paragraph. ViewBag is a.NET method of sending data from the Controller to the View. Basically, whatever you set in ViewBag in the Controller can also be used within the View as well.
Note: You can also use ViewData. There are some differences between them, but for the limited purpose of this tutorial, both will work just fine.
Now, go to Index and make the following changes to the button:
<button style="@ViewBag.display" class="button">
  Sign up to our mailing list
</button>
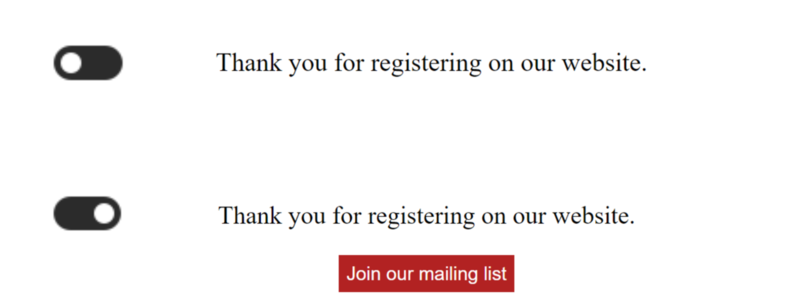
Save and restart the application. You won’t be able to see the button as the feature flag in your dashboard is automatically set to false upon creation. You can easily change that by toggling the flag on, saving the changes, and reloading the app. Now, you can give your users the option of signing up for the mailing list or restrict this feature at any time with just a few clicks.
Key Takeaways
In this tutorial, I've covered a very simple use case of feature flags in the latest and improved .NET6. To replicate the sample app, simply follow these steps:
- Create a ConfigCat account as well as a feature flag.
- Create a .NET6 MVC application.
- Connect your application to the .NET SDK.
- Create a simple HTML and CSS page.
- Incorporate the flag into an if statement using the SDK.
- Use ViewBag to propagate its value to the View.
- Toggle the flag on and off from the ConfigCat Dashboard.
Feature flags are an excellent way to manage features that are frequently turned on and off. You can also use them if you plan on implementing a feature now but have it roll out later. With these toggles, you have more control of your application and can significantly reduce the need for redeployment, meaning that you can manage your features and configurations without actually deploying new code.
There’s a lot more you can do with feature flags, so check out the other articles on the ConfigCat blog, the official documentation, and the Facebook, Twitter, and LinkedIn pages.