ConfigCat SDK for Chromium Extensions!

At ConfigCat, we always prioritize our customers' feedback and requests to ensure we provide the best experience possible. That's why we took action on a user suggestion to support browser extensions based on the Manifest V3 platform.
We're excited to announce the release of our ConfigCat SDK for Chromium Extensions. This SDK is a specialized fork of our JavaScript SDK. Designed to allow for easy incorporation of our feature flag services into browser add-ons, it features a specialized cache implementation leveraging the chrome.storage API, which enables proper SDK functionality.
Let's familiarize ourselves with some technical terms first, then we will dive into creating a simple Chrome extension and trying out this SDK.
What are Chromium and Chrome?
Chromium is an open-source project that forms the foundation of various web browsers, such as Google Chrome, Microsoft Edge, Brave, Vivaldi, and numerous others. It provides essential functionality for web browsing, such as rendering web pages, handling user input, and managing network connections. Thanks to its open-source nature, Chromium fosters collaboration and innovation within the web browsing community, making it a popular choice among developers and power users who value customization and configurability.
Chrome is a popular web browser developed by Google, which is based on the Chromium open-source project. It is known for its swift and smooth performance, user-friendly interface, and an extensive selection of extensions and apps that add to its functionality.
What is browser extension development?
Browser extension development is the process of creating new browser functionality. Browser extensions are small programs that run within the web browser environment. They can be used to customize the user interface, add new features, or be integrated with other services and tools.
Browser extensions are created with web technologies based on HTML, CSS, and JavaScript. They are distributed through online marketplaces such as the Chrome Web Store.
To learn more about extension development in Google Chrome, visit the official docs here.
What is a Manifest?
The manifest is the means by which an extension communicates with the browser. In extensions, it is a special JSON file that contains essential information and configuration settings. It serves as a blueprint, informing the browser about various aspects of the extension. These aspects include its name, version, icons, permissions, and required resources. By defining these details, the manifest file ensures that the extension functions correctly in the browser environment.
Manifest V3 is the latest version of the manifest, and it includes significant changes that aim to improve security and performance in extension development.
Now that we understand these technical terms, let's dive into the tutorial and create an extension for Google Chrome.
How to create a Chrome extension
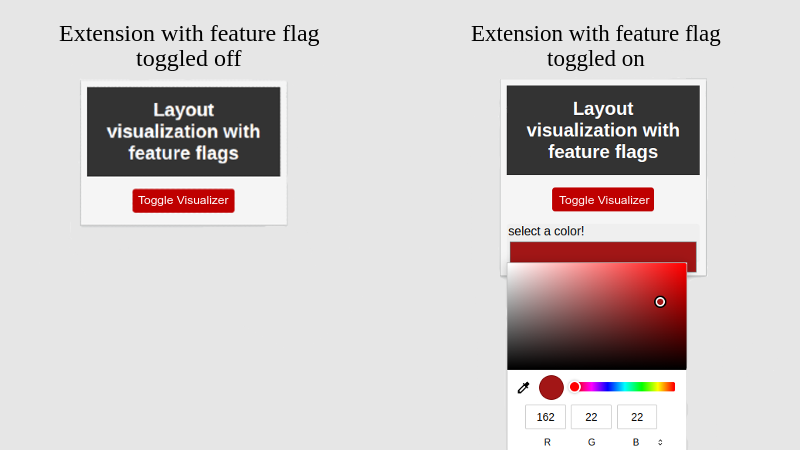
We will create an extension that adds a CSS outline to all HTML elements in the current browser tab, allowing for the visualization of the page layout and possible misalignment of individual HTML elements. We will utilize the ConfigCat SDK for Chromium Extensions to add a feature that enables the user to change the outline color when the flag is activated.
To follow along you need to know a bit of HTML, CSS, JavaScript, Webpack, and Extension development.
You can find the complete code of this Chrome extension on GitHub.
Creating the extension
First, create a new folder called my-extension to hold the project.
Next, open your favorite code editor and initialize the project by running the following command:
npm init -y
After generating the package.json file, add the following script to it:
"scripts": {
    "build": "webpack --mode production"
  },
This script will be used later to bundle the SDK with the extension.
Create a new file named webpack.config.js in the root folder. Next, create a folder called src. Inside the src folder, create four files: visualizer.css, main.js, manifest.json, and popup.html.
Your folder structure should look like this:
my-extension/
│
├── src/
│   ├── visualizer.css
│   ├── main.js
│   ├── manifest.json
│   └── popup.html
|
├── package-lock.json
├── package.json
└── webpack.config.js
Coding the manifest.json file
In order to allow the extension to manipulate the DOM, we have to configure the manifest file. That is why you can see that I declared scripting and activeTab under permissions in the code below.
{
  "name": "layout visualizer with flags",
  "version": "1.0.0",
  "manifest_version": 3,
  "action": {
    "default_popup": "popup.html",
    "default_title": "ConfigCat flags in chrome extension"
  },
  "permissions": ["storage", "activeTab", "scripting"]
}
You may have noticed that I added another storage permission to the manifest. ConfigCat uses this storage permission to store feature flags and settings in the form of a config JSON file. This is crucial for proper functioning of the SDK.
Coding the popup.html file
The file contains HTML markup for the extension popup. It includes a header, popup CSS styles, a button to enable the CSS visualizer, and a script tag to load the main.js file.
<!DOCTYPE html>
<html lang="en">
  <head>
    <!-- head code... -->
    <title>Layout visualization</title>
    <style>
      /* popup styles... */
    </style>
  </head>
  <body id="popup">
    <h1>Layout visualization with feature flags</h1>
    <button id="visualizer-btn">Toggle Visualizer</button>
    <script src="main.js"></script>
  </body>
</html>
Note that I added an id on the <body> element. I will use it later to enable the user to set the outline color.
The base visualization logic
The extension will hold a visualizer.css file that contains the CSS styles which will be injected into the active page. By default, the extension will apply a red outline to all elements on the page. The style will be toggled on the <html> element of the active web page as a class using JavaScript in the following manner:
- When the tag is toggled on, the class is going to be added:
<html class="css-visualizer"></html>
- When the tag is toggled off, the class is going to be removed:
<html class=""></html>
The * selector matches all children elements under the <html> element, allowing us to see their outline.
.css-visualizer * {
  outline: 2px solid red;
}
Explaining the JavaScript functionality
The extension code starts with the DOMContentLoaded event, then it initializes a variable called isVisualizerEnabled to 'false', and defines a function called toggleCssVisualizer that toggles the visualizer on and off by changing the value of isVisualizerEnabled variable. Depending on the state of isVisualizerEnabled, the visualizer.css file is either inserted or removed from the currently active page using the chrome.scripting.insertCSS API. The script also toggles the css-visualizer class on the root element of the document based on the value of isVisualizerEnabled. Finally, the script adds an event listener to a button in the popup file with the ID of visualizer-btn triggering the toggleCssVisualizer function when clicked.
document.addEventListener('DOMContentLoaded', () => {
  let isVisualizerEnabled = false;

  function toggleCssVisualizer() {
    isVisualizerEnabled = !isVisualizerEnabled;

    const files = isVisualizerEnabled ? ['visualizer.css'] : [];

    chrome.tabs.query({ active: true, currentWindow: true }, (tabs) => {
      chrome.scripting.insertCSS({ target: { tabId: tabs[0].id }, files });
      chrome.scripting.executeScript({
        target: { tabId: tabs[0].id },
        func: (enable) => {
          document.documentElement.classList.toggle('css-visualizer', enable);
        },
        args: [isVisualizerEnabled],
      });
    });
  }

  document
    .getElementById('visualizer-btn')
    .addEventListener('click', toggleCssVisualizer);
});
With this code, the base functionality of the extension is complete and can be loaded into Chrome from the src folder. If you want to try the extension at this point, visit the Loading and testing the extension in Google Chrome section.
How to use feature flags in a Chrome extension?
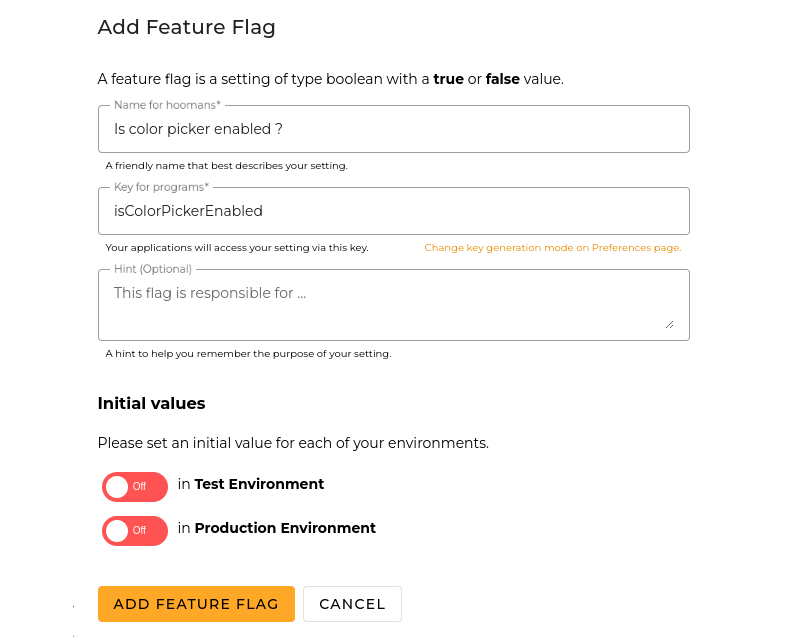
To create the feature flag, sign up for a free ConfigCat account.
Please add a feature flag to the dashboard. The key for programs will be used in the extension code to evaluate the flag. The key I will use is: isColorPickerEnabled.
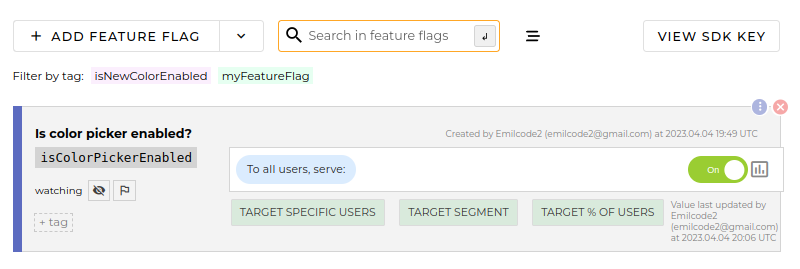
Once your flag has been created, save the changes. You can locate the "View SDK Key" button in the top right corner of the dashboard. You'll need this unique key later in the tutorial to connect the extension to your dashboard.
How to integrate the ConfigCat SDK for Chromium Extensions into the project
We need to update the main.js file to use the SDK. To do this:
- Open the terminal and install the ConfigCat SDK for Chromium Extensions.
npm install configcat-js-chromium-extension
- Import the SDK in the
main.jsfile
import * as configcat from 'configcat-js-chromium-extension';
- Initialize the SDK with the
createClientmethod and set the SDK key. This is required for managing the communication between the application and ConfigCat servers.
const configCatClient = configcat.createClient('Your-SDK-key');
- Get the flag with the
getValueAsyncmethod, this returns the value of the feature flag based on its key.
configCatClient
  .getValueAsync('isColorPickerEnabled', false)
  .then((flagValue) => {
    if (flagValue) {
      // TODO: Create the new visualizer with a custom color selector
    } else {
      // I have moved the document selector here to demonstrate how the default behavior of the extension can be set.
      // This code will be refactored in a later stage.
      document
        .getElementById('visualizer-btn')
        .addEventListener('click', toggleCssVisualizer);
    }
  });
The getValueAsync takes two arguments, the flag key isColorPickerEnabled, and the default flag value. Using the callback function, we can access the flag value. If the flagValue is false, meaning the color picker feature is not enabled, the 'click' event listener for the button is set to the original toggleCssVisualizer function.
Now that we understand how to add the SDK, I will do a bit of code refactoring. Namely, I am introducing two new variables.
- The
toggleBtn, which grabs the button from thepopup.htmlfile - The
colorPicker, which will be inserted into thepopup.htmlfile
To implement the new extension behavior, I created a new function called toggleCssVisualizerWithCustomColor. This function is responsible for manipulating the page's DOM in a new way and adding the color selector to the extension. Unlike before, where the class was added to the <body> tag, this function loops over all HTML elements and adds a new style with an outline to them.
Based on the conditional flagValue the 'click' event listener will be tied either to the old toggleCssVisualizer function, or the new toggleCssVisualizerWithCustomColor function with the additional color picker.
import * as configcat from 'configcat-js-chromium-extension';

document.addEventListener('DOMContentLoaded', () => {
  let isVisualizerEnabled = false;

  const toggleBtn = document.getElementById('visualizer-btn');
  const colorPicker = document.createElement('input');
  colorPicker.type = 'color';

  const configCatClient = configcat.createClient('Your-SDK-key');

  function toggleCssVisualizer() {
    //  DOM manipulation code
  }

  function toggleCssVisualizerWithCustomColor() {
    isVisualizerEnabled = !isVisualizerEnabled;
    const outline = isVisualizerEnabled
      ? `2px solid ${colorPicker.value}`
      : 'none';
    chrome.tabs.query({ active: true, currentWindow: true }, (tabs) => {
      chrome.scripting.executeScript({
        target: { tabId: tabs[0].id },
        func: (enable, outline) => {
          const elements = document.getElementsByTagName('*');
          for (let i = 0; i < elements.length; i++) {
            elements[i].style.outline = outline;
          }
          document.documentElement.classList.toggle('css-visualizer', enable);
        },
        args: [isVisualizerEnabled, outline],
      });
    });
    chrome.tabs.query({ active: true, currentWindow: true }, (tabs) => {
      chrome.scripting.insertCSS({ target: { tabId: tabs[0].id } });
    });
  }

  configCatClient
    .getValueAsync('isColorPickerEnabled', false)
    .then((flagValue) => {
      if (flagValue) {
        document.getElementById('popup').appendChild(colorPicker);
        toggleBtn.addEventListener('click', toggleCssVisualizerWithCustomColor);
      } else {
        toggleBtn.addEventListener('click', toggleCssVisualizer);
      }
    });
});
How to build the Chrome Extension
First, install the Webpack dependencies by running:
npm install webpack webpack-cli copy-webpack-plugin --save-dev
To prepare our code for Chrome, open the webpack.config.js file. This file contains configuration settings for the Webpack bundler. It specifies the entry point for JavaScript code and the output directory. It also uses the CopyWebpackPlugin to copy the specified files from the src directory to the build directory.
const path = require('path');
const CopyWebpackPlugin = require('copy-webpack-plugin');

module.exports = {
  entry: {
    main: './src/main.js',
  },
  output: {
    filename: '[name].js',
    path: path.resolve(__dirname, 'build'),
  },
  plugins: [
    new CopyWebpackPlugin({
      patterns: [
        { from: 'src/manifest.json', to: 'manifest.json' },
        { from: 'src/popup.html', to: 'popup.html' },
        { from: 'src/visualizer.css', to: 'visualizer.css' },
      ],
    }),
  ],
};
Finally, run the command:
npm run build
This will bundle the code, and create the required files in the build directory.
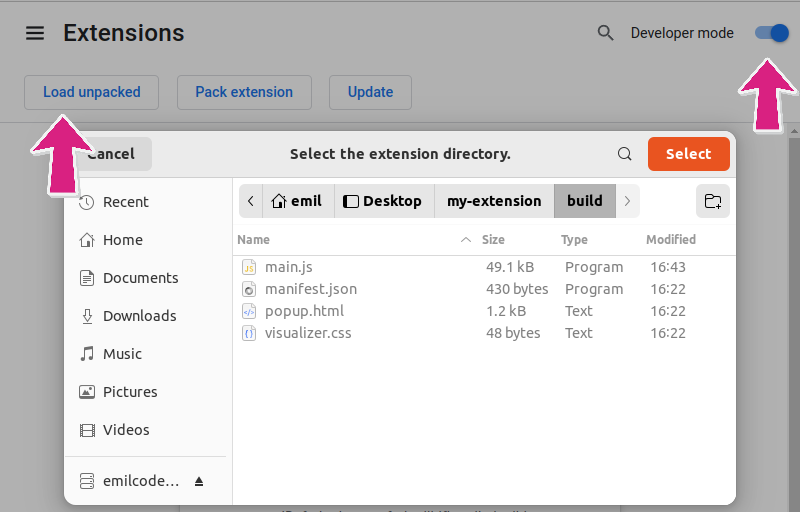
Loading and testing the extension in Google Chrome
To test the extension, open the extensions' page by navigating to chrome://extensions in the address bar. Make sure the "Developer mode" checkbox is checked, then click on the "Load unpacked" button and select the build directory.
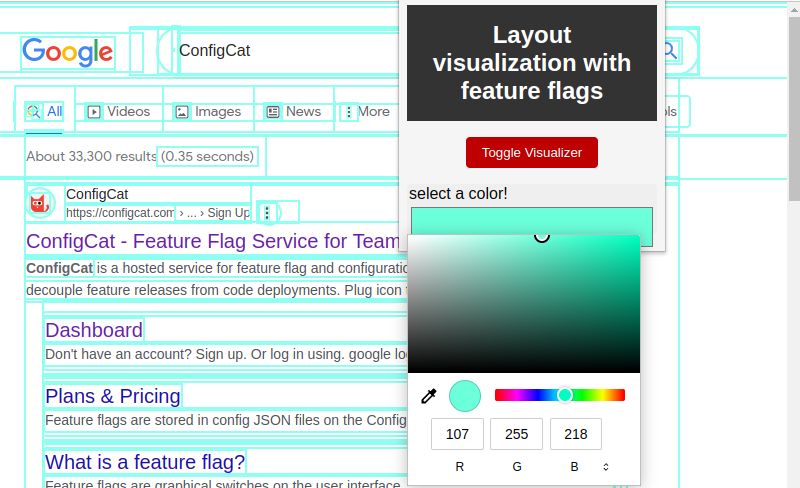
Testing the Feature Flag in the Chrome extension
Once the extension is loaded, click on the extension icon to open the popup. Click on the Toggle Visualizer button to toggle the CSS visualizer on and off. If the isColorPickerEnabled flag is set to on, you should see a color picker that allows you to change the CSS outline color.
Go to the ConfigCat dashboard and toggle the flag on/off, the changes will reflect on the ability to set the outline color.
Key Takeaways
We saw that ConfigCat made the SDK integration super simple. We saw that it took four simple steps:
- Creating the flag on ConfigCat's dashboard
- Importing the SDK into the project
- Connecting the SDK to ConfigCat's CDN and our dashboard
- Grabbing the flag value and controlling the extension's behavior with the flag.
We encourage all developers who work with Chromium extension development to try out the new SDK and provide feedback on their experience.
Feature flags let you launch new features and change your software configuration without (re)deploying code. ConfigCat can be integrated with other applications/programming languages. You can find implementation solutions on ConfigCat Labs. ConfigCat also offers a free plan that allows you to try out the platform and SDKs with no commitment or credit card required.
To keep up with other announcements and posts like this, follow ConfigCat on Twitter, Facebook, LinkedIn, and GitHub.