How to Implement A/B Testing in Ionic

The world population continues to grow, and so does the number of house pets. While we all hope most of them have a good quality of life, some don't have a home. To combat this, we can make an animal care app. In this blog post, the app's objective is to increase the pet adoption rate. We will change the color of our call-to-action button and measure the click-through rate of each button version using A/B testing.
What is A/B testing?
A/B testing is a way to track the performance of two versions of the same thing without conveying our experiment to the users by using feature flags, which let you launch new features and change your software configuration without (re)deploying code.
The test should include only one change. We want to know the effect of the difference reliably. If we change several things, we cannot distinguish the personal impact of each. In this case, half of the users get the old version of the button (this version is also known as control), and the other half get the new (the variant). Then we measure the number of clicks on each and compare them. We are essentially performing user segmentation and measuring the growth potential.
Creating the A/B testing app
You can find the complete project on GitHub.
Prerequisites:
- basic understanding of React
- basic understanding of Ionic
Setting up ConfigCat
ConfigCat is a developer-centric feature flag service that helps you turn features on and off, change their configuration, and roll them out gradually to your users. It supports targeting users by attributes, percentage-based rollouts, and segmentation. Available for all major programming languages and frameworks, it can be licensed as SaaS or self-hosted for all major programming languages and frameworks. GDPR and ISO 27001 compliant.
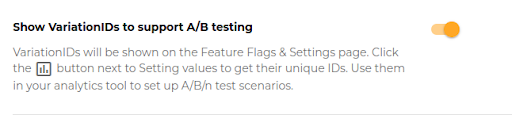
- To segment users in ConfigCat, we first need to enable VariationIDs in our ConfigCat panel to support A/B testing.
- Enable the segmentation feature by adding the % option. Please set it to 50%, and don’t forget to save and publish the changes. Now we have an even distribution of our buttons to the users.
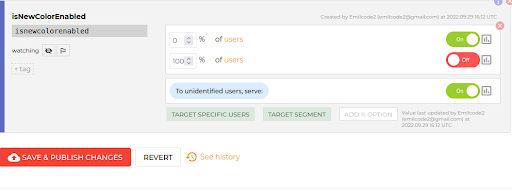
- ConfigCat should have a user identifier when targeting users. Usually, we get this from a server backend. For tutorial purposes, we’ll hard code a user identifier. To simulate a new user, just change the value. This will help simulate users landing in either the variant or control versions of the app.
const USER_ID = "someUserId1234"
- Implement the ConfigCat sdk in your code.
const { value: isNewColorEnabled, loading } = useFeatureFlag(
"Isnewcolorenabled",
False,
{identifier: USER_ID}
);
The isNewColorEnabled determines which button color the user will get.
Connecting to Amplitude
- Install Amplitude in your project with the command line.
npm install amplitude-js
- Create an account here
- Select JavaScript SDK
- Grab the key and click next.
- Set the key in the project.
const AMPLITUDE_KEY = "[insert-aplitude-key-here]";
let AmplitudeInstance = amplitude.getInstance().init(AMPLITUDE_KEY);
Creating the UI components and adding logic to them.
First render
We don't want to display any content before the flag is received. To prevent odd behavior, we should add a conditional to check if the flag is ready.
{loading ?
( <IonLabel>Fetching content</IonLabel> )
:
( <>  **show the page** <> )
}
Creating the rest of UI components
First let's create the button component:
const Button:React.FC<Props> = ({USER_ID, AmplitudeInstance, button_color, setShowToast}) =>{

const handleClick = (button_color: string): void => {
amplitude.getInstance(AmplitudeInstance as any).setUserId(USER_ID);
amplitude.getInstance(AmplitudeInstance).logEvent(`user clicked: ${button_color} `);
};

const [color, setColor] = useState('color')

useEffect(() => {
  if(button_color === "original"){
  setColor('medium')
  }
  else if(button_color === "variant"){
  setColor('primary')
  }
}, [button_color])

return (
  <IonButton
    color={`${color}`}
    expand="full"
    onClick={() => {
      handleClick(button_color);
      setShowToast(true);
    }}
  >
    Learn How
  </IonButton>
);
We added a handle click function to log the button click and 'useEffect' hook to set the button color. Back on our app page, the IsNewColorEnabled flag is used to decide which version should be served to our user.
<Button
USER_ID={USER_ID}
AmplitudeInstance={AmplitudeInstance}
setShowToast={setShowToast}
button_color={isNewColorEnabled ? "variant" : "original"}/>
As extra features I added:
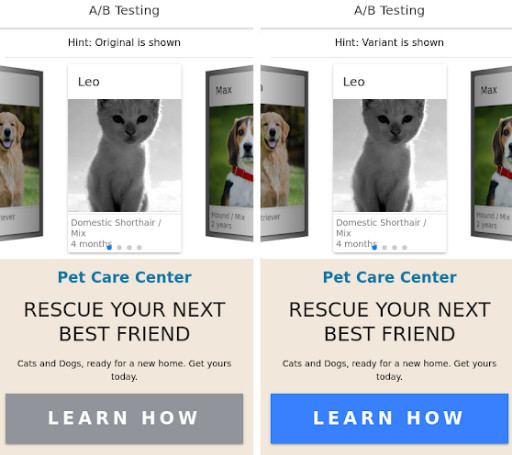
- a hint, so we know what we are seeing for our tutorial purposes.
- a carousel of pets to make things nicer.
- additional app text to describe the purpose of the button to end users.
- an IonToast so we can easily see if a button is clicked.
The main part of the user interface:
{loading ? (
  <IonLabel>Fetching content</IonLabel>
) : (
  <>
    <Carousel />
    <IonCardContent className="content">
      <IonLabel>
        <h4>Pet Care Center</h4>
      </IonLabel>
      <IonCardTitle>
        <h2>Rescue your next best friend</h2>
      </IonCardTitle>
      <p>Cats and Dogs, ready for a new home. Get yours today.</p>
      <Button
        USER_ID={USER_ID}
          AmplitudeInstance={AmplitudeInstance}
          setShowToast={setShowToast}
          button_color={isNewColorEnabled ? "variant" : "original"}/>
    </IonCardContent>
  </>
)}<IonToast
          position="top"
          isOpen={showToast}
          onDidDismiss={() => setShowToast(false)}
          message={isNewColorEnabled ? "variant clicked!" : "original clicked!"}
          duration={2000}
        />
Run the app and try to change the user identifier a few times. We should get an average 50% of the variant and 50% of the original button in our app. Click on the button to create some user engagement data on Amplitude.
Displaying analytical data on Amplitude
Let's head back to the Amplitude website
Click on the +new button on the top left of the page, then Analysis and finally Segmentation.
Add the events:
- Select Event => user clicked: original
- Select Event => user clicked: variant

We should have a data chart on the bottom of the page. The chart shows the amount of button clicks over time.
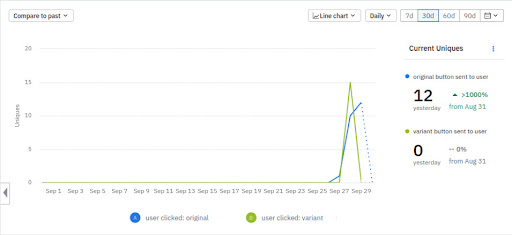
- Switch the chart to Bar chart to see the total activity.
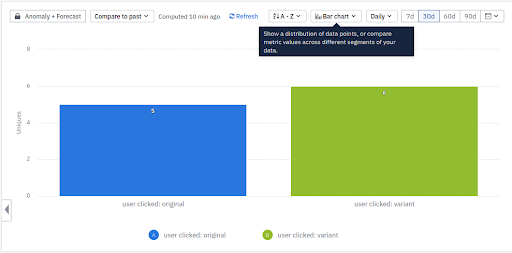
- Run the test for some time and make the final decision. Which is better? A or B ?
Recap
We saw two things in our app:
- ConfigCat’s feature flags can simplify the A/B testing process. We don't need to create the logic of the even feature distribution.
- A/B testing helps push things in the right direction. When introducing a new feature, A/B testing gives us the user response report.
Useful links
- Complete code of the sample app on GitHub
- ConfigCat docs
- Amplitude docs
- More on A/B testing
You can find ConfigCat on Twitter, Facebook, LinkedIn and GitHub.