How to Use ConfigCat Feature Flags with Docker

Docker is a platform that enables developers to build apps and run them in mini virtual machines called containers. As a result, developers can just focus on writing code without needing to set up or configure an environment for running that code. Docker also allows easy application sharing because its environment is abstracted away from the host machine. This allows the containerized application to run on any host machine Docker is installed on. Developers can extend the functionality of Docker's desktop application with extensions. But the goodness doesn't stop there. You can use feature flags to control smaller feature components of these extensions without rebuilding and updating them.
Introducing Feature Flags
Feature flags allow developers to switch features in software applications on or off remotely without modifying the code. A feature flag works similarly to a light switch. By setting its boolean value to either true or false you can control whether a feature should be shown to users or not.
The main benefits of using feature flags would include:
- Through a simple GUI dashboard you can toggle particular features on or off without the need to edit and redeploy your application's code.
- If a new feature is deployed and is causing bugs, you can easily roll it back by turning off its flag.
- Feature flags give developers the freedom and confidence to experiment quickly.
- Conducting A/B tests can be streamlined when combined with feature flags.
Importantly, you can use feature flags in many programming languages or frameworks. ConfigCat offers an extensive list of SDKs for integrating its feature flag service in your technology stack.
ConfigCat: A Cloud-Hosted Feature Flag Provider
ConfigCat allows you to manage your feature flags from an easy-to-use dashboard, including the ability to set targeting rules for releasing features to a specific segment of users. These rules can be based on country, email, and custom identifiers such as age, eye color, etc.
But let's get to the point: Feature flags are cool but how do we use them with Docker?
How to Use ConfigCat Feature Flags with Docker
Docker offers developers a simple API to create extensions that add extra functionalities to the Docker desktop application. This can be achieved using the Extensions SDK.
In the upcoming section, I'll show you how to build and install a simple extension that displays a table of Docker containers currently present on your machine. We'll then proceed to add a feature flag to control the visibility of one of its child components.
Developing a Docker Desktop Extension
Let's jump right into building our Docker desktop extension.
Before getting started check if you've got the following prerequisites:
- Docker Desktop
- A code editor such as VS Code
- Basic knowledge of React
- To get started, open up a terminal and point it to the folder where you want the extension to live. Then, set up the directory for your extension and generate the needed files with the following command:
docker extension init my-extension
To verify that the generated extension works, build and install it using the following commands:
docker build -t my-extension .
docker extension install my-extension
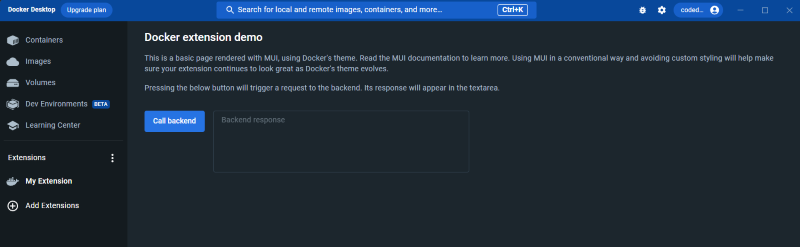
If the above was successful, you should see the extension available in your Docker desktop application:
- The
docker extension init my-extensioncommand has also generated a backend service for the extension. For this demo, we'll only focus on the front-end so it is safe to delete thebackendfolder. Update the following files as follows to remove all references to the backend:
Dockerfile:
FROM --platform=$BUILDPLATFORM node:18.12-alpine3.16 AS client-builder
WORKDIR /ui
# cache packages in layer
COPY ui/package.json /ui/package.json
COPY ui/package-lock.json /ui/package-lock.json
RUN --mount=type=cache,target=/usr/src/app/.npm \
    npm set cache /usr/src/app/.npm && \
    npm ci
# install
COPY ui /ui
RUN npm run build

FROM alpine
LABEL org.opencontainers.image.title="My extension" \
    org.opencontainers.image.description="My awesome Docker extension" \
    org.opencontainers.image.vendor="Awesome Inc." \
    com.docker.desktop.extension.api.version="0.3.4" \
    com.docker.extension.screenshots="" \
    com.docker.desktop.extension.icon="" \
    com.docker.extension.detailed-description="" \
    com.docker.extension.publisher-url="" \
    com.docker.extension.additional-urls="" \
    com.docker.extension.categories="" \
    com.docker.extension.changelog=""

COPY docker-compose.yaml .
COPY metadata.json .
COPY docker.svg .
COPY --from=client-builder /ui/build ui
docker-compose.yaml
services:
  my-extension:
    image: ${DESKTOP_PLUGIN_IMAGE}
metadata.json
{
  "icon": "docker.svg",
  "vm": {
    "composefile": "docker-compose.yaml"
  },
  "ui": {
    "dashboard-tab": {
      "title": "My Extension",
      "src": "index.html",
      "root": "ui"
    }
  }
}
- Modify the
App.tsxfile so that the extension will display a table of Docker containers on your system:
// ui/src/App.tsx
import React, { useEffect } from 'react';
import {
  Stack,
  Table,
  TableBody,
  TableCell,
  TableContainer,
  TableHead,
  TableRow,
  Typography,
} from "@mui/material";
import { createDockerDesktopClient } from "@docker/extension-api-client";

//obtain docker desktop extension client
const ddClient = createDockerDesktopClient();

export function App() {
  const [containers, setContainers] = React.useState<any[]>([]);

  const fetchAllContainers = async () => {
    ddClient.docker.cli.exec('ps', ['--all', '--format', '"{{json .}}"']).then((result) => {
      // result.parseJsonLines() parses the output of the command into an array of objects
      setContainers(result.parseJsonLines());
    });
  }

  useEffect(() => {
    // Get all containers
    fetchAllContainers();
  }, []);

  return (
      <Stack>
        <Typography data-testid="heading" variant="h3" role="title">
          Container list
        </Typography>
        <Typography
          data-testid="subheading"
          variant="body1"
          color="text.secondary"
          sx={{ mt: 2 }}
        >
        Simple list of containers using Docker Extensions SDK.
        </Typography>

        <TableContainer sx={{ mt: 2 }}>
          <Table>
            <TableHead>
              <TableRow>
                <TableCell>Container id</TableCell>
                <TableCell>Image</TableCell>
                <TableCell>Command</TableCell>
                <TableCell>Created</TableCell>
                <TableCell>Status</TableCell>
              </TableRow>
            </TableHead>
            <TableBody>
              {containers.map((container) => (
                <TableRow
                  key={container.ID}
                  sx={{ '&:last-child td, &:last-child th': { border: 0 } }}
                >
                  <TableCell>{container.ID}</TableCell>
                  <TableCell>{container.Image}</TableCell>
                  <TableCell>{container.Command}</TableCell>
                  <TableCell>{container.CreatedAt}</TableCell>
                  <TableCell>{container.Status}</TableCell>
                </TableRow>
              ))}
            </TableBody>
          </Table>
        </TableContainer>
      </Stack>
  );
}
To see the new changes, build and update the extension:
docker build -t my-extension .
docker extension update my-extension
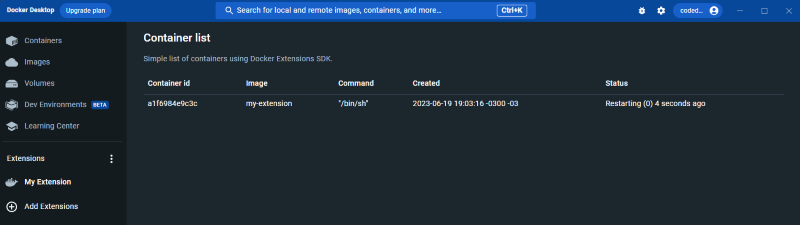
It should look like:
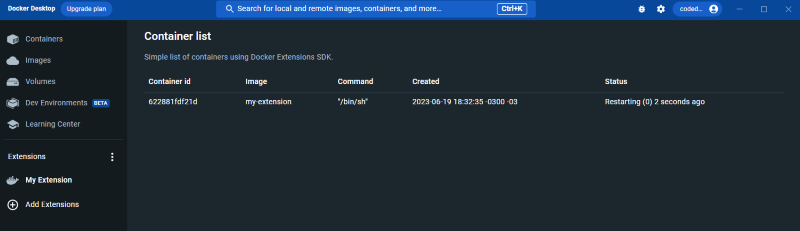
The extension now displays a table of all Docker containers on your machine. Instead of showing all containers, including the ones that are turned off, let's add a filter switch to display only the running containers.
- Modify the
App.tsxfile as follows:
// ui/src/App.tsx
import React, { useEffect } from 'react';
import {
  Stack,
  Table,
  TableBody,
  TableCell,
  TableContainer,
  TableHead,
  TableRow,
  Typography,
  Switch,
  FormControlLabel,
  FormGroup,
} from "@mui/material";
import { createDockerDesktopClient } from "@docker/extension-api-client";

//obtain docker desktop extension client
const ddClient = createDockerDesktopClient();

export function App() {
  const [containers, setContainers] = React.useState<any[]>([]);

  const fetchAllContainers = async () => {
    ddClient.docker.cli.exec('ps', ['--all', '--format', '"{{json .}}"']).then((result) => {
      // result.parseJsonLines() parses the output of the command into an array of objects
      setContainers(result.parseJsonLines());
    });
  }

  const fetchRunningContainers = async () => {
    ddClient.docker.cli.exec('ps', ['--format', '"{{json .}}"']).then((result) => {
      // result.parseJsonLines() parses the output of the command into an array of objects
      setContainers(result.parseJsonLines());
    });
  }

  const handleFetchContainers = (event: React.ChangeEvent<HTMLInputElement>) => {
    if (event.target.checked) {
      fetchRunningContainers();
    } else {
      fetchAllContainers();
    }
  }

  useEffect(() => {
    // Get all containers
    fetchAllContainers();
  }, []);

  return (
      <Stack>
        <Typography data-testid="heading" variant="h3" role="title">
          Container list
        </Typography>
        <Typography
          data-testid="subheading"
          variant="body1"
          color="text.secondary"
          sx={{ mt: 2 }}
        >
        Simple list of containers using Docker Extensions SDK.
        </Typography>

          <FormGroup sx={{ mt: 1 }}>
            <FormControlLabel control={<Switch onChange={(event) => handleFetchContainers(event)} />} label="Show only running containers" />
          </FormGroup>

        <TableContainer sx={{ mt: 2 }}>
          <Table>
            <TableHead>
              <TableRow>
                <TableCell>Container id</TableCell>
                <TableCell>Image</TableCell>
                <TableCell>Command</TableCell>
                <TableCell>Created</TableCell>
                <TableCell>Status</TableCell>
              </TableRow>
            </TableHead>
            <TableBody>
              {containers.map((container) => (
                <TableRow
                  key={container.ID}
                  sx={{ '&:last-child td, &:last-child th': { border: 0 } }}
                >
                  <TableCell>{container.ID}</TableCell>
                  <TableCell>{container.Image}</TableCell>
                  <TableCell>{container.Command}</TableCell>
                  <TableCell>{container.CreatedAt}</TableCell>
                  <TableCell>{container.Status}</TableCell>
                </TableRow>
              ))}
            </TableBody>
          </Table>
        </TableContainer>
      </Stack>
  );
}
- Build and update the extension as we did before, and you should see:

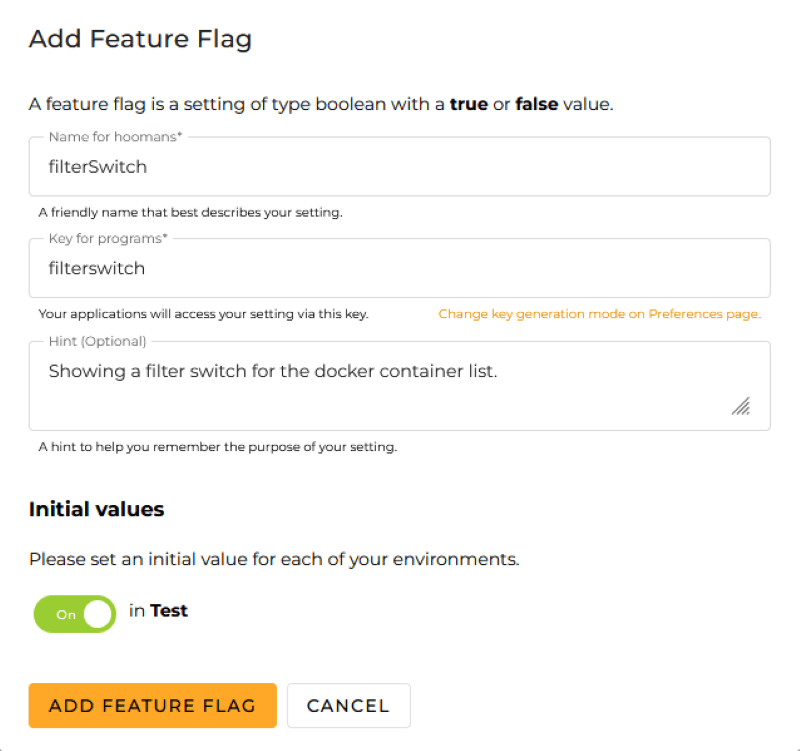
- Let's create a feature flag in the ConfigCat dashboard with the following details. This feature flag will control the visibility of the filter switch:
Since we're using React, let's install and use ConfigCat's React SDK.
- Install the React SDK with the following command:
npm i configcat-react
- In the
main.tsxfile, Import theConfigCatProviderand wrap the<App />component using it:
import { ConfigCatProvider } from "configcat-react"; // Newly added

import { App } from './App';

ReactDOM.createRoot(document.getElementById("root") as HTMLElement).render(
  <React.StrictMode>
    {/*
      If you eject from MUI (which we don't recommend!), you should add
      the `dockerDesktopTheme` class to your root <html> element to get
      some minimal Docker theming.

      Newly added <ConfigCatProvider />
    */}
    <ConfigCatProvider sdkKey="YOUR-CONFIGCAT-SDK-KEY">
      <DockerMuiThemeProvider>
        <CssBaseline />
          <App />
      </DockerMuiThemeProvider>
    </ConfigCatProvider>
  </React.StrictMode>
);
- In the
App.tsxfile, add the following line beneath the existing import statements:
import { useFeatureFlag } from 'configcat-react';
- Within the
App()function block, add the following hook:
const { value: isFilterSwitchEnabled } = useFeatureFlag('filterswitch', false);
The isFilterSwitchEnabled will hold a value of true when the feature flag (filterswitch) is enabled and false otherwise. Let's use it to render the filter switch when it is true:
{
  isFilterSwitchEnabled && (
    <FormGroup sx={{ mt: 1 }}>
      <FormControlLabel
        control={<Switch onChange={(event) => handleFetchContainers(event)} />}
        label="Show only running containers"
      />
    </FormGroup>
  );
}
Test Drive
Turning off the feature flag in your Dashboard will hide the feature:

Interested in learning more? In the next section, I'll share some additional information that will make using Docker and ConfigCat feature flags even easier for you.
Best Practices to Consider When Using ConfigCat Feature Flags with Docker
While there isn't any right or wrong way to use feature flags in general, there are some best practices that can help you get the most out of using them with Docker.
Developing Your Docker Extensions with Feature Flags in Mind
Imagine you built and deployed your first Docker extension. As it scales and more users hop on board, more features are needed, even ones you haven't thought about. If you design the extension components to be controlled by feature flags, you can easily determine how and when they are released.
What this means is that you can choose to render each feature component in your code based on the value of its corresponding feature flag. This can be done by checking whether the flag's boolean value is set to true with a conditional IF-statement.
Optimizing for Faster Performance
In my experience using ConfigCat, although it's relatively fast, there are ways to further optimize its performance and potentially limit the HTTP requests made by your containers for querying feature flag values. One way to achieve this is by utilizing a custom cache.
If you decide to use a custom cache such as Redis, you can integrate it with your ConfigCat SDK client based on the instructions documented here. With this approach, you can free up network request processes on the client side. This is because your client SDK will instead evaluate your feature flags based on the cache data. Check out the using ConfigCat with Redis guide to learn more.
Summary of Key Points
- Docker is a tool for building and sharing code in containerized environments.
- ConfigCat is a cloud-hosted feature flag service that simplifies feature flag management from a central dashboard.
- A feature flag is like a switch for a feature. It can be used to show or hide the feature it is linked to.
- The Docker extension SDK provides an API for developers to extend Docker desktop functionalities.
- You can use feature flags in your Docker extension to control feature components without the need to build and redeploy the extension.
- To make the most of using ConfigCat feature flags with Docker, consider the best practices we've discussed.
Conclusion
The advantages of using Docker make it an attractive choice for developers when it comes to deploying their applications. This, in turn, facilitates effortless sharing and deployment of these applications, owing to the isolated environments created by Docker's containerization approach. Through extensions, developers can incorporate extra functionalities into Docker. When combined with feature flags, developers can readily deploy their extensions to the public community and introduce new features effortlessly with a simple click of a button.
References
Source Code
You can find the complete code for the extension here.
Further Reading
If you'd like to learn more, check out the following resources:
- Docker extensions Quick start
- ConfigCat React SDK Reference
- Custom cache implementation with ConfigCat
- How to use ConfigCat with Redis
Eager to give what you learned a try? Sign up for a free-tier ConfigCat account here and stay on top of the latest posts and announcements from ConfigCat on Twitter, Facebook, LinkedIn, and GitHub.