A/B Testing in PHP with Feature Flags and Amplitude

Let's say your team has developed a new feature update and is planning to release it to the public. There can be some uncertainty and risk because it is hard to predict how users will react to the change. Will the new update have a negative impact and drive users away from the app? The best way to know for sure is to adopt an A/B testing approach by releasing it to a subset of users to measure its impact prior to making a full deployment. This gives you enough room to uncover bugs and refine the feature without disrupting the experience for everyone.
A short overview of A/B testing
A/B testing is the process of comparing a variation state with a control state to determine which is more effective. The variation state of a website/app includes the new feature update, while the control state is generally regarded as the benchmark as it does not include the updates. Metrics from both the control and variation states are captured and recorded. To conclude the test we can compare the two states to determine which is more efficient.
To avoid biases, make sure that metrics for both states are recorded over the same time frame with the same subset of users.
Through the use of a cloud-hosted feature flag management service like ConfigCat, I'll create a feature flag that allows me to switch between the states by toggling its value without reconfiguring and redeploying the app. After that, I'll create a user segment for testing within the dashboard. Let's put the pieces together in a demo A/B test.
Identifying the two states
Let's begin by looking at the two states in a fictitious PHP e-commerce website I developed with Laravel. Here is a screenshot:
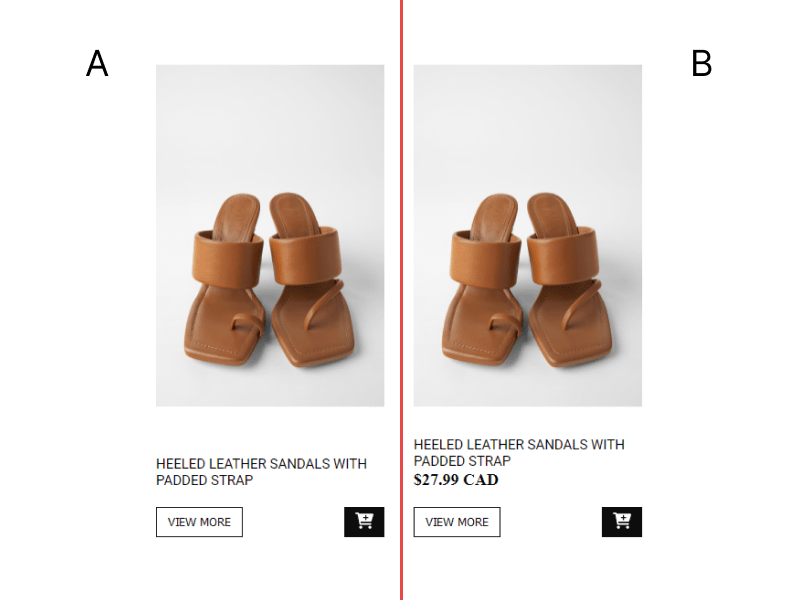
The product layout on the left (marked with the letter A) is the control state and the one on the right (marked with the letter B) is the variation state. The difference is that the variation state shows the price of the product. Let's say that, on average, the control state influences 200 clicks per day. The test will help me determine if variation state will produce a greater number clicks compared to the control state.
With this in mind, let's set up a feature flag and create a user segment to start testing.
Adding a feature flag
1. Sign up for a free ConfigCat account.
2. In the dashboard, create a feature flag with the following details:
Name: product_price
Key: product_price
Description: Showing the product price on the product card.
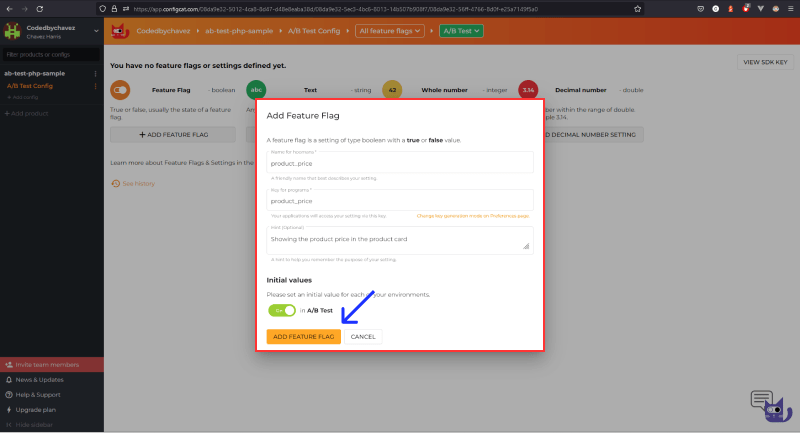
Make sure to turn on the feature flag in your appropriate environment.
3. Click the ADD FEATURE FLAG button to create and save the feature flag.
In this demo, I'll test the new feature update on beta users. You can also create custom segments based on user demographics and characteristics. For example, you may opt to release your new experimental feature to American users over the age of 23.
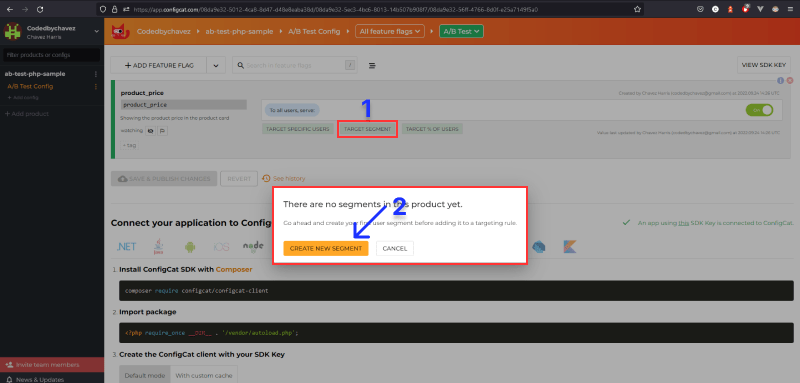
4. To create a user segment to run the test on, click the TARGET SEGMENT button, then click the CREATE NEW SEGMENT button:
5. Fill out the New Segment form:

Name: Beta users
Description: All users who applied for beta testing
Include users when:
- Comparison attribute: Email
- Comparator: IS ONE OF (hashed)
- Comparison value: Here you can add a list or email address for beta users
6. Select the user segment as a condition:
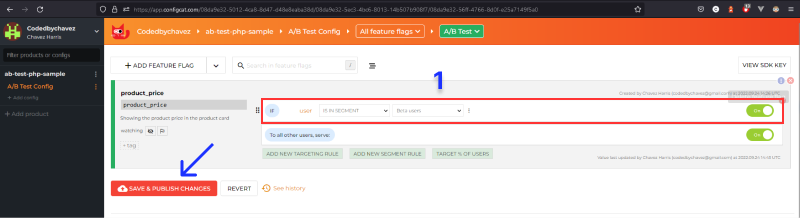
This setting ensures that the variation state is only available to beta users when the feature flag is enabled.
7. To enable the feature flag, toggle it on and implement it as follows:
a. Install the ConfigCat client SDK using composer
composer require configcat/configcat-client
b. Require it in the file where you want to use it, and then create the client with your ConfigCat SDK key:
require '../vendor/autoload.php';

$client = new \ConfigCat\ConfigCatClient("YOUR_SDK_KEY");
c. Query the status of the feature flag as follows:
$canshowproductprice = $client->getValue("product_price", false);
You can find more details here.
8. In the code below, I'm using conditional logic in HTML to reveal or hide the new feature update based on the status of the feature flag using Laravel's blade templating syntax:
  <div class="product-card flex">
      <!-- Rest of code omitted for clarity -->
      <p class="product-description">HEELED LEATHER SANDALS WITH PADDED STRAP</p>

      @if ($canShowProductPrice)
      <div class="product-price">$16.99 CAD</div>
      @endif

      <!-- Rest of code omitted for clarity -->
    </div>
  </div>
To record the click events for the variation state, I will use a product analytics tool called Amplitude in the next section.
Setting up Amplitude
1. Sign up for a free Amplitude account.
2. Switch to the Data section by clicking the dropdown at the top left.
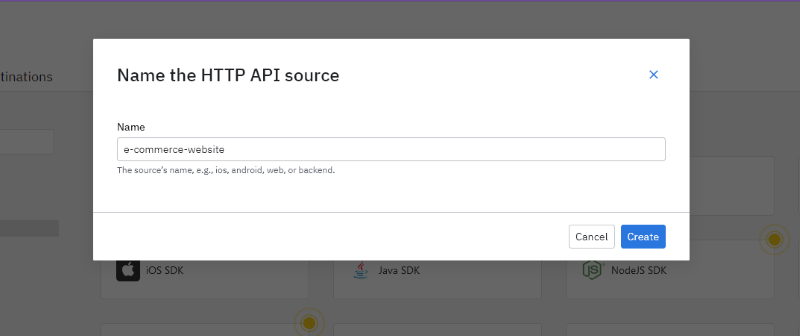
3. Click the Sources link under Connections in the left sidebar, then click the + Add Source button on the top right.
4. Select the HTTP API from the SDK sources list and enter the following details to create a source:
5. You should be automatically redirected to the implementation page. We'll get back to this soon, but first, let's add an event.
Adding an event
By creating an event, we are instructing Amplitude to specifically listen for that event and log it. Soon, we will trigger this event whenever the View More button is clicked.
1. Click the Events link in the left sidebar under Tracking Plan to access the events page.
2. Click the + Add Event button at the top right to create an event and fill in the following details:
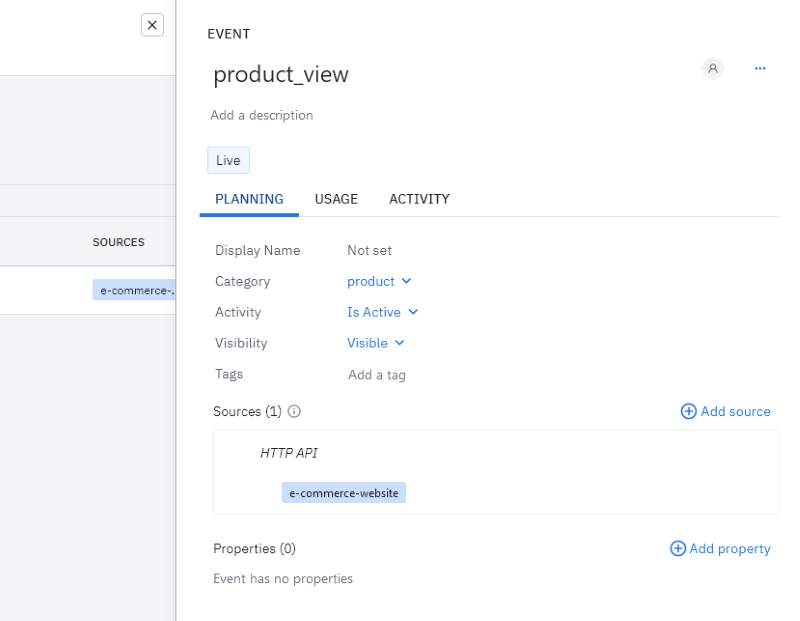
As shown above, I created an event called product_view. Added a category, then activated the event by selecting the is Active option. Lastly, I added the correct source to this event.
3. Click the Save changes button in the left sidebar.
Integrating with Amplitude
Click the implementation link in the left sidebar to see the integration instructions page.
1. On the View More button, I've added an onclick event. I'll use this shortly to trigger and send an event to Amplitude each time this button is clicked.
<button onclick="handleProductViewClick()" class="button view-more-button">
  View More
</button>
Sending an event to Amplitude
Let's look at how to trigger and send the event when the button is clicked.
1. Add a script tag before the closing body tag with the following JavaScript code or just link it to an external .js file.
<script>
function handleProductViewClick() {
// HTTP POST request body:
let data = {
api_key: 'YOUR_AMPLITUDE_API_KEY',
events: [
{
// Replace this with a unique identifier for the user
event_type: 'product_view',
},
],
};
// Send POST request to Amplitude
fetch('https://api.amplitude.com/2/httpapi', {
method: 'POST',
headers: {
'Content-Type': 'application/json',
},
body: JSON.stringify(data),
}).then((response) => {
if (!response.ok) {
throw new Error('Response was not OK');
} else {
console.log('Event logged successfully', response);
}
});
}
</script>
When the function above is executed, Amplitude receives and logs the product_view event.
To verify that it works, let's check for logged requests.
Checking for logged requests
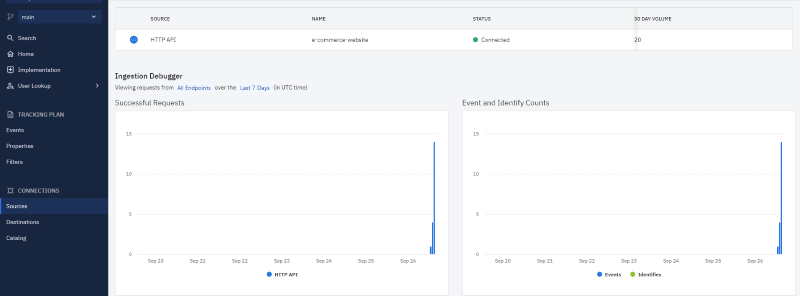
1. Under Connections in the left sidebar, click on Sources.
2. Clicking on the View More button will log the event to Amplitude as shown in the Successful Requests graph on the left:
To record the metrics, let's create an analysis chart. Following that, I'll demo how you can compare these metrics with the control state (benchmark) metrics.
Setting up an analysis chart
1. Switch to the Analytics dashboard, by clicking the dropdown arrow on the top left next to Data.
2. In the analytics dashboard, click the New button in the left sidebar.
3. Click on Analysis and then Segmentation. Segmentation is a mechanism used by Amplitude to collect and create charts from user-initiated events. In this way, Amplitude will create and set up a chart for collecting data from the event we previously created.
4. Select the event as shown below:
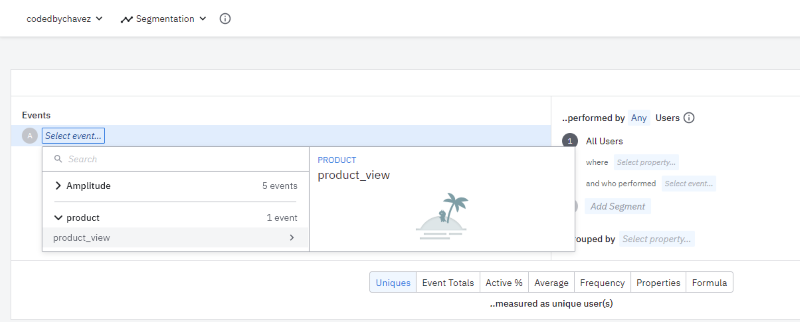
5. Click Save on the top right to save the chart.
Analyze the test results
To compare and analyze the results gathered from the two states, you can click the Compare to past dropdown at the top of the chart as shown below. Start by selecting the appropriate time interval. For example, if the total amount of clicks on the View More button was 1200 for the past week, you can compare that to the current week to determine if the feature (in this case, showing the price) is influencing more clicks.
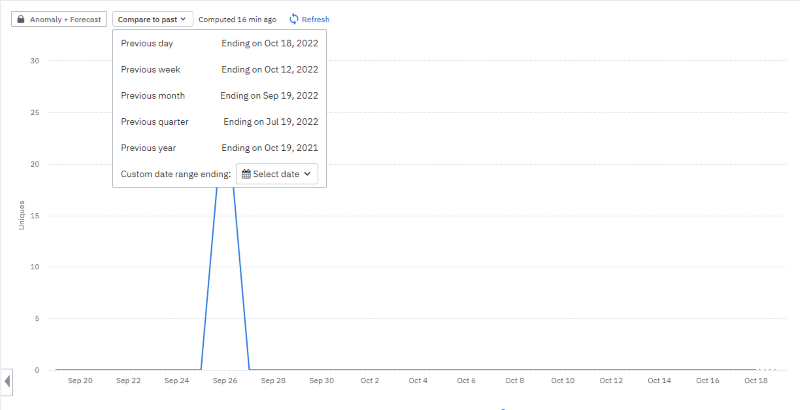
To keep a log of when you enabled and disabled your feature flags during testing you can add it to your charts on Amplitude.
Review
Let's take a moment to recap what we did so far:
1. We discussed the main concepts for conducting an A/B test and identified the control and variation states in the sample app.
2. Created a feature flag.
3. Set up an Amplitude account.
4. Created a source.
5. Added an event.
6. Attached a click event listener to the View More button to trigger and log the event to Amplitude.
7. Sent and tracked a few successful requests.
8. Created an analysis chart to record the click events.
9. Finally, we looked at how we can compare the variation state to the control state in Amplitude's analysis chart by using the compare to past option.
Conclusion
Through A/B testing, we can let users guide our decisions, thus removing much of the decision-making strain. As a result of this testing method, we can analyze, test, and refine experimental features on a sample of users without exposing them to everyone. Using ConfigCat’s feature flag services makes the entire A/B testing process easier with the added ability to target specific user segments. With this, we can toggle experimental features on or off quickly from a 10-minute trainable feature flag management interface to switch between states without redeploying our code.
You can find ConfigCat on Twitter, Facebook, LinkedIn, and GitHub.