Feature Flags in AWS Lambda with .NET: A Serverless Implementation Guide


Running feature flags in AWS Lambda requires a slightly different approach from using them in a traditional long-running application. Lambda execution environments can be created and discarded as demand changes, so caching and feature configuration need to account for cold starts and short-lived instances.
In this tutorial, we'll build a .NET AWS Lambda function that uses ConfigCat to control application behavior at runtime. We'll also add Redis as a shared cache, configure the ConfigCat SDK for Lazy Loading, and change the Lambda's behavior without redeploying it.
This pattern is particularly useful in microservices and other distributed systems, where deployment and release often need to happen independently. A service can be deployed with new code already in place while a feature flag keeps the new behavior disabled until you're ready to release it.

Why Feature Flags Are Useful in Microservices and Serverless Architectures
Feature flags (also called feature toggles) are configuration switches that allow developers to turn application features on or off without redeploying code. In distributed systems, they provide an additional layer of control between deploying code and releasing functionality.
Instead of coordinating releases across multiple services, teams can:
- Deploy code with features disabled
- Gradually enable functionality when ready
- Disable problematic functionality without redeploying
- Release features to selected users or groups
Feature flags are commonly used for:
- Progressive rollouts
- Canary releases
- A/B testing
- Kill switches for production incidents
- User segmentation
This decouples deployment from release, which is one of the key principles behind modern release practices.
For example, imagine that a document-processing service is being updated to use a new OCR pipeline, but the downstream indexing service is not ready to handle the new output format yet. The team can deploy the updated OCR code with the new pipeline disabled behind a feature flag. Once the indexing service is ready, they can enable it remotely without coordinating another deployment.
If the new pipeline causes unexpected parsing errors or increases processing time, the team can turn it off again without rolling back the release.
If you'd like a deeper introduction to this pattern, see our guide to using feature flags in a microservices architecture.
Microservices vs. Serverless Architecture
Although the terms are sometimes used together, microservices and serverless refer to different things.
| Concept | Description |
|---|---|
| Microservices | How an application is structured |
| Serverless | How services are deployed and executed |
Serverless platforms like AWS Lambda are often used to run microservices because they provide:
- Automatic scaling
- No server management
- Pay-per-execution pricing
- Fast deployment cycles
Each microservice can run as its own set of Lambda functions.
When combined with feature flags, this architecture allows teams to control behavior remotely across distributed services without redeploying functions.
The Challenge of Using Feature Flags in AWS Lambda
AWS Lambda execution environments are ephemeral. AWS can reuse an execution environment for multiple invocations (warm start), but your application should not depend on in-memory state remaining available indefinitely. A cold start creates a new execution environment, so any cache stored only in memory starts empty.
AWS explains this execution model in its Lambda runtime and execution environment documentation. This matters when your application uses remotely managed feature flags.
If your Lambda function repeatedly needs to download feature flag configuration, this can introduce:
- Additional latency from network requests
- Unnecessary configuration downloads
- More network traffic
- Less predictable behavior across newly created execution environments
For serverless workloads where multiple execution environments should share the same cached configuration, an external cache such as Redis can help. The cache lifetime also determines how quickly a feature flag change becomes visible to the Lambda function. A shorter lifetime gives you fresher configuration, while a longer lifetime reduces configuration fetches.
How to Implement Feature Flags in AWS Lambda with .NET
Let's walk through a practical example of integrating feature flags in a .NET AWS Lambda function using ConfigCat.
The ConfigCat SDK uses an in-memory cache by default. For workloads where Lambda execution environments are frequently replaced, or where multiple instances should share the same cached configuration, you can provide a custom external cache.
The ConfigCat SDK also uses Auto Polling mode by default, which is generally not recommended for serverless platforms due to periodic polling. Lazy Loading mode is a better fit for short-lived invocations.
Prerequisites
To follow this tutorial, you'll need the following tools and accounts:
- A ConfigCat account: You can sign up for a Forever Free account here.
- An AWS account: You will need access to the AWS Console and a user with permissions to create Lambda functions.
- Docker Desktop: For this tutorial, you can use Docker to spin up a Redis server to run the Lambda locally. (In production AWS environments, Amazon ElastiCache is typically used instead.)
- Microsoft .NET SDK: You will need the .NET 10 SDK or newer to build the project. Download it here.
- Command line tools:
- AWS .NET Mock Lambda Test Tool: Install the version matching your .NET SDK version as a global .NET tool (
dotnet tool install -g Amazon.Lambda.TestTool-10.0). - AWS CLI: Configure it with your credentials (
aws configure). - AWS Lambda Tools for .NET: Install it as a global .NET tool (
dotnet tool install -g Amazon.Lambda.Tools).
- AWS .NET Mock Lambda Test Tool: Install the version matching your .NET SDK version as a global .NET tool (
Step 1: Creating a Feature Flag in ConfigCat
Before writing code, we need a feature flag to control the Lambda function.
- Log in to the ConfigCat Dashboard, or sign up for the Forever Free plan.
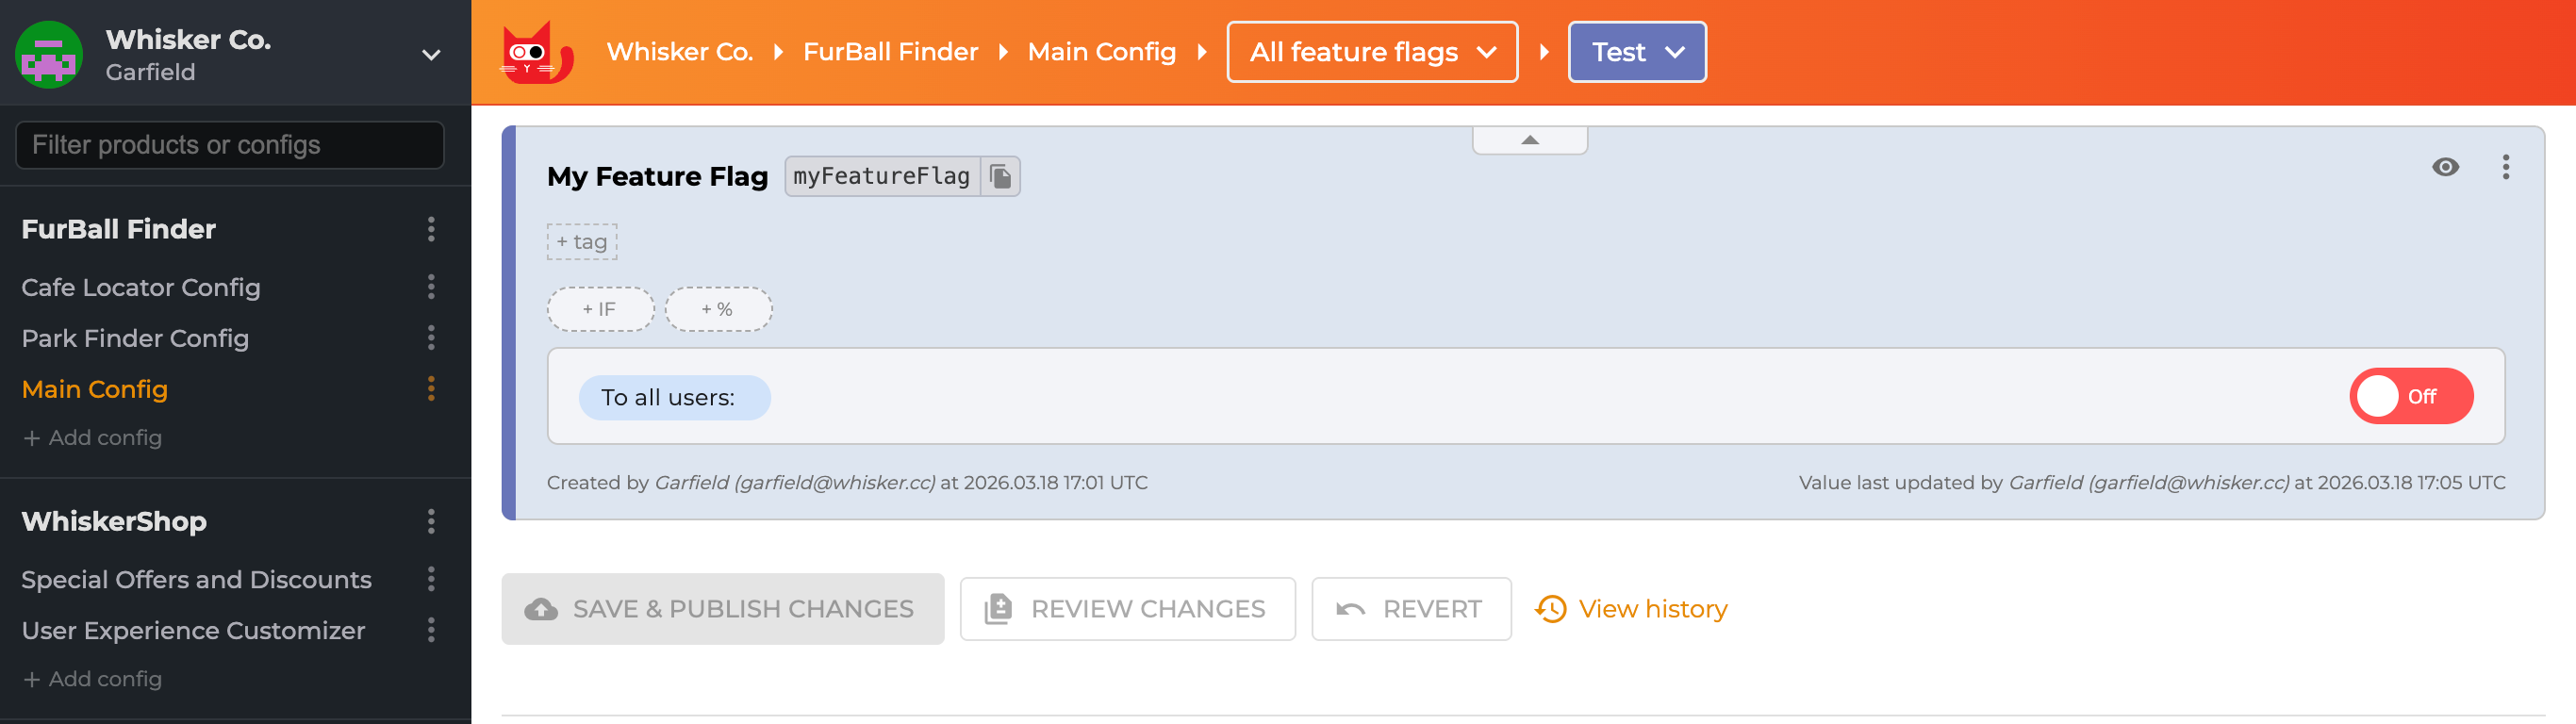
- Create a new feature flag with the name My Feature Flag and key
myFeatureFlag. - Leave the feature flag OFF for now.
Step 2: Setting Up the .NET Project
Refer to the AWS guide on installing AWS templates for dotnet new before you begin.
We will use the .NET CLI to generate the project for the Lambda function. Open your terminal or PowerShell and run the following commands:
# Create a new project with an empty Lambda function
dotnet new lambda.EmptyFunction -n ConfigCatLambdaDemo

# Navigate into the project directory
cd ConfigCatLambdaDemo

# Install the ConfigCat SDK and the Redis client
dotnet add package ConfigCat.Client
dotnet add package StackExchange.Redis
This installs the necessary NuGet packages to integrate ConfigCat feature flags and the Redis cache.
Step 3: Implementing the Lambda Function
Here comes the most critical part of this tutorial:
-
For typical .NET applications, in-memory caching usually works fine. In AWS Lambda, however, in-memory state is not guaranteed to persist between invocations. To prevent your Lambda functions from downloading the config JSON from the ConfigCat CDN on every "cold start", you will need a persistent cache, such as Redis.
So start by creating a file named
RedisConfigCatCache.cswith the following code:RedisConfigCatCache.csusing ConfigCat.Client;using StackExchange.Redis;namespace ConfigCatLambdaDemo;public class RedisConfigCatCache : IConfigCatCache{private readonly Lazy<ConnectionMultiplexer> _connection;public RedisConfigCatCache(string connectionString, bool ssl){var options = ConfigurationOptions.Parse(connectionString);options.AbortOnConnectFail = false;options.ConnectTimeout = 2000;options.SyncTimeout = 2000;options.Ssl = ssl;_connection = new Lazy<ConnectionMultiplexer>(() => ConnectionMultiplexer.Connect(options));}private IDatabase Database => _connection.Value.GetDatabase();public async ValueTask<string?> GetAsync(string key, CancellationToken cancellationToken = default){return await Database.StringGetAsync(key);}public async ValueTask SetAsync(string key, string value, CancellationToken cancellationToken = default){await Database.StringSetAsync(key, value);}}The
RedisConfigCatCacheclass implements theIConfigCatCacheinterface, so the ConfigCat client we instantiate next can use it to cache feature flag data in Redis. -
To integrate ConfigCat with AWS logging, it's also recommended to implement the
IConfigCatLoggerinterface, as shown here. This allows logs from the ConfigCat client to be logged natively in AWS and accessed later using Amazon CloudWatch Logs Centralization. -
Finally, open your
Function.csfile and replace the content with the following code. I've added comments to explain what each part does.Function.csusing Amazon.Lambda.Core;using ConfigCat.Client;[assembly: LambdaSerializer(typeof(Amazon.Lambda.Serialization.SystemTextJson.DefaultLambdaJsonSerializer))]namespace ConfigCatLambdaDemo;public class Function{private static readonly IConfigCatClient _configCatClient;static Function(){#if DEBUGvar sdkKey = "YOUR-CONFIGCAT-SDK-KEY-FOR-DEVELOPMENT";var cacheTimeToLive = TimeSpan.FromSeconds(5);var logger = new ConfigCatToLambdaLoggerAdapter(ConfigCat.Client.LogLevel.Info);// Use the Docker Redis cache setup in developmentvar configCache = new RedisConfigCatCache("localhost:6379,password=myRedisPassword123,user=default", false);#elsevar sdkKey = Environment.GetEnvironmentVariable("CONFIGCAT_SDK_KEY");if (string.IsNullOrWhiteSpace(sdkKey)){throw new InvalidOperationException("The CONFIGCAT_SDK_KEY environment variable is not set.");}var cacheTimeToLive = TimeSpan.FromSeconds(60);var logger = new ConfigCatToLambdaLoggerAdapter(ConfigCat.Client.LogLevel.Warning);var redisOssConnectionString = Environment.GetEnvironmentVariable("REDIS_CONNECTION_STRING");if (string.IsNullOrWhiteSpace(redisOssConnectionString)){throw new InvalidOperationException("The REDIS_CONNECTION_STRING environment variable is not set.");}// Use ElastiCache when deployed to AWSvar configCache = new RedisConfigCatCache(redisOssConnectionString, true);#endif// Configure the ConfigCat client to use the Redis cache_configCatClient = ConfigCatClient.Get(sdkKey, options =>{options.ConfigCache = configCache;options.Logger = logger;options.PollingMode = PollingModes.LazyLoad(cacheTimeToLive);});}public static async Task<string> FunctionHandler(ILambdaContext context){// Ensure the flag key here matches the one in your ConfigCat Dashboardvar isFeatureEnabled = await _configCatClient.GetValueAsync("myFeatureFlag", false);if (isFeatureEnabled){return "Result returned by new logic";}else{return "Result returned by old logic";}}}
In this tutorial, we used a local Redis instance for simplicity. In AWS, Amazon ElastiCache is one option for running a shared Redis-compatible cache outside the Lambda execution environment.
If your ElastiCache instance is deployed inside a VPC (Virtual Private Cloud), make sure the Lambda function has the required VPC and security group configuration to reach it.
Step 4: Testing the Lambda Locally
-
Now that the code is complete, you can test the Lambda locally using Docker. Create a
docker-compose.ymlfile to spin up a local Redis server:docker-compose.ymlservices:redis:image: redis:8.10-alpinecontainer_name: redis-serverrestart: alwaysports:- "6379:6379"command: redis-server --requirepass myRedisPassword123 --appendonly yesvolumes:- redis_data:/datavolumes:redis_data: -
Run
docker compose up -dto build and start the Docker container for Redis. -
With the Redis server up and running, rebuild the project (
dotnet build) and run the Lambda Test Tool (dotnet lambda-test-tool-10.0). When launched, click the Execute Function button. The Response and Log Output show the result of feature flag evaluation, based on the data cached in Redis.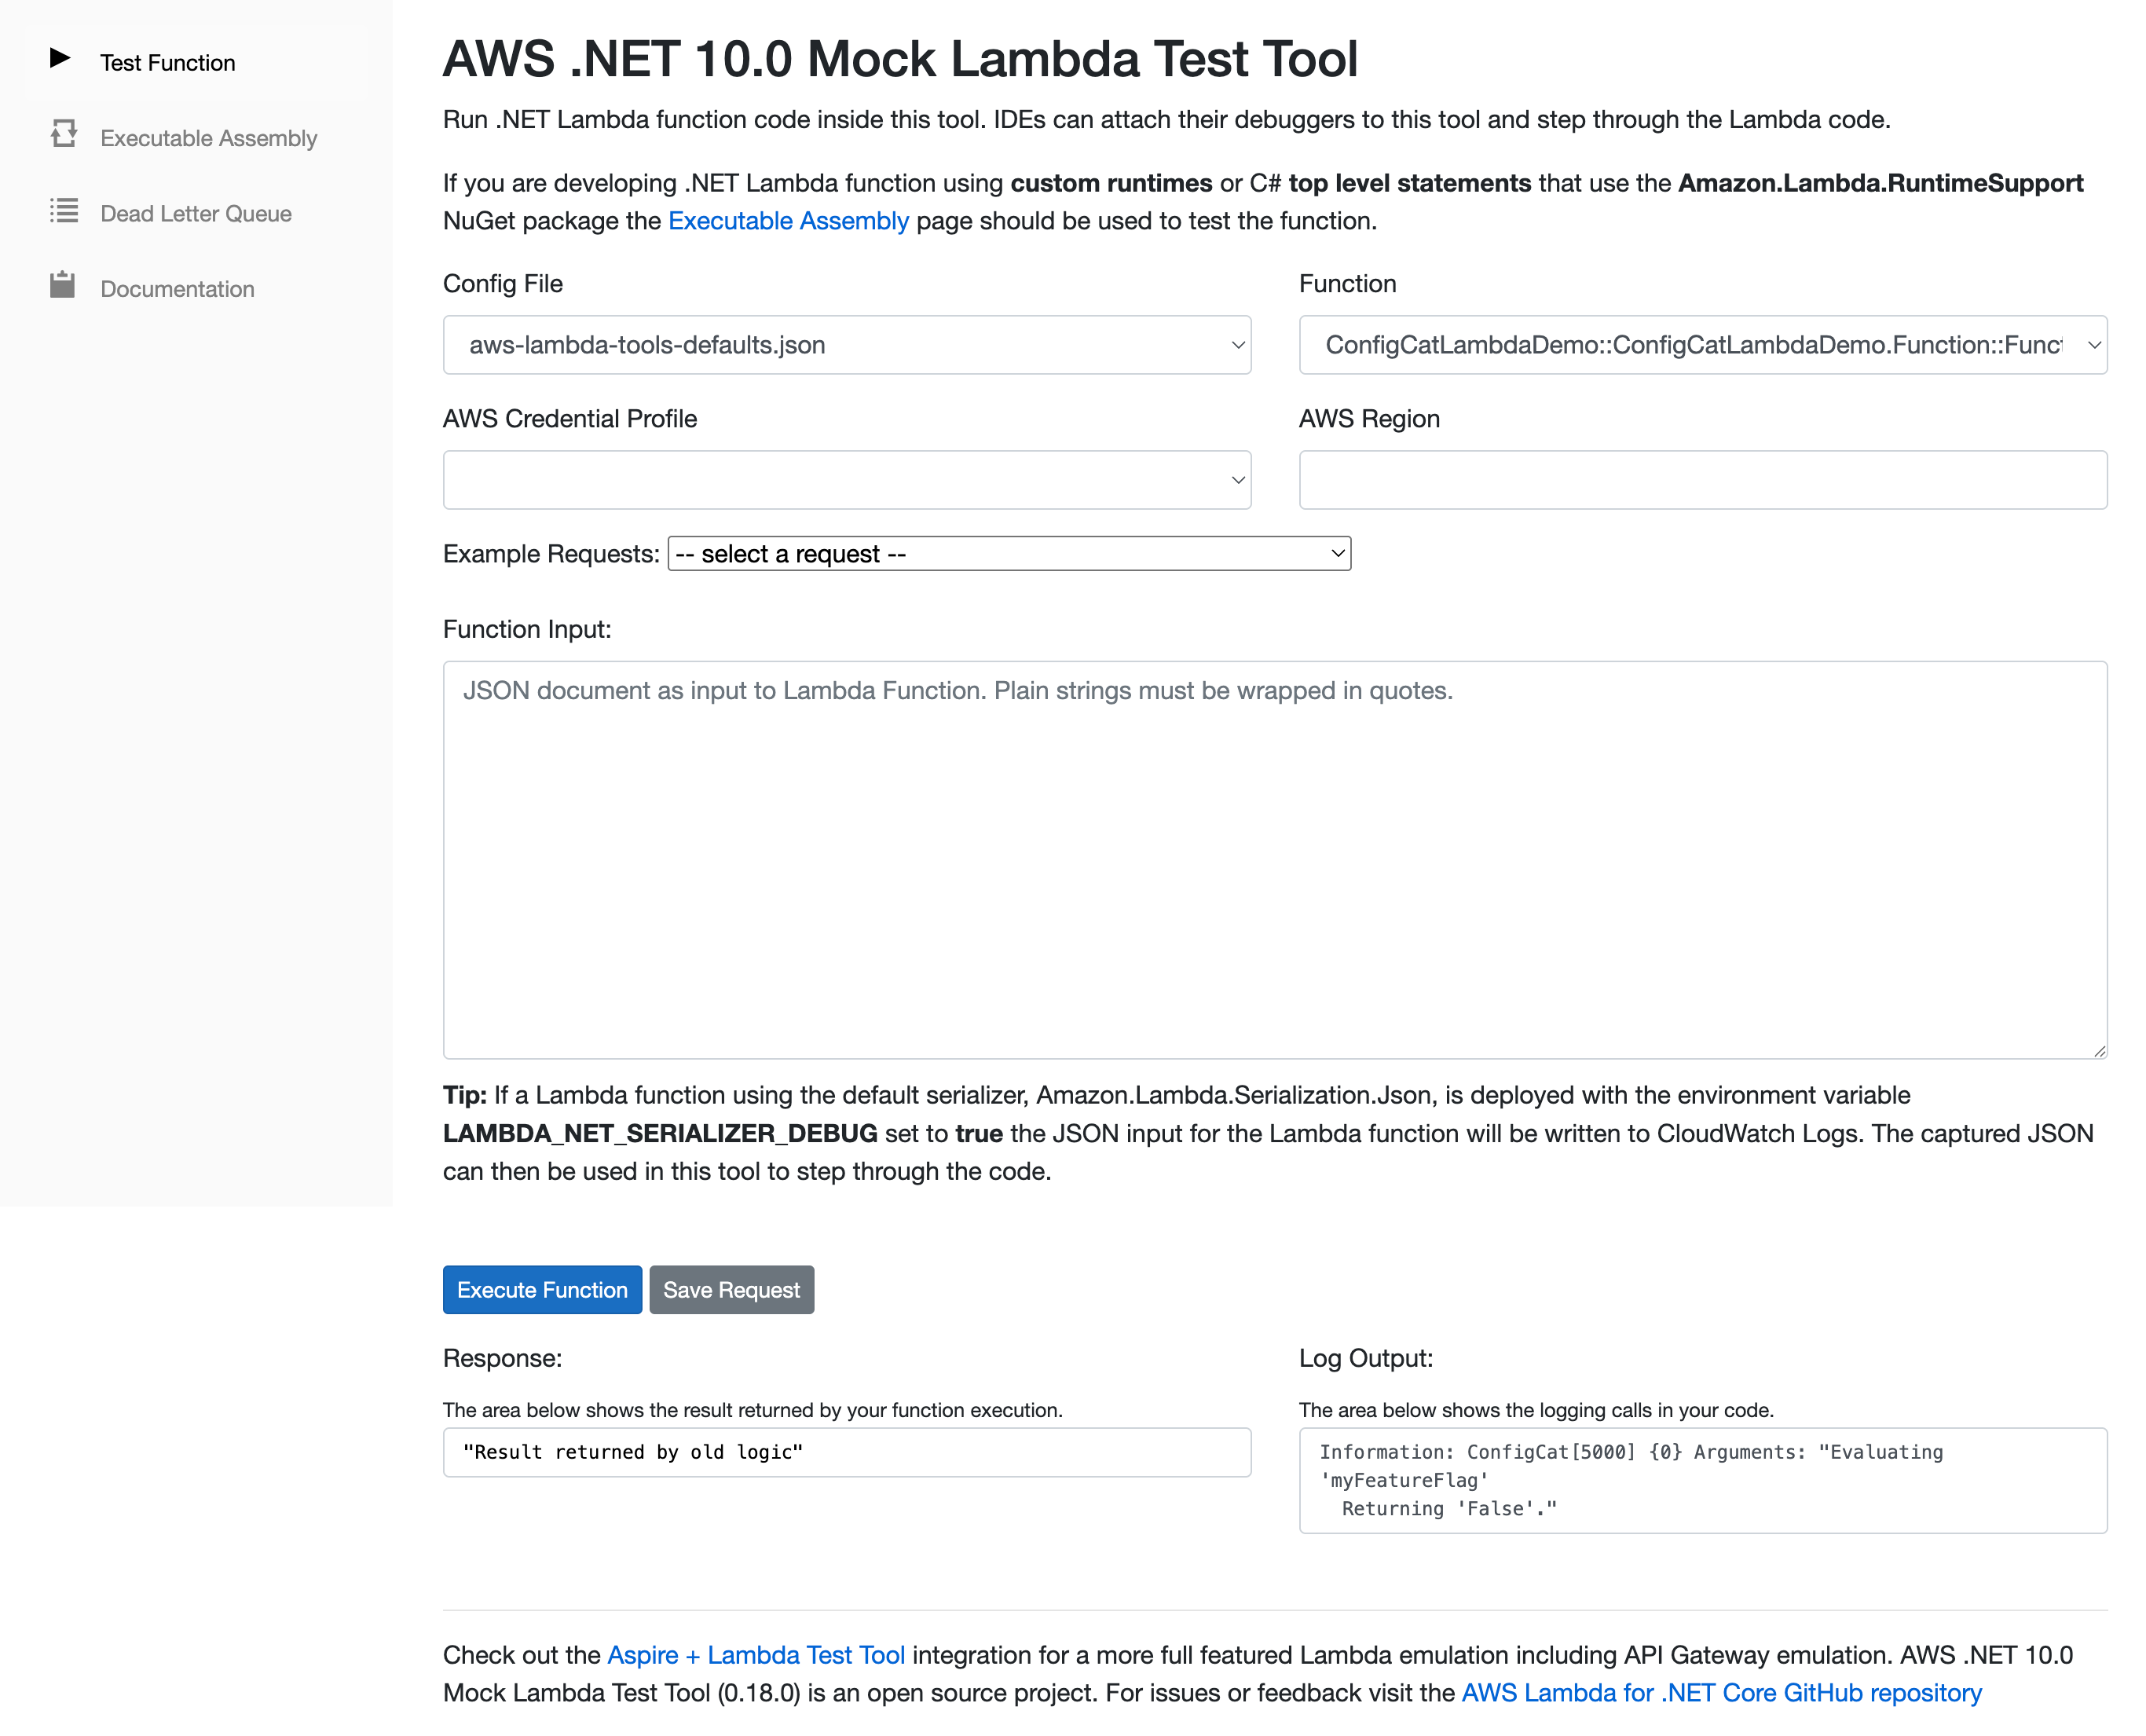
Step 5: Deploying to AWS
Now that our code is ready, we need to push it to AWS. The .NET CLI makes this straightforward with the Amazon Lambda Tools.
-
Install the Lambda Tools (if you haven't installed them):
dotnet tool install -g Amazon.Lambda.Tools -
Deploy the function: Run the following command in your project folder. It compiles your code and uploads it to AWS.
dotnet lambda deploy-function ConfigCatLambdaDemo -
Configure the environment variables: Once deployed, create Lambda environment variables for:
CONFIGCAT_SDK_KEYREDIS_CONNECTION_STRING
-
Test the function: Invoke the deployed function directly from the CLI to see the result immediately:
dotnet lambda invoke-function ConfigCatLambdaDemoSince your feature flag is currently OFF in ConfigCat, you will see the response:
"Result returned by old logic"
Step 6: Verifying Runtime Control
To check that everything works as expected under the hood:
- Log in to your AWS Console.
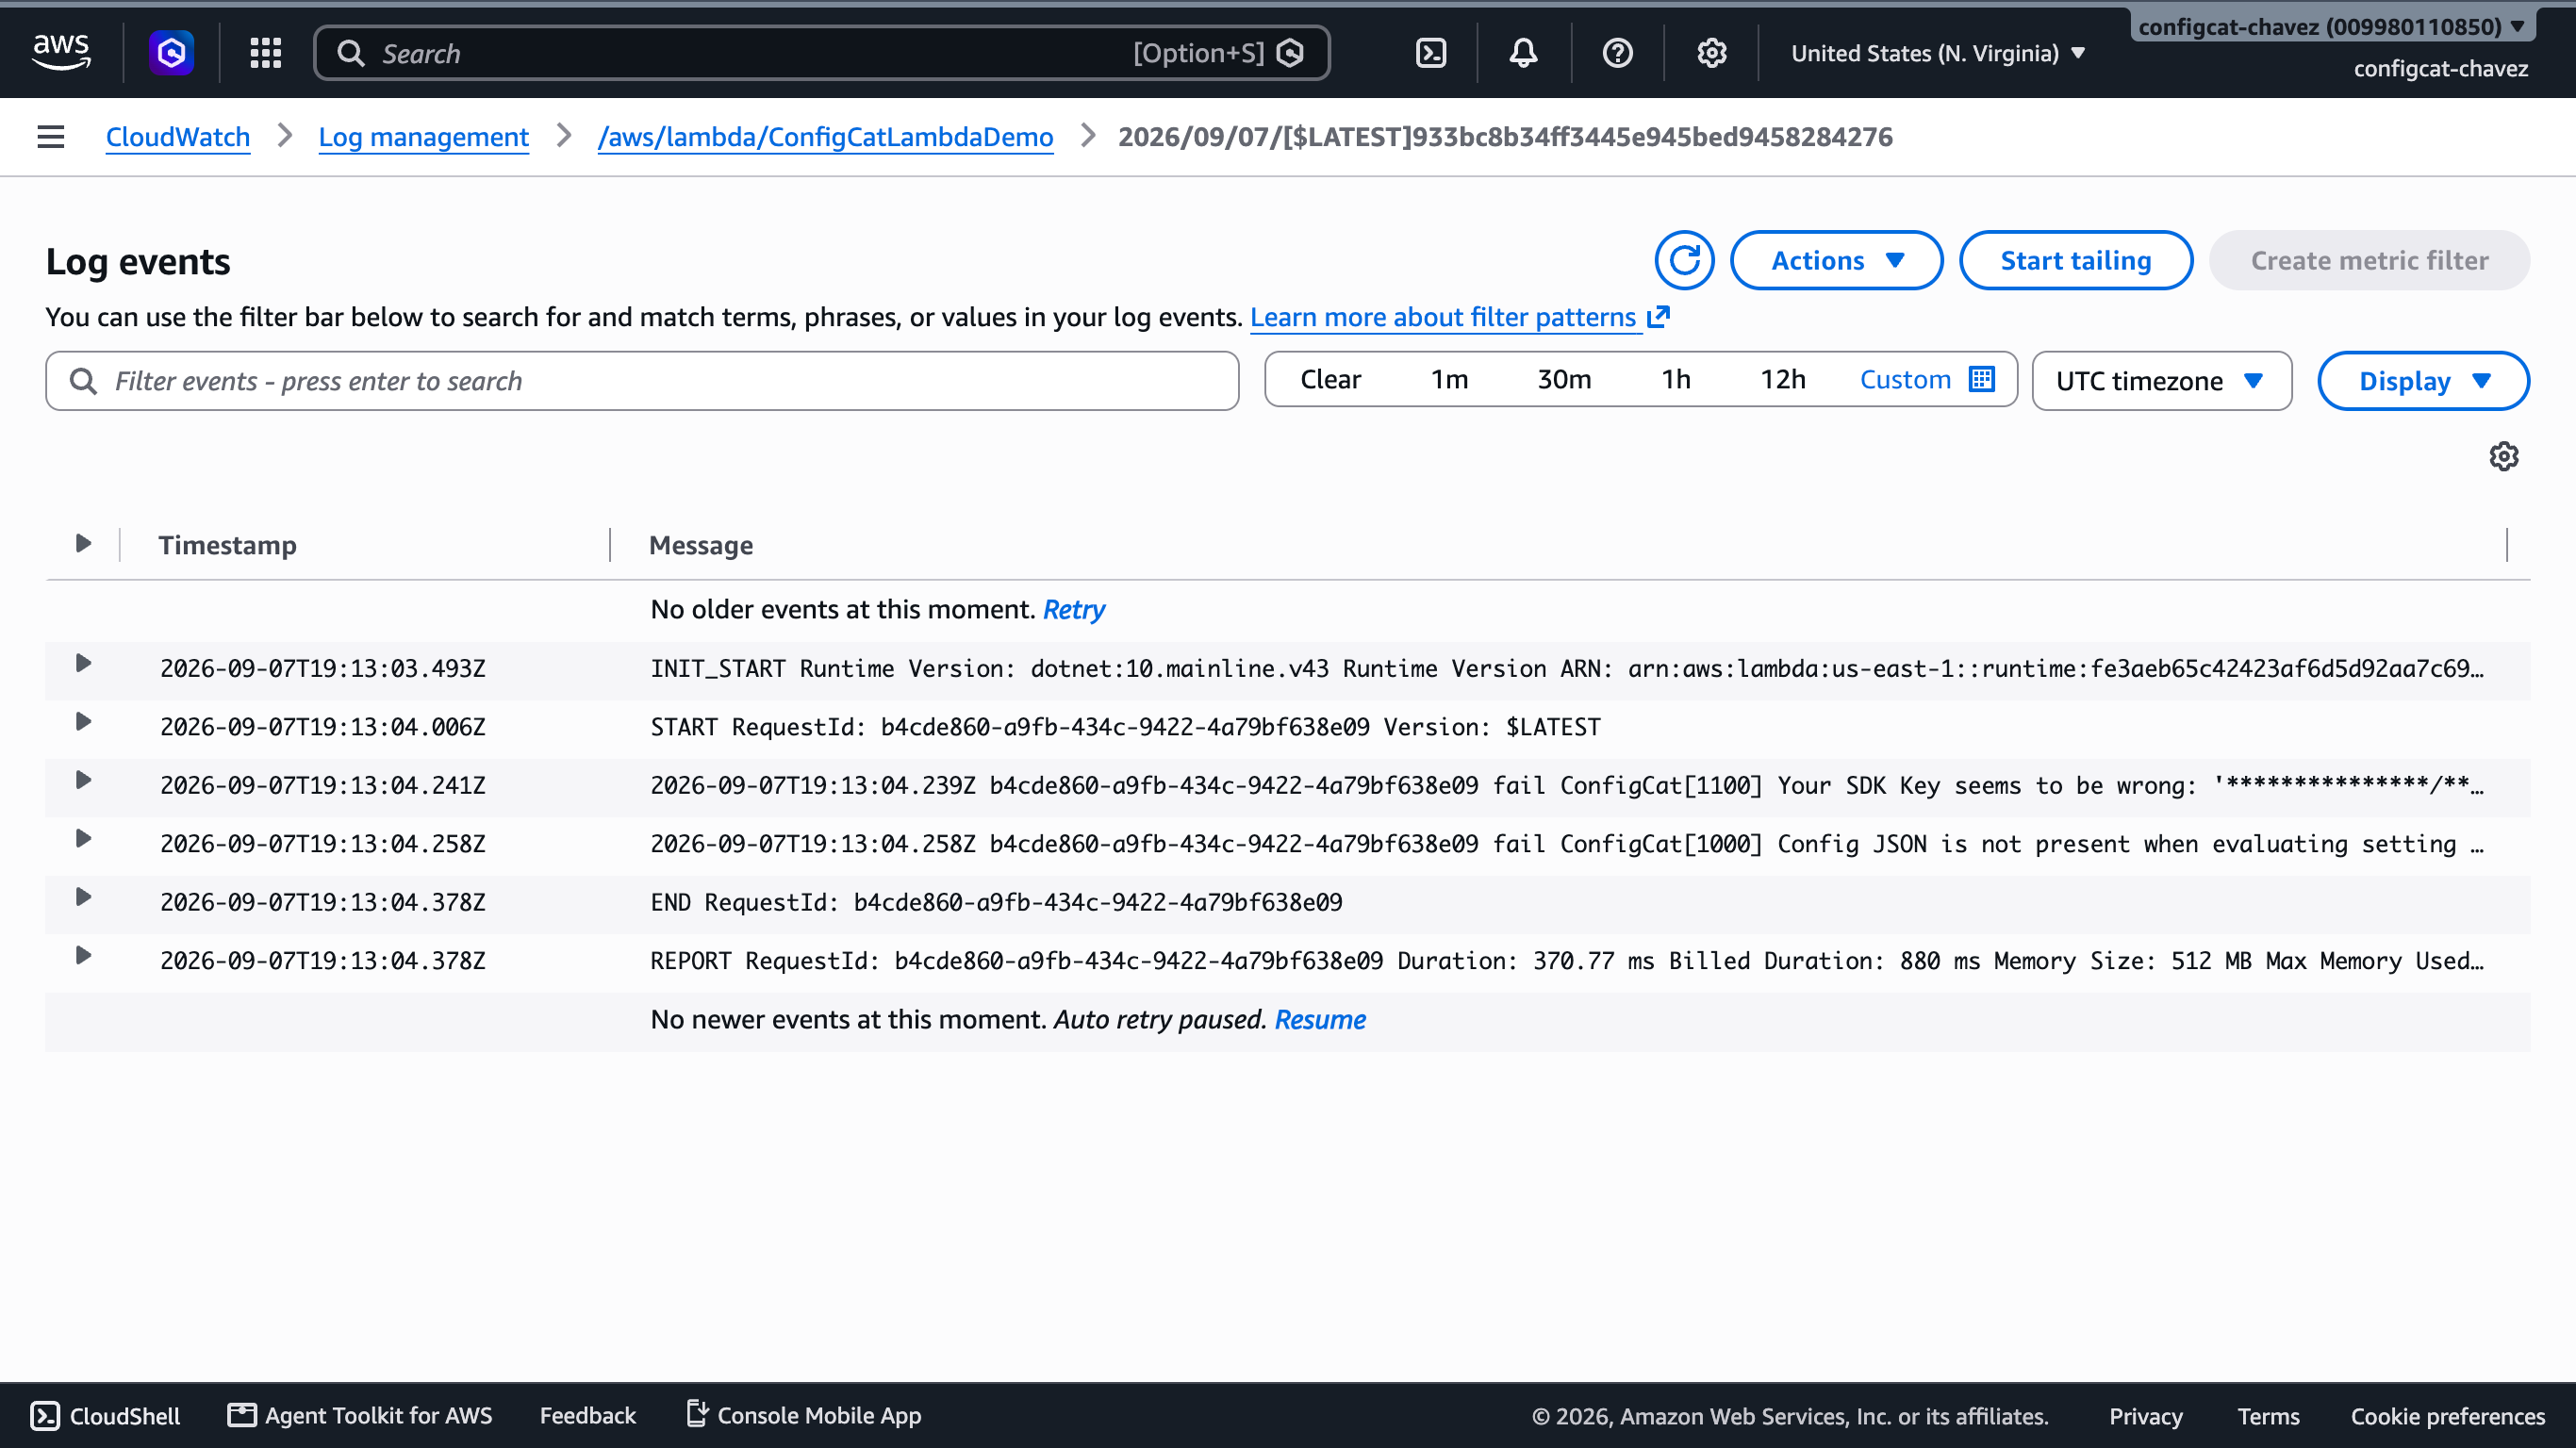
- Navigate to CloudWatch > Logs > Log management.
- Click on
/aws/lambda/ConfigCatLambdaDemo. - You will see the logs generated by your code. Look for warnings or errors to identify any issues.
Once all looks good in the logs, verify that the feature flag works. Go to the ConfigCat Dashboard and toggle the flag ON.
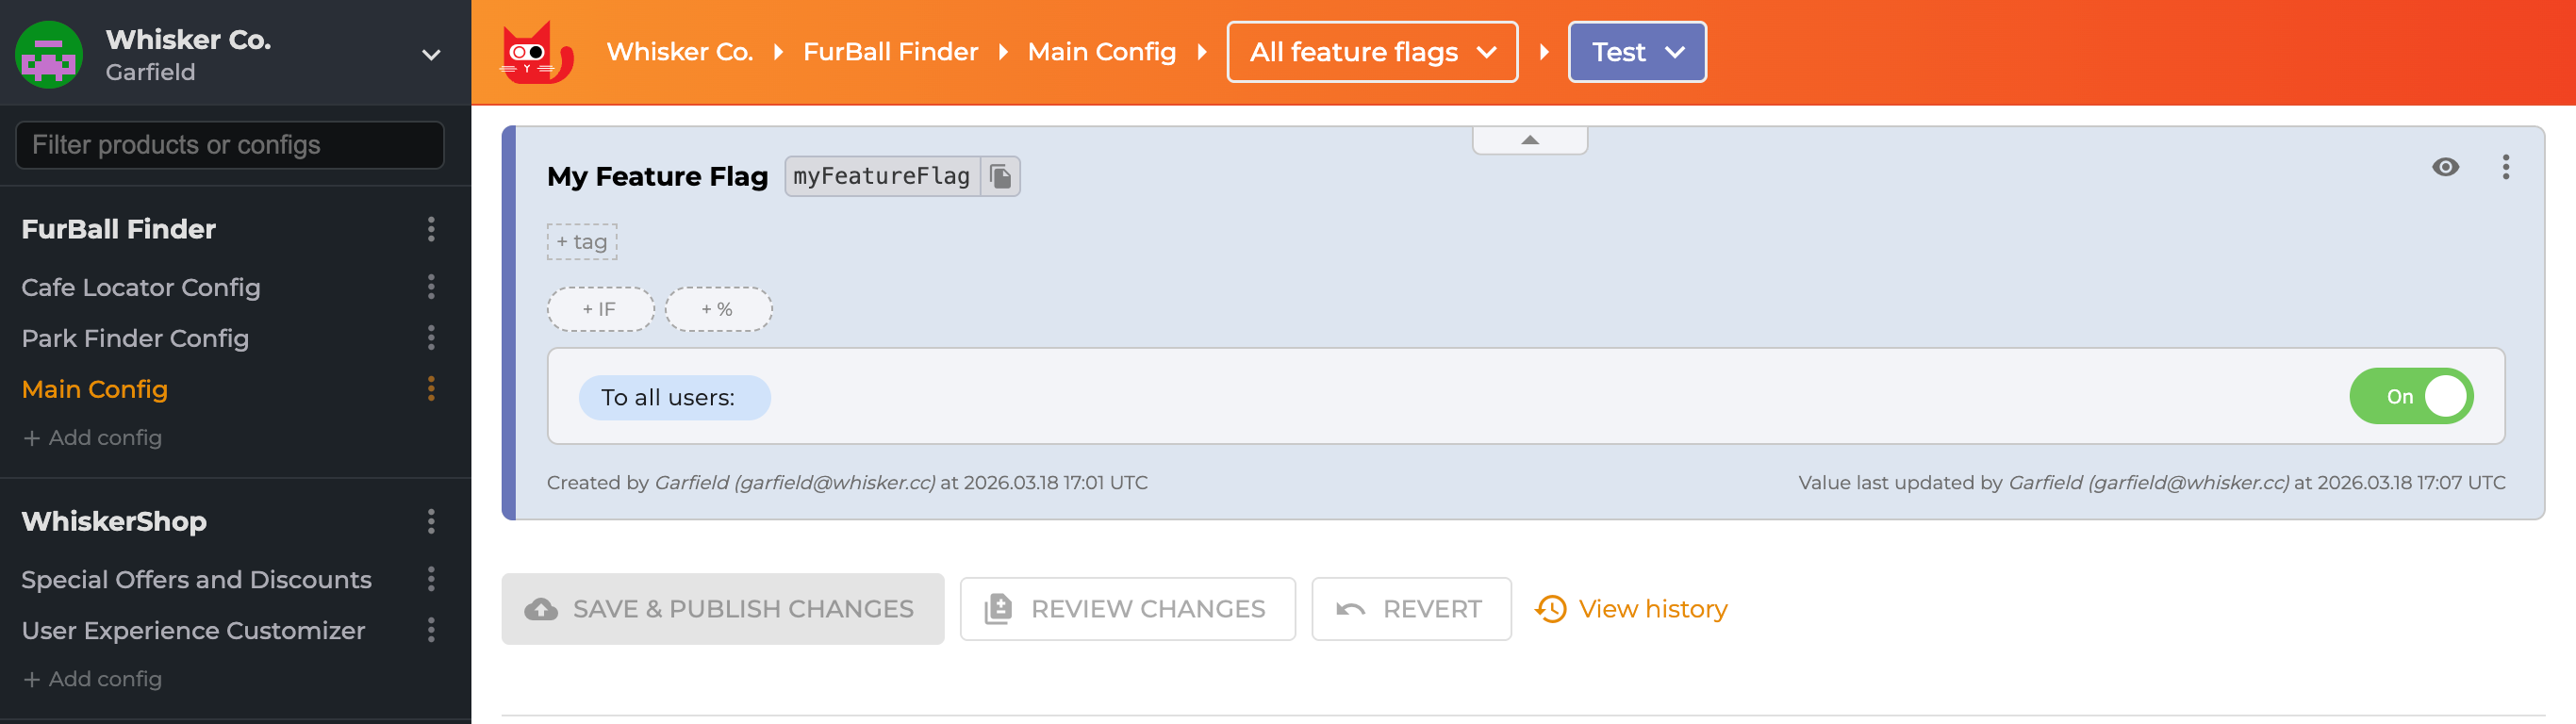
AWS Lambda doesn't listen for ConfigCat updates; it only checks when the function runs. So toggling the flag doesn't instantly change behavior. You need to wait for the cache to expire, then trigger a new execution.
After waiting 60+ seconds, invoke the function again:
dotnet lambda invoke-function ConfigCatLambdaDemo
Then, you will see the response: "Result returned by new logic".
That's runtime control in action; production behavior changed with zero deployments.
Step 7 (Optional): Implementing Progressive Delivery
Imagine the new OCR pipeline from the earlier example is now ready, but you want to validate its accuracy and processing time before sending every document through it.
This is where progressive delivery shines. Start by serving the new flow to 10% of users. If checkout completion rates stay stable and error logs look clean, bump it to 30%, then 70%, then everyone. It's a controlled rollout, sometimes called a canary release.
Traditional setups require custom load balancer logic or proxy configurations to perform canary releases. But ConfigCat handles it with percentage-based rules called percentage options, without code or infrastructure changes.
To start a canary release:
-
Go back to your ConfigCat Dashboard.
-
Find your My Feature Flag feature flag.
-
Instead of changing the main toggle, click the +% button.
-
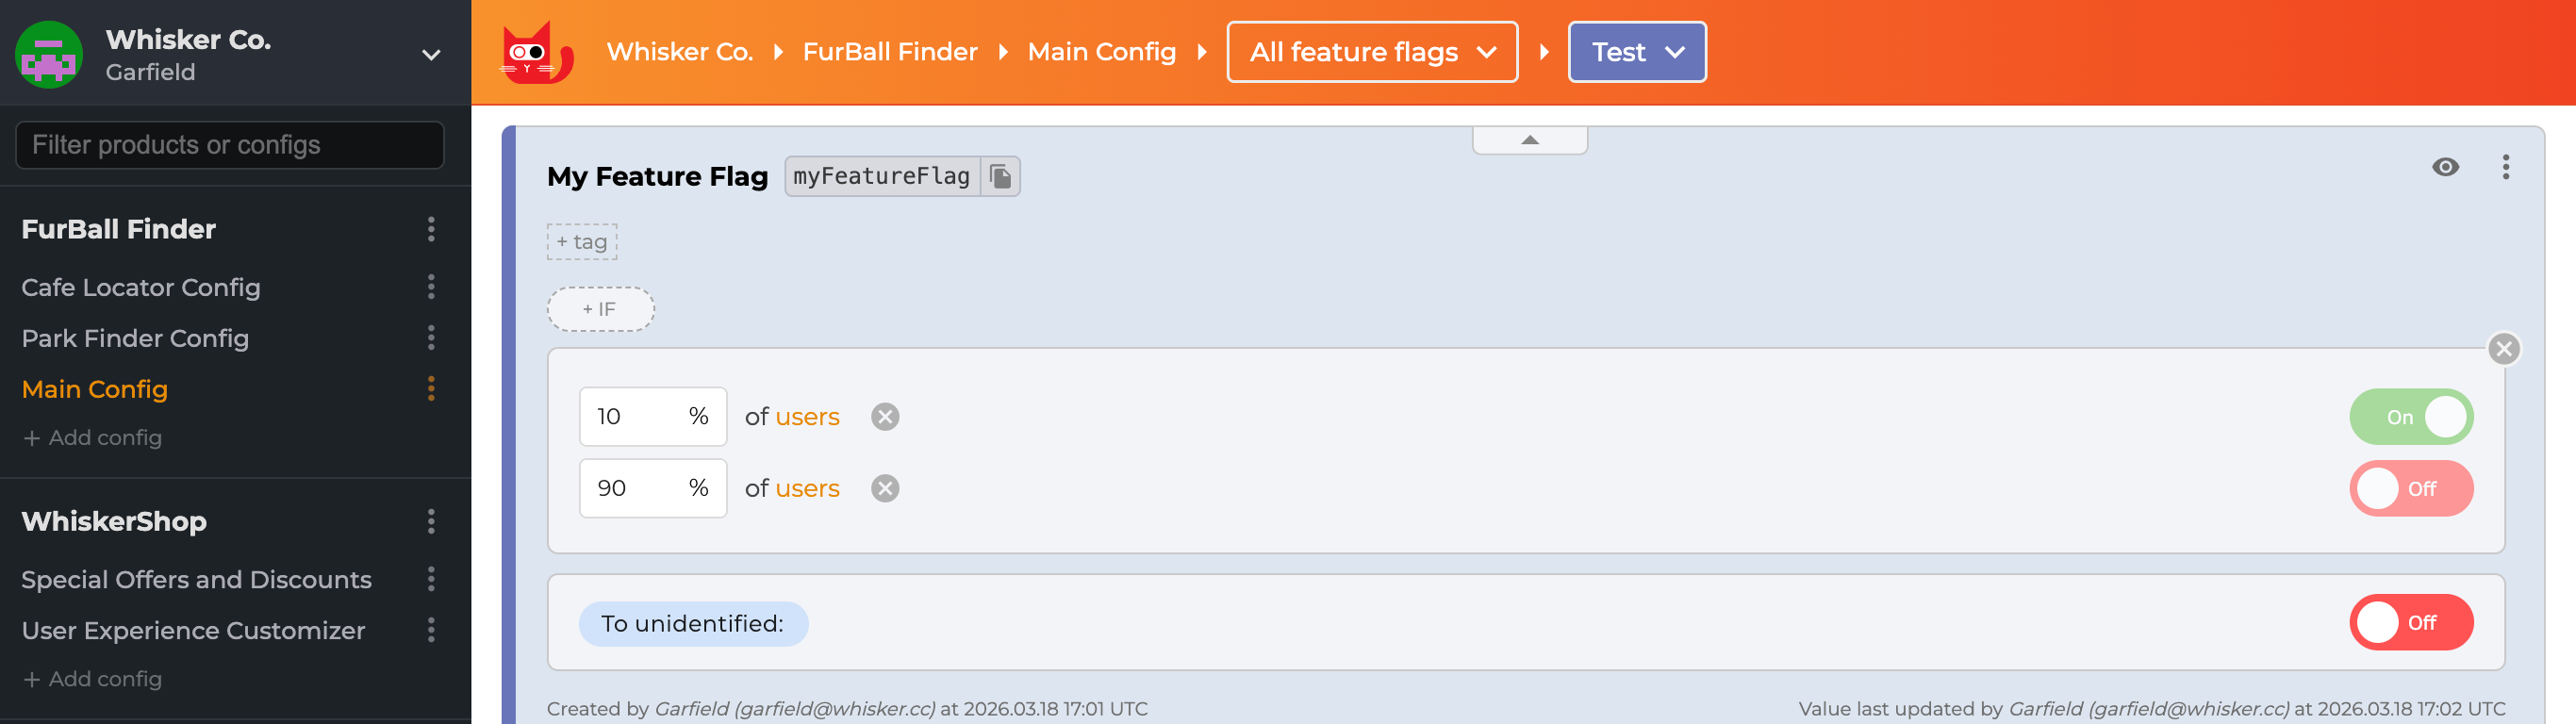
Set the percentage options to serve ON to 10% of users and OFF to the remaining 90%.
-
When invoking the AWS Lambda from your web application, send a unique user identifier with each request. Pass this identifier to the ConfigCat SDK when evaluating the feature flag so the same user is consistently assigned to the same percentage group. Update
Function.csas shown below:Function.cs// existing code...// 1. Add a request classpublic class Request{public string UserId { get; set; } = string.Empty;}public class Function{// existing code...public static async Task<string> FunctionHandler(Request request, // 2. Add the request as an input parameter to the Lambda handler.ILambdaContext context){// 3. Create a ConfigCat User Object using the UserId from the request.var user = new User(request.UserId);// 4. Pass the user when evaluating the feature flag.var isFeatureEnabled = await _configCatClient.GetValueAsync("myFeatureFlag", false, user);if (isFeatureEnabled){return "Result returned by new logic";}else{return "Result returned by old logic";}}} -
Rebuild the project with the
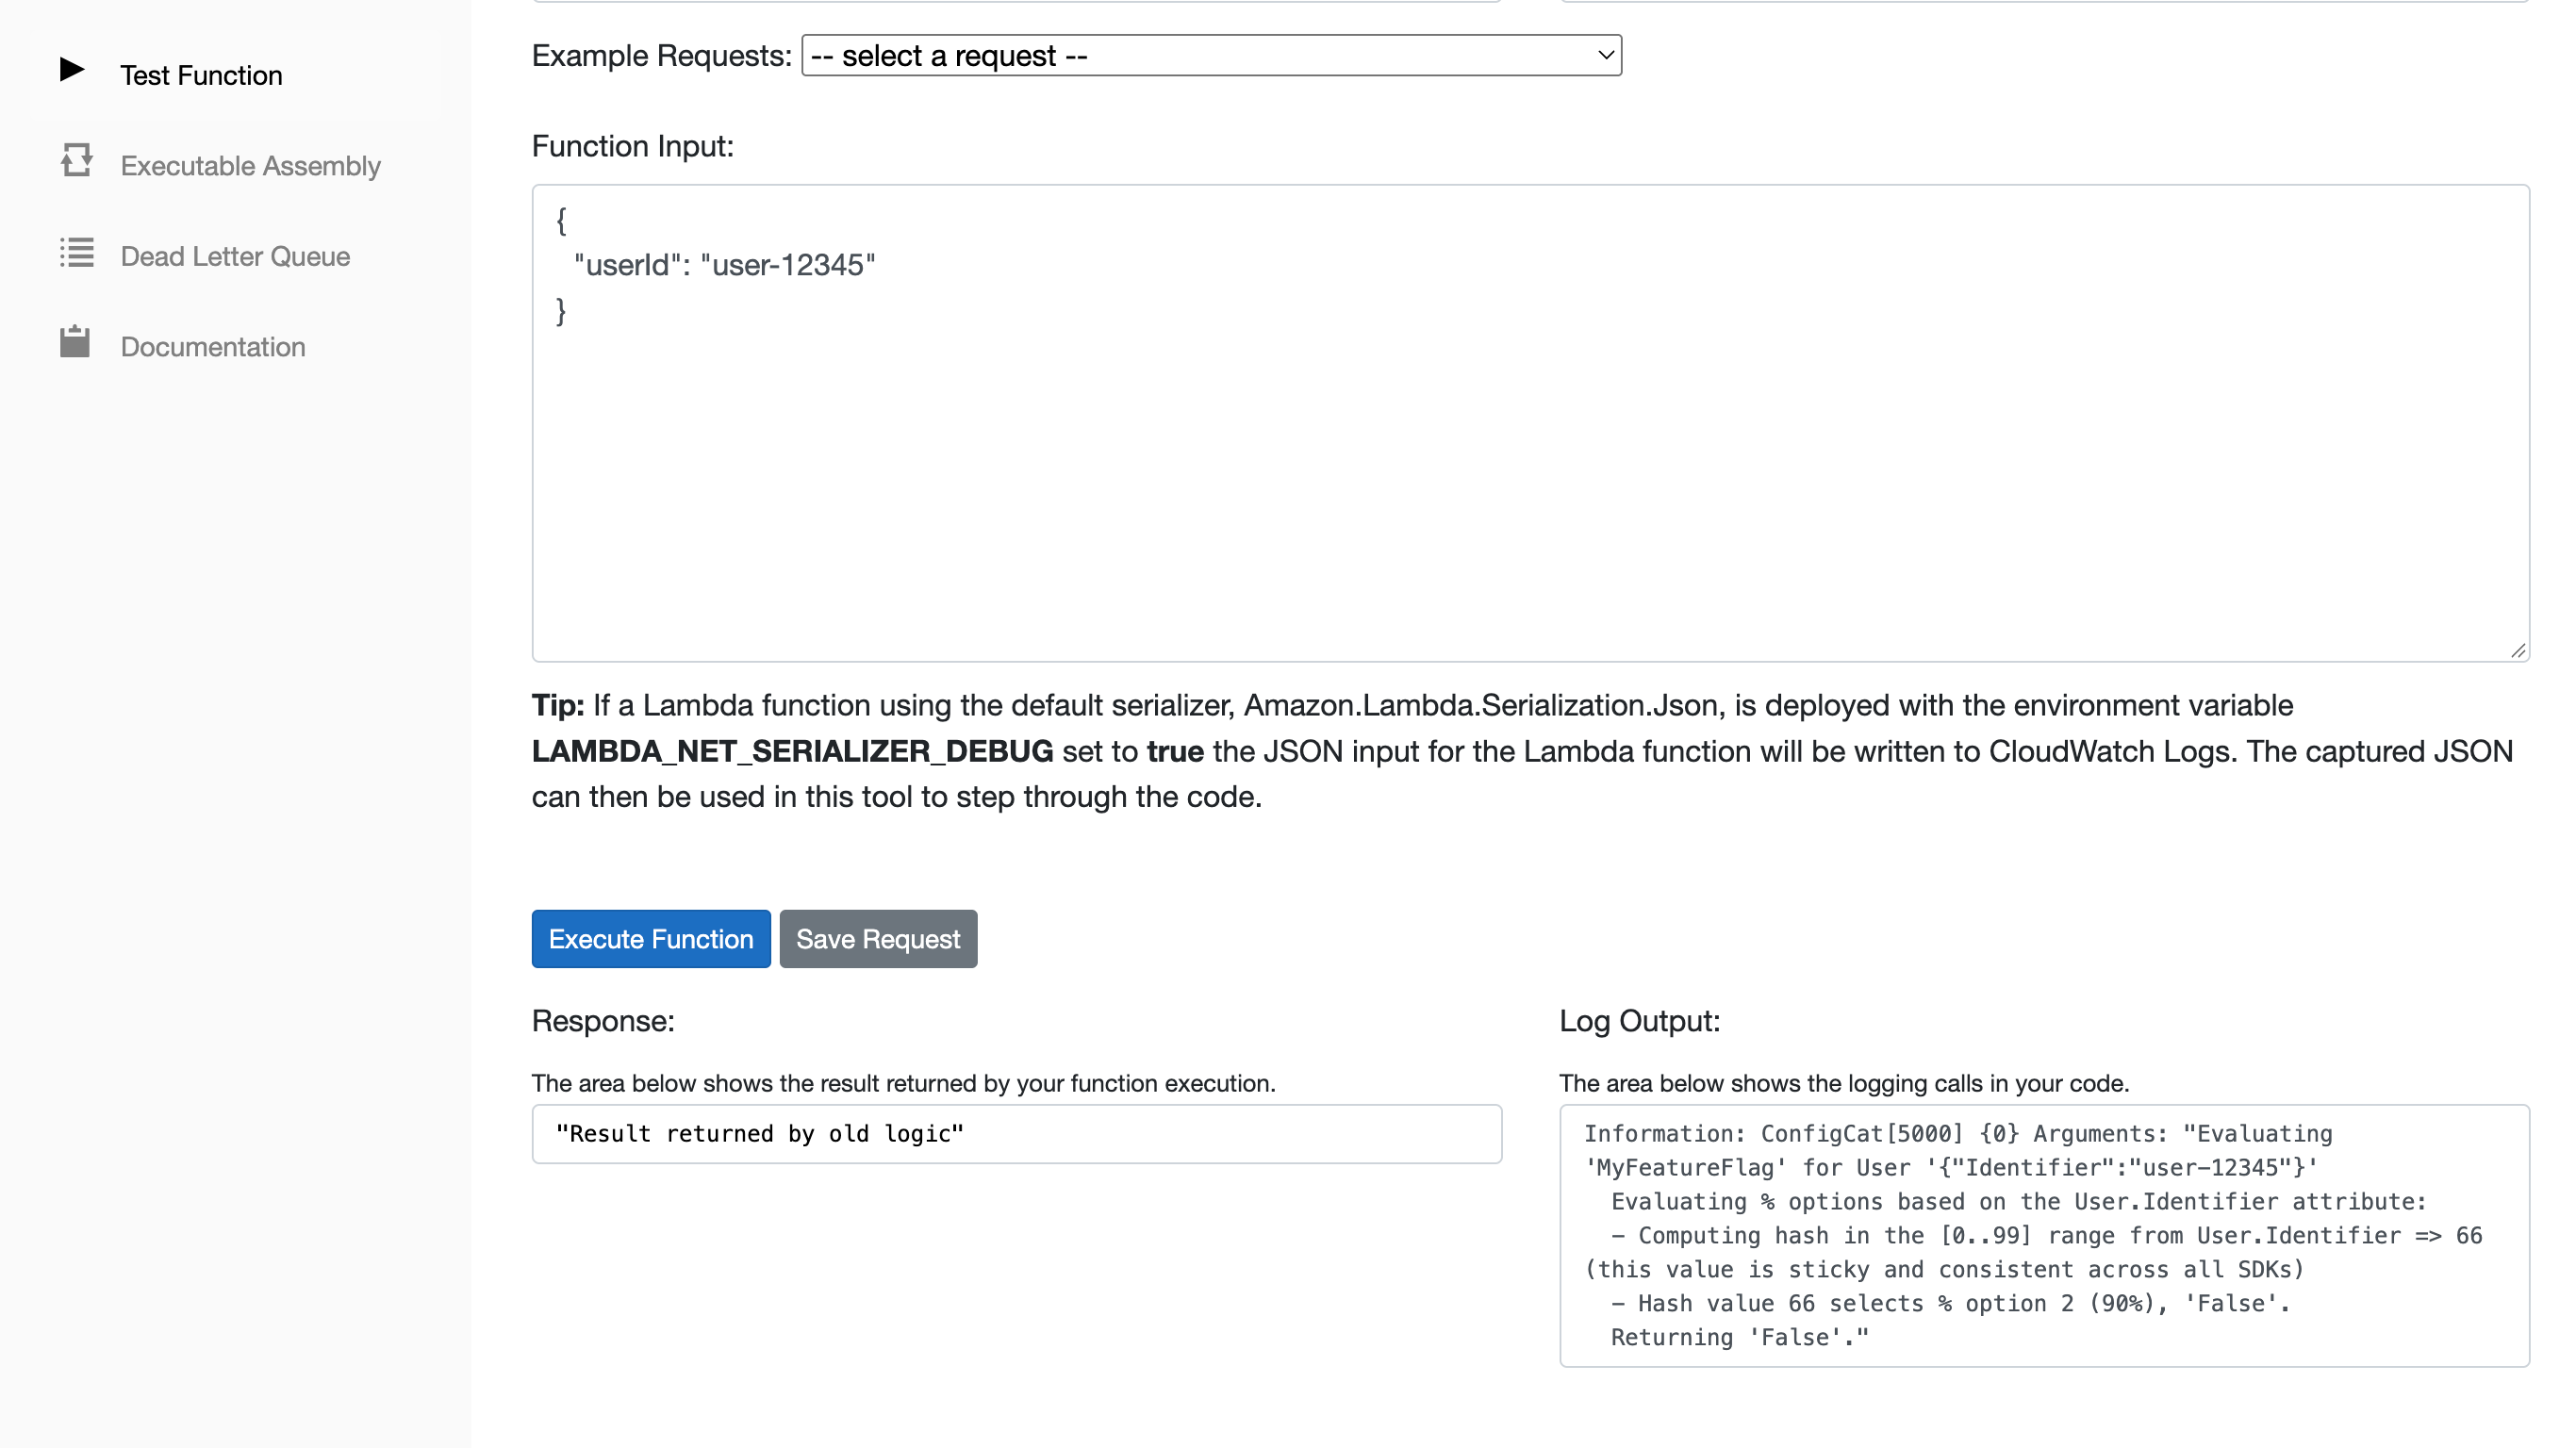
dotnet buildcommand. Then, in the AWS Lambda Test Tool, enter the following JSON in the Function Input.{"userId": "user-12345"} -
Execute the function. The feature flag should evaluate to false for this user, so the function returns "Result returned by old logic".
-
Next, try a different user ID, such as
user-311, and execute the function again. Depending on the percentage bucket assigned to that identifier, the result may differ. The important part is that the same user ID receives a consistent result while the percentage configuration remains unchanged.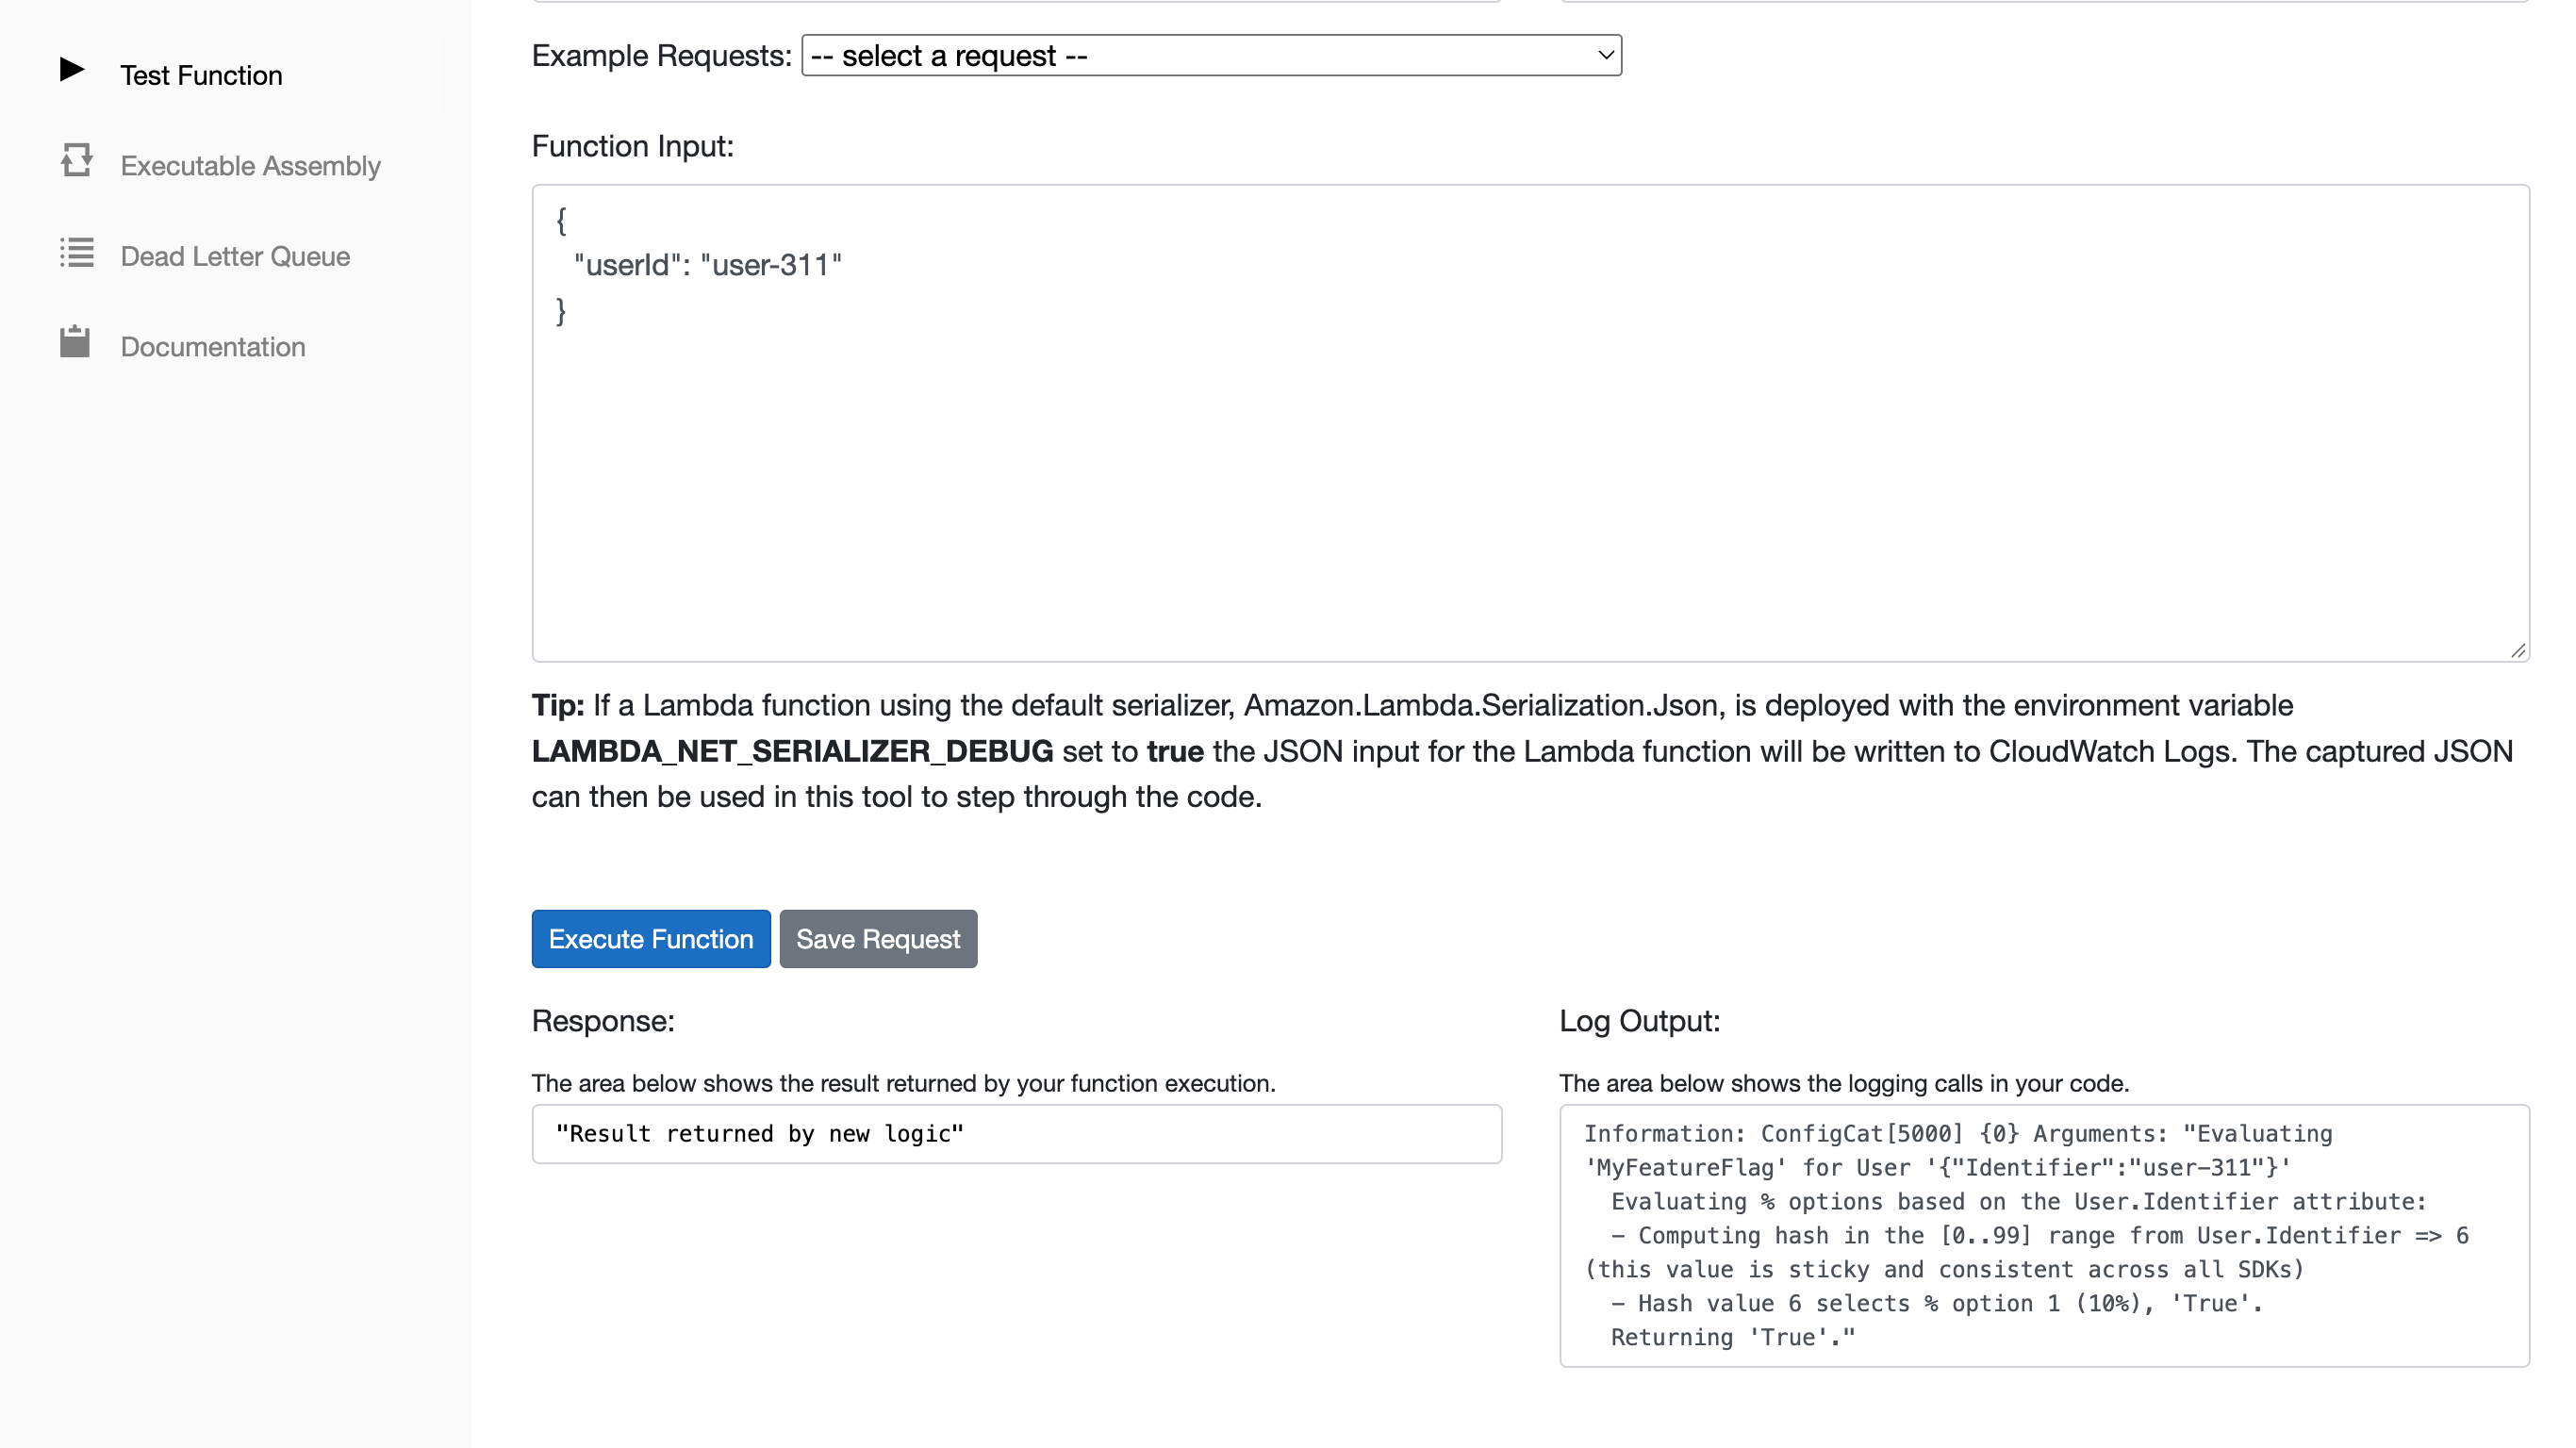
Why Progressive Delivery Works Well with Serverless
The ConfigCat SDK evaluates the percentage options when the Lambda function runs, using the identifier passed in the User Object. The percentage assignment is deterministic, so the same user remains in the same percentage group across requests as long as the percentage configuration stays the same.
Here's what that looks like in practice:
- Watch CloudWatch logs as the feature rolls out
- Errors show up? Only 10% of users are impacted
- Everything stable? Bump the percentage (30% → 50% → 100%) from the ConfigCat Dashboard
Benefits for microservices:
The same approach also helps when services depend on each other. For example, the OCR service can be deployed before the downstream indexing service is ready, while the new pipeline remains disabled behind the feature flag. Once both services are compatible, the feature can be enabled without another deployment.
Feature Flag Best Practices for Microservices and Serverless
When using feature flags in distributed systems, keep the following practices in mind.
-
Choose safe fallback values: The fallback value passed to
GetValueAsyncis returned when the SDK can't retrieve or evaluate the feature flag successfully. Choose a fallback value based on the safest behavior for that specific feature rather than assumingfalseis always the right default. -
Clean up old flags: Most teams use feature flags to manage and release a new feature. Once you've hit 100% rollout and the feature is stable, remove the flag from your code. The Zombie Flag Report and the Code References tool help you identify stale flags in your code before they become technical debt.
-
Choose an appropriate cache duration: This example uses a 60-second cache lifetime. A shorter interval lets configuration changes propagate sooner, while a longer interval reduces refresh frequency. Choose a value that fits your requirements for configuration freshness and network activity.
Conclusion
Feature flags give serverless applications a layer of runtime control that deployment alone doesn't provide.
In this tutorial, you added ConfigCat feature flags to a .NET AWS Lambda function, configured Lazy Loading, used Redis as a shared cache, and changed the function's behavior without redeploying it. You also passed a User Object to the SDK so the same implementation can support consistent percentage rollouts. This gives you a practical progressive delivery workflow: deploy the code, expose the new behavior gradually, monitor the results, and reduce or disable exposure if something goes wrong.
This approach enables:
- Safer deployments
- Progressive rollouts
- Instant rollback capabilities
- Smoother collaboration across teams
Whether you're running microservices on Kubernetes or serverless workloads on AWS Lambda, feature flags provide a flexible way to release software with confidence.
Beyond .NET, ConfigCat provides a wide range of SDKs for other platforms, including Node.js, Python, Go, and Java. All of these work seamlessly with AWS Lambda runtimes. To learn more, check out ConfigCat's official documentation.
To get more posts like this and the latest updates, follow ConfigCat on X, Facebook, LinkedIn, GitHub, and the News & Product Updates page.