How to Use Feature Flags in Unity


Want to test a new gameplay feature in Unity without releasing it to every player? Feature flags let you enable or disable functionality, gradually roll out updates, and test new features with specific groups of players, all without deploying a new build.
In this tutorial, you'll learn how to use feature flags in Unity with C# and ConfigCat's .NET SDK. We'll use a simple game where a feature flag controls a robot's ability to automatically jump onto boxes, and you'll see how to enable or disable this behavior directly from the ConfigCat Dashboard.

What Is Unity?
Unity is a cross-platform game engine used to develop 2D and 3D games for desktop, mobile, console, and web platforms. It uses C# for scripting, allowing developers to integrate tools like ConfigCat's .NET SDK to control gameplay features through feature flags.
Why Use Feature Flags in Unity?
Feature flags, also known as feature toggles, let developers control which features are available in a game without changing or redeploying its code. Instead of releasing a feature to every player at once, you can enable it for a smaller group, monitor how it performs, and gradually make it available to more players.
In Unity game development, feature flags can be particularly useful for:
- Testing new character abilities: enable a new movement mechanic or special ability for a small group of players before releasing it to everyone.
- Gradually rolling out gameplay features: introduce new functionality to a percentage of players, monitor its performance, and expand the rollout when you're confident it's working as expected.
- Managing seasonal events: activate or deactivate limited-time events without publishing a new game build, as long as the required content is already included in the game.
- Disabling problematic features: turn off an unstable feature while investigating an issue, without having to roll back an entire game update.
Feature flags are also a form of remote configuration. Rather than hardcoding every gameplay setting, developers can control existing functionality through configuration values retrieved by the game.
In this tutorial, we'll keep things simple by using a boolean feature flag to control whether the Player Robot can automatically jump onto boxes.
Getting Started
For this tutorial, we'll be using ConfigCat's .NET SDK to integrate a feature flag in Unity via a C# script.
We'll work with an existing Unity sample project that includes a controllable robot and several boxes. This lets us focus on implementing feature flags rather than building the game mechanics from scratch.
Prerequisites
- A computer that meets the system requirements for Unity.
- Unity Hub and the Editor for Unity 6.6 (6000.6) installed.
- Visual Studio Code with the C# Dev Kit and Unity extensions installed.
- The Microsoft .NET SDK installed.
- The ConfigCat .NET SDK version 10.0.0.
- Git installed to clone the sample project.
- A ConfigCat account to create and manage feature flags.
Launch the Unity demo project
First, let's play the sample game to see how the robot behaves before we add the feature flag.
You can see the complete source code on GitHub.
-
In a new directory, clone the sample Unity project from GitHub with the following command:
git clone -b starter-code https://github.com/configcat-labs/feature-flags-in-unity-sample.git -
Open Unity Hub, click Add > Add project from disk, select the cloned
feature-flags-in-unity-samplefolder, and open the project in Unity.infoTo ensure that your Unity editor looks the same as the one shown in this tutorial, it is recommended that you use the Default layout. In the top-right corner of the editor, click the Layout dropdown and select Default.
-
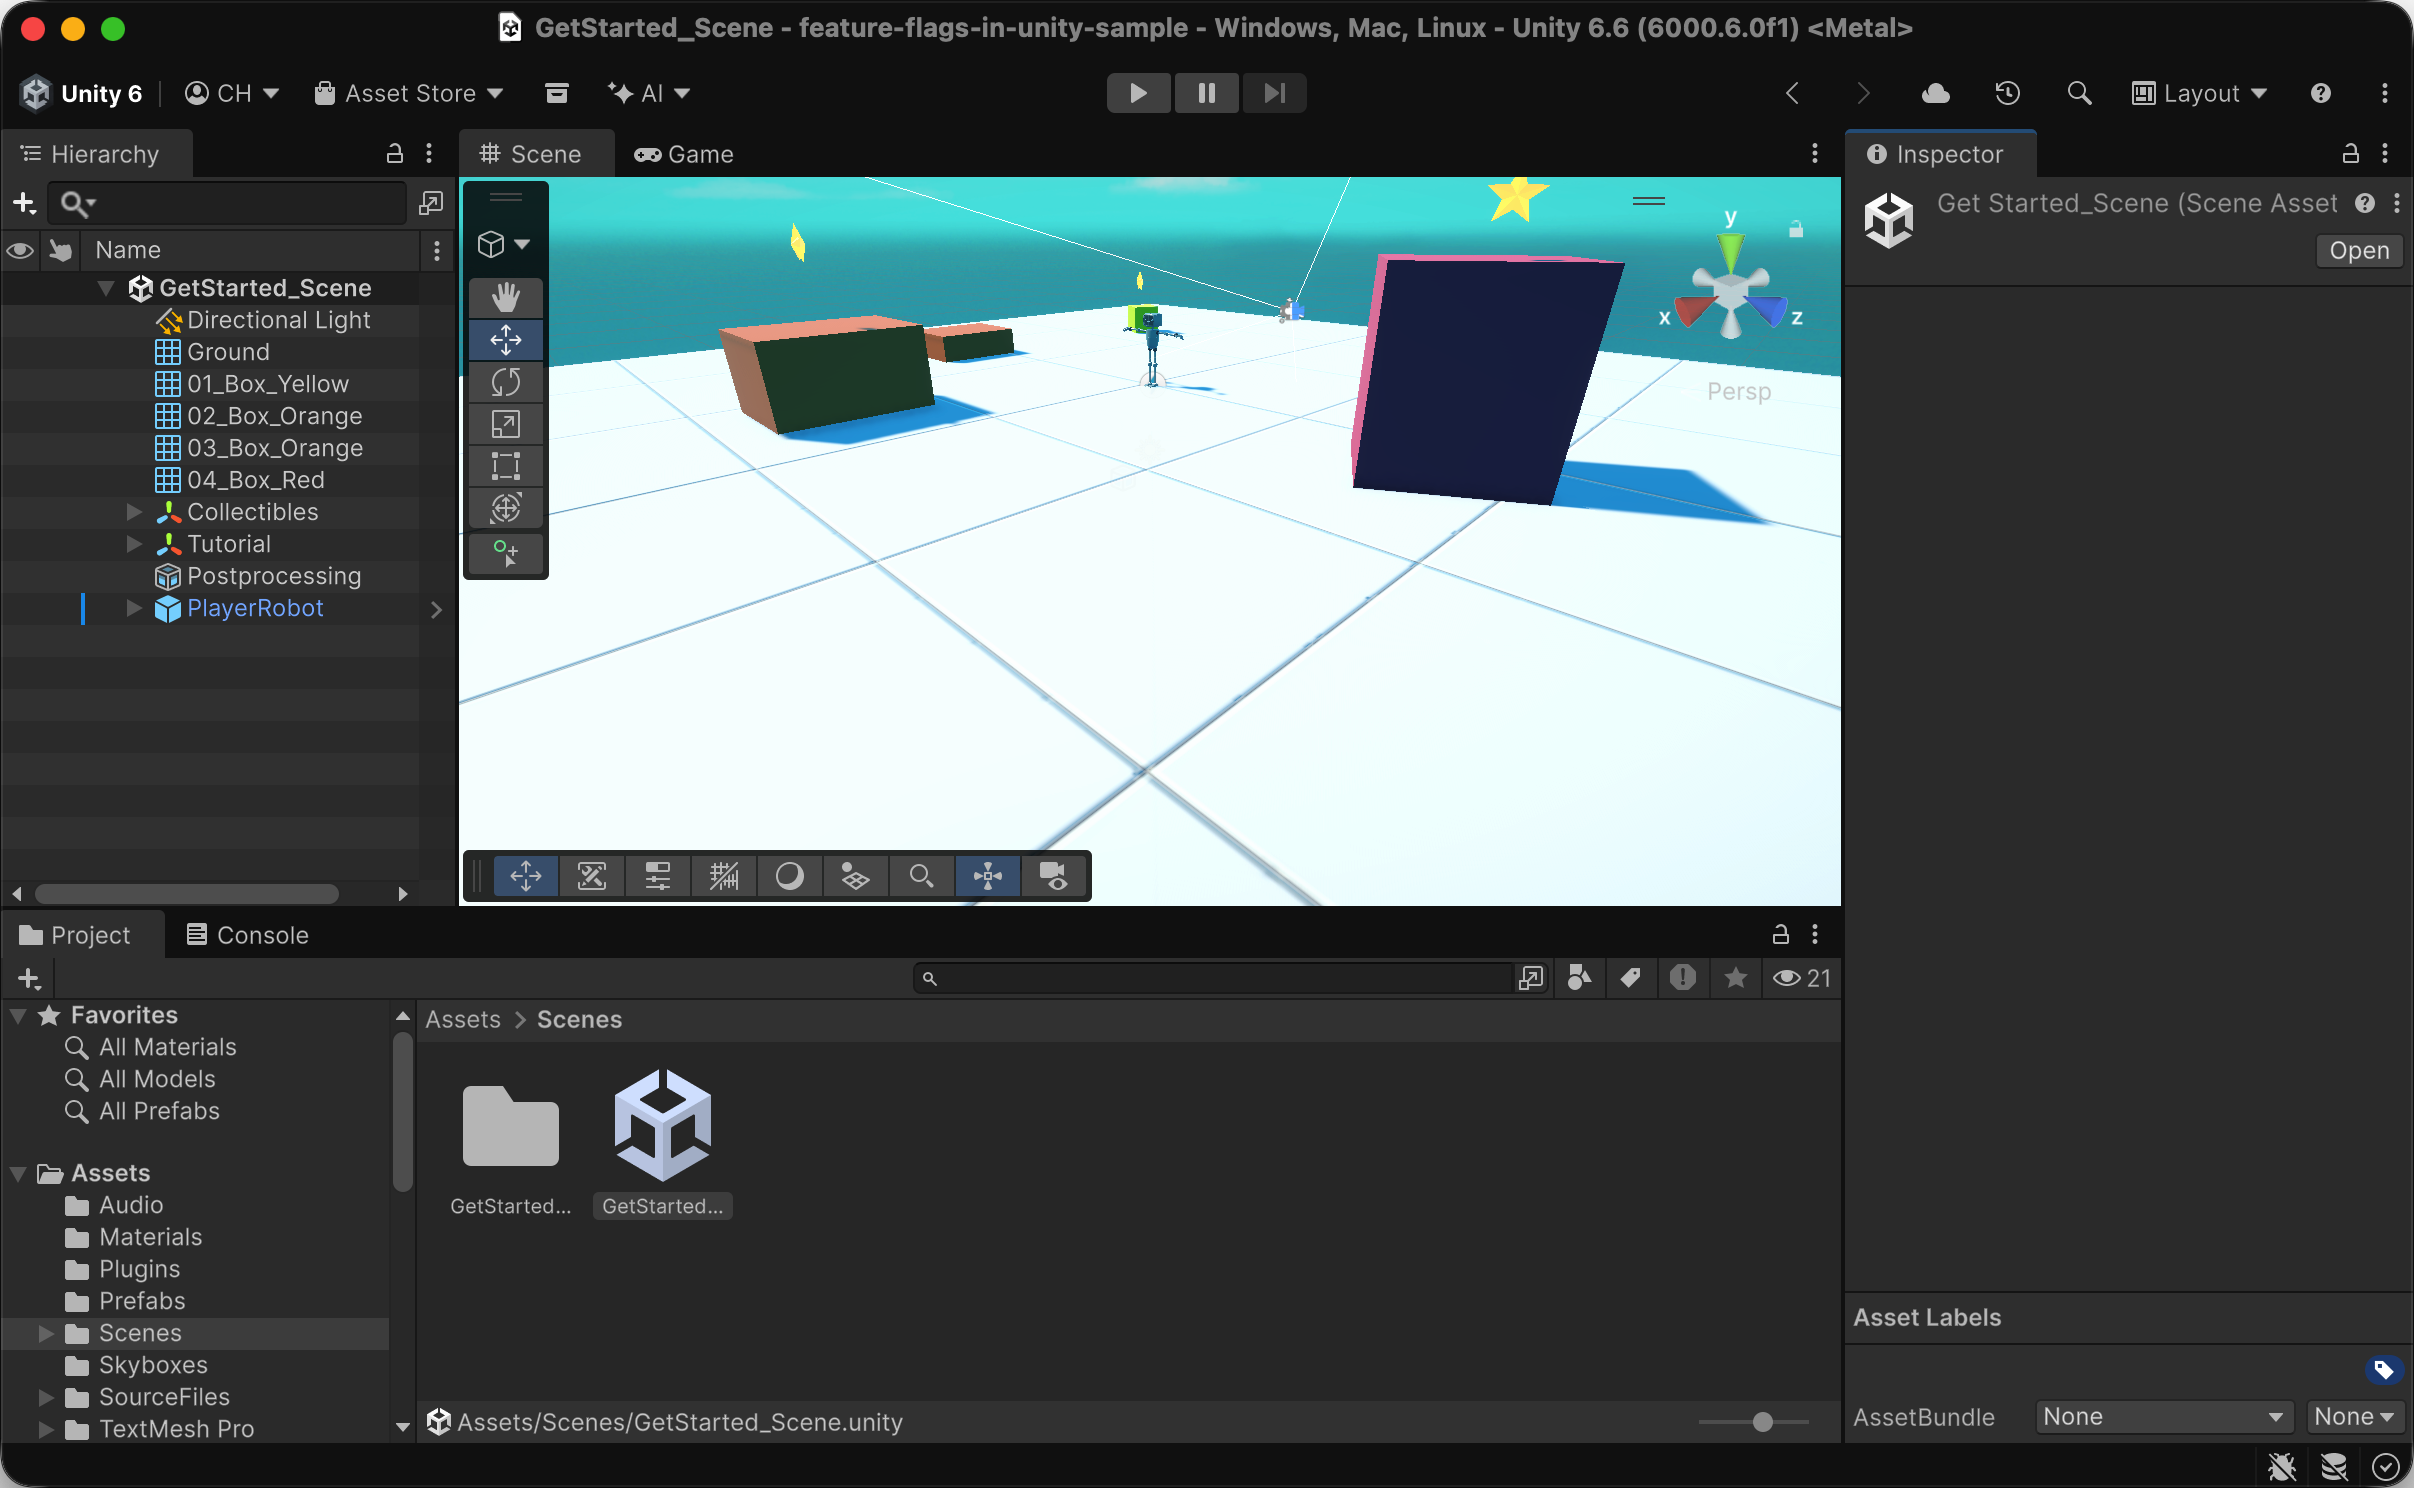
In the Project window, go to Assets > Scenes and double-click GetStarted_Scene to open it.
-
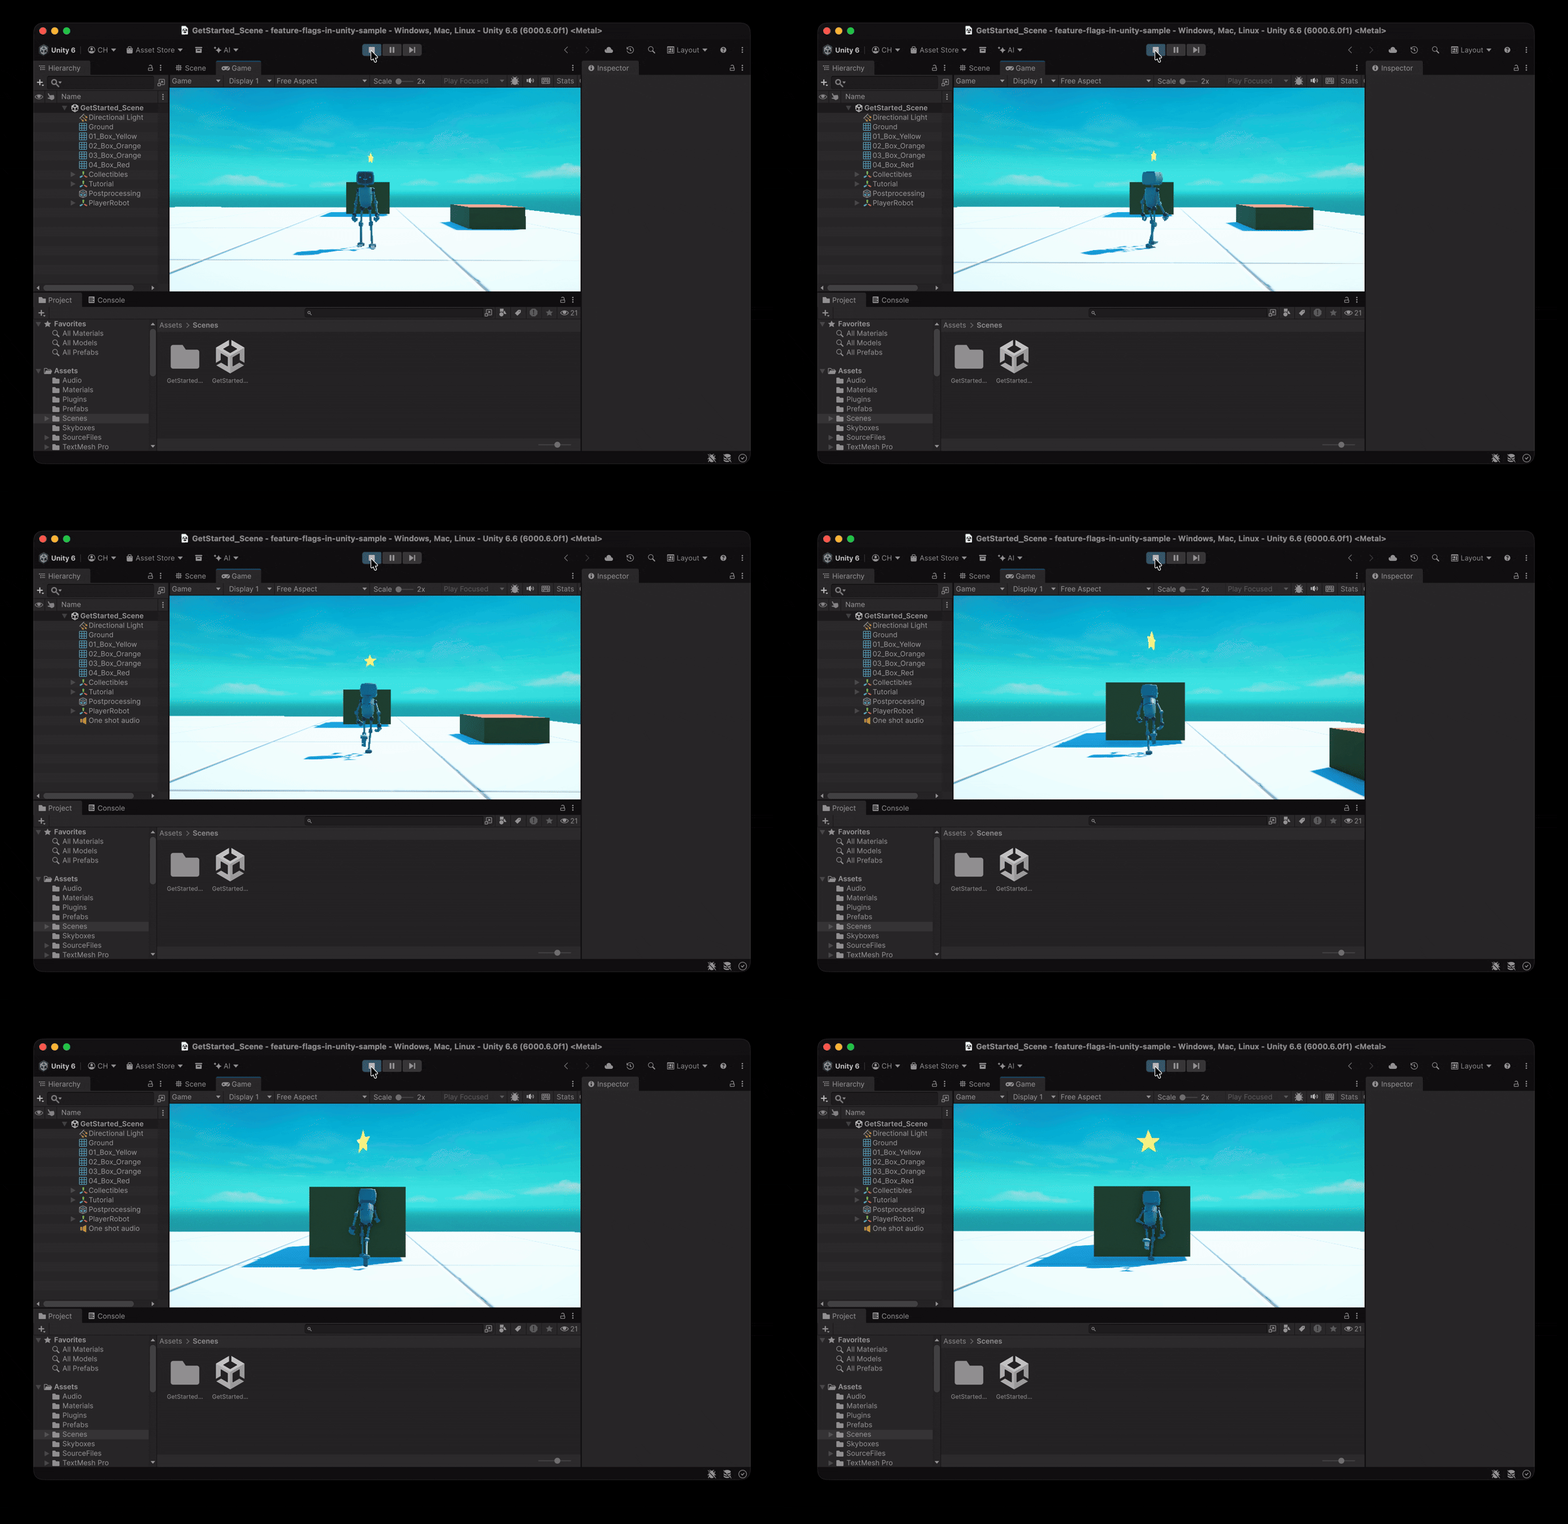
Play the game by pressing the Play button at the top. Use the arrow keys or WASD keys to move the Player Robot toward the boxes (hold Shift to run). Currently, the robot can't automatically jump onto the boxes. We'll add this ability and use a ConfigCat feature flag to control whether it's enabled.
Install the ConfigCat .NET SDK in Unity
Unity uses C# for scripting, but unlike a standard .NET project, it doesn't provide built-in NuGet package management. To use ConfigCat's .NET SDK in Unity, we'll first prepare the required assemblies and then import them into our project.
This will allow our Unity scripts to communicate with ConfigCat and evaluate feature flags during gameplay.
-
Create a file named
Plugins.csprojanywhere on your computer with the following code:<Project Sdk="Microsoft.NET.Sdk"><PropertyGroup><TargetFramework>netstandard2.0</TargetFramework></PropertyGroup><ItemGroup><PackageReference Include="ConfigCat.Client" Version="10.0.0" /></ItemGroup></Project> -
With your terminal opened in the same directory as the file above, run the following command to publish the project. This will generate all the necessary
.dllfiles in thebin/Release/netstandard2.0/publishfolder.dotnet publish -c Release -
Create a folder named
Pluginsin your Unity project'sAssetsfolder, then copy the contents of the/publishfolder above into it (except for thePlugins.*files). Unity will import the assemblies, making the ConfigCat SDK available to your C# scripts.
Create a Loading Scene
Feature flag services usually require an initialization step in which the SDK fetches feature flag data from a remote server. Because this involves network communication, it's inherently asynchronous and takes time.
ConfigCat is no exception. Although its SDK offers synchronous feature flag evaluation, asynchronous initialization is still required. The startup logic must wait for this operation to complete; otherwise, the game would start running with hard-coded defaults instead of actual feature flag values.
The standard way to address this is a loading screen that is displayed until the ConfigCat client finishes initializing.
Follow these steps:
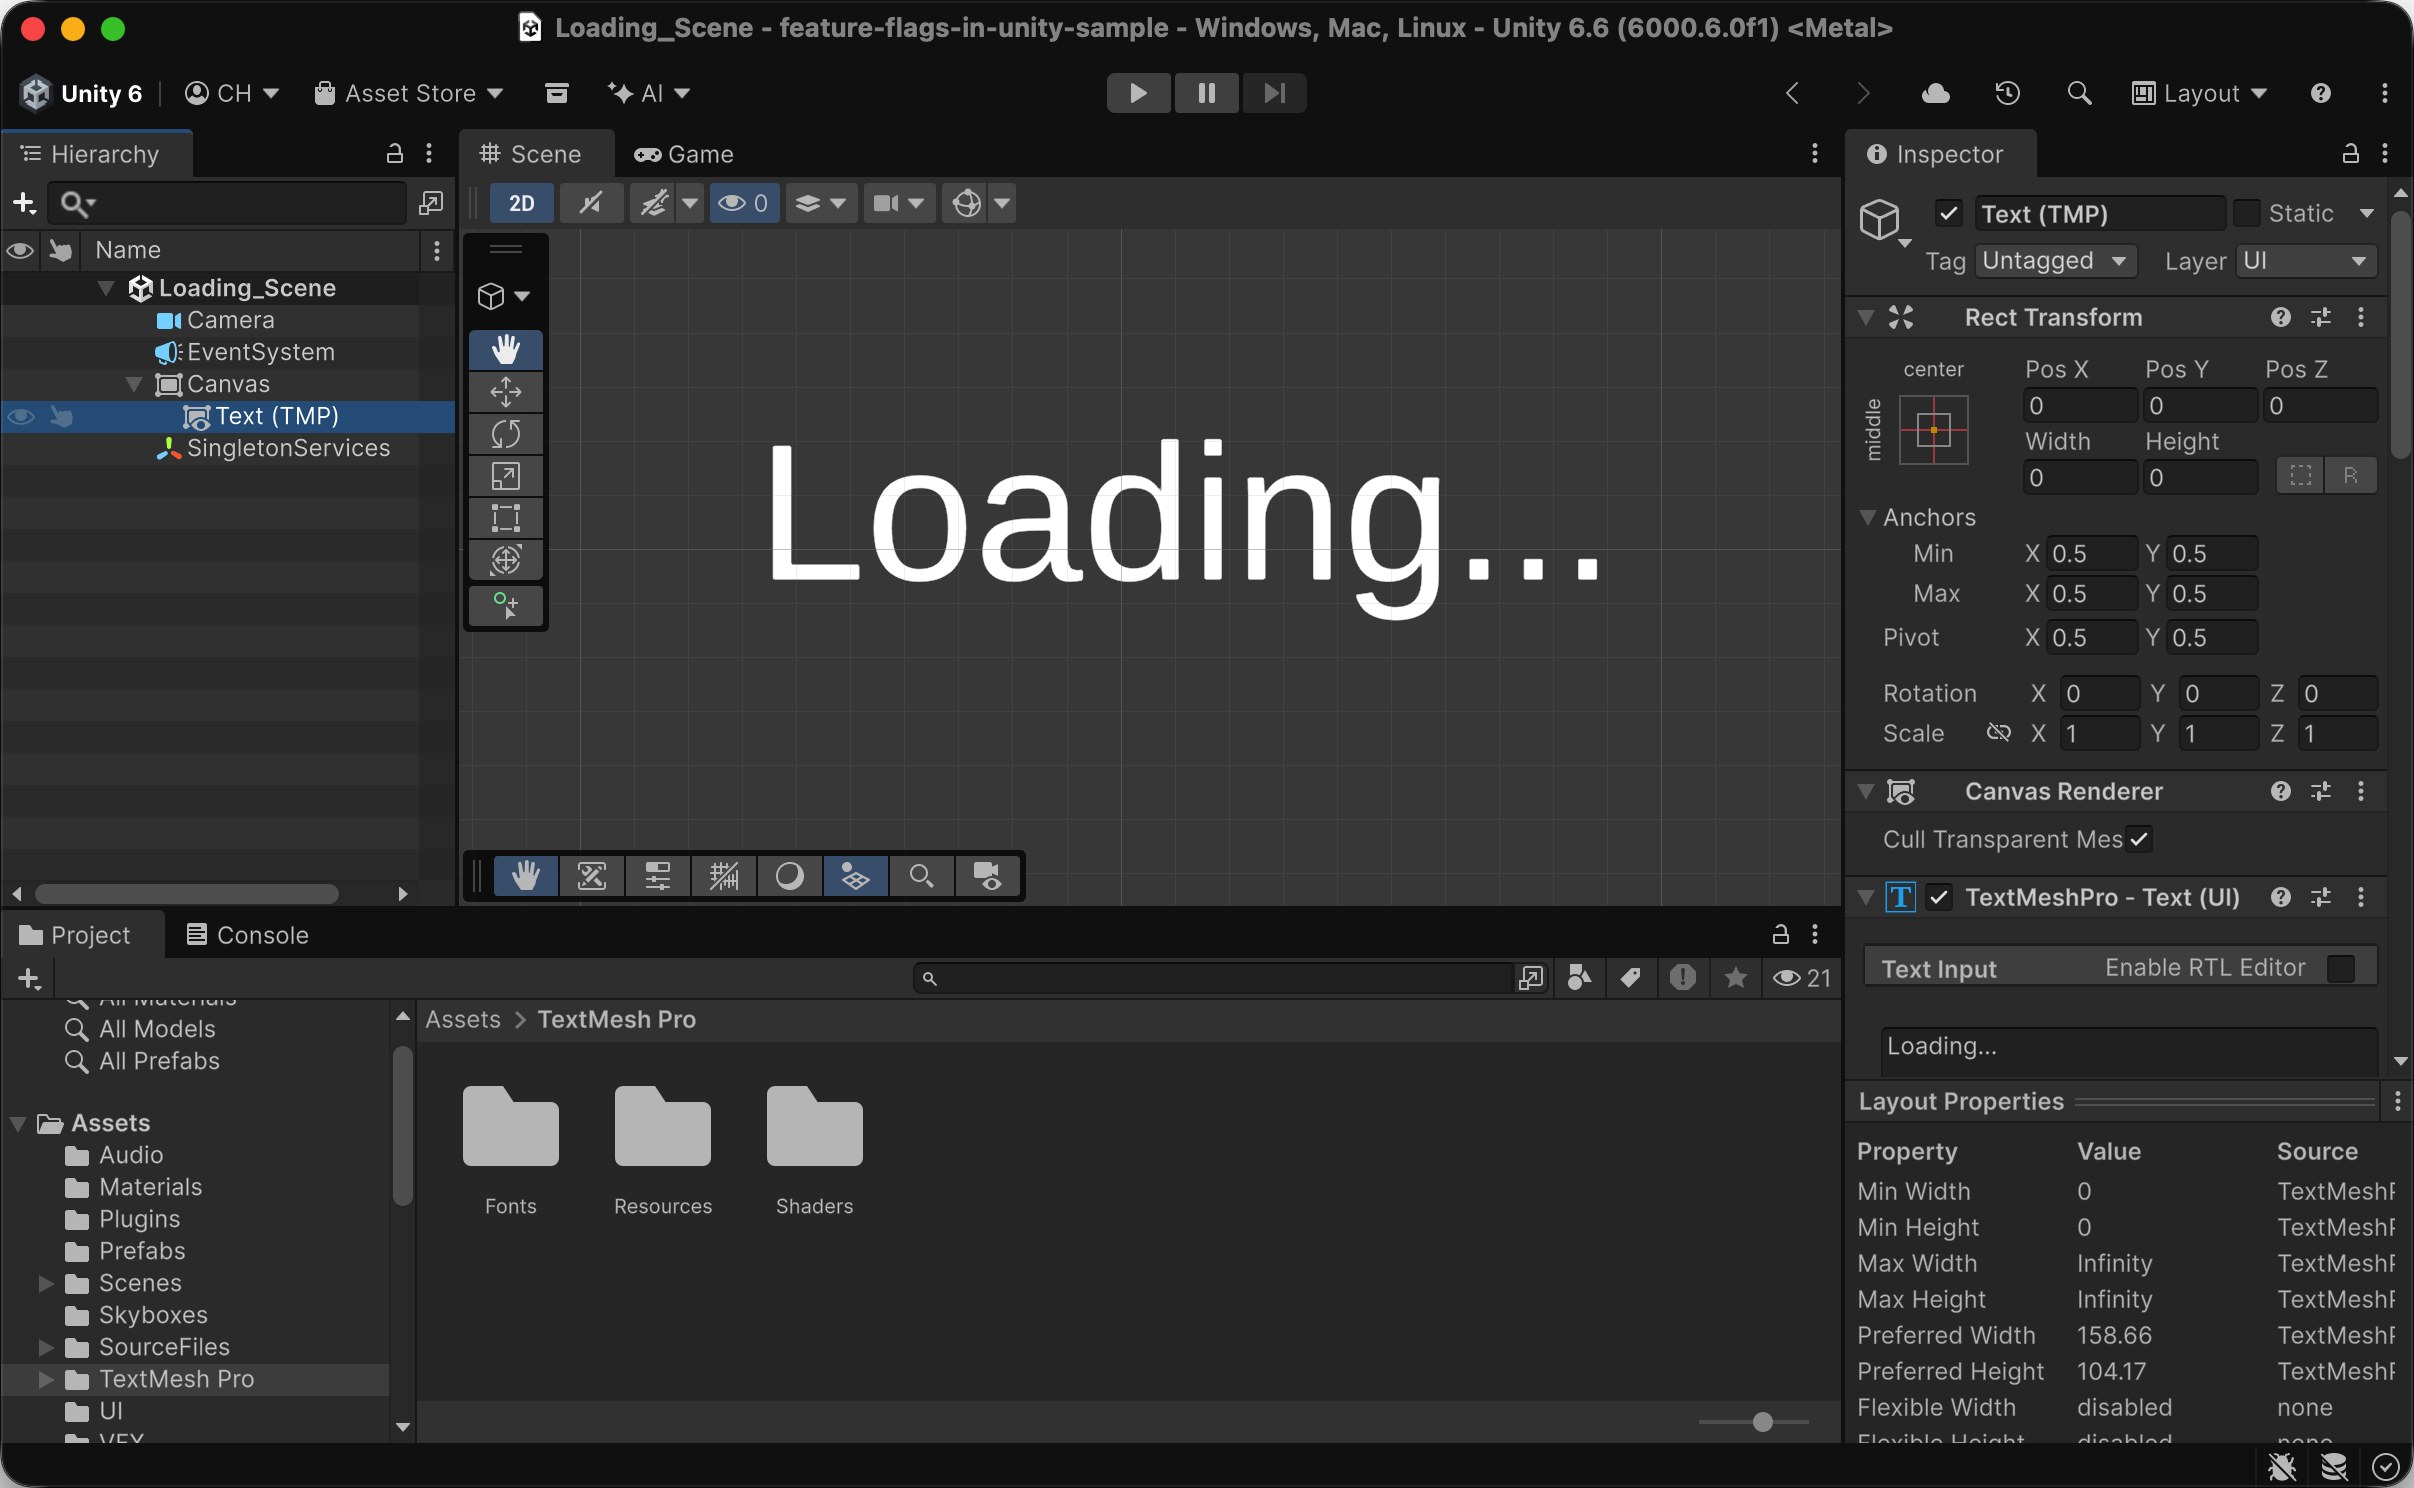
- Create a new scene. Go to File > New Scene, select Empty, and click Create.
- Save the scene. Go to File > Save As, save it in
Assets/Scenes, and name itLoading_Scene. - Add the scene to the build. Go to File > Build Profiles > Open Scene List, add
Loading_Scene, and move it to the top of the list so it loads first. Then, close the Build Profiles. - Set the active scene. In the Hierarchy, right-click
Loading_Sceneand select Set Active Scene. - Add a camera. In the Hierarchy, right-click and select Camera.
- Configure the camera. In the Inspector, set Environment > Background Type to Solid Color and Projection to Orthographic.
- Add a Canvas. Go to GameObject > UI (Canvas) > Canvas. Keep its Render Mode set to Screen Space - Overlay so the loading screen appears over the camera view.
- Add a loading message. Go to GameObject > UI (Canvas) > Text - TextMeshPro, place the text inside the Canvas, and set it to
Loading.... Adjust the font size and alignment in the Inspector. - Create a service GameObject. In the Hierarchy, right-click and select Create Empty. Name it
SingletonServices. We'll attach the ConfigCat initialization script to this object in the next section.
Set Up ConfigCat in Unity
Now that the ConfigCat .NET SDK is integrated into Unity, let's put it to use.
-
First, head over to your ConfigCat Dashboard and create a feature flag with the following details:
Field Value Name autoJumpOnBoxesKey autoJumpOnBoxesHint Make the player robot auto-jump on boxes it comes in contact with 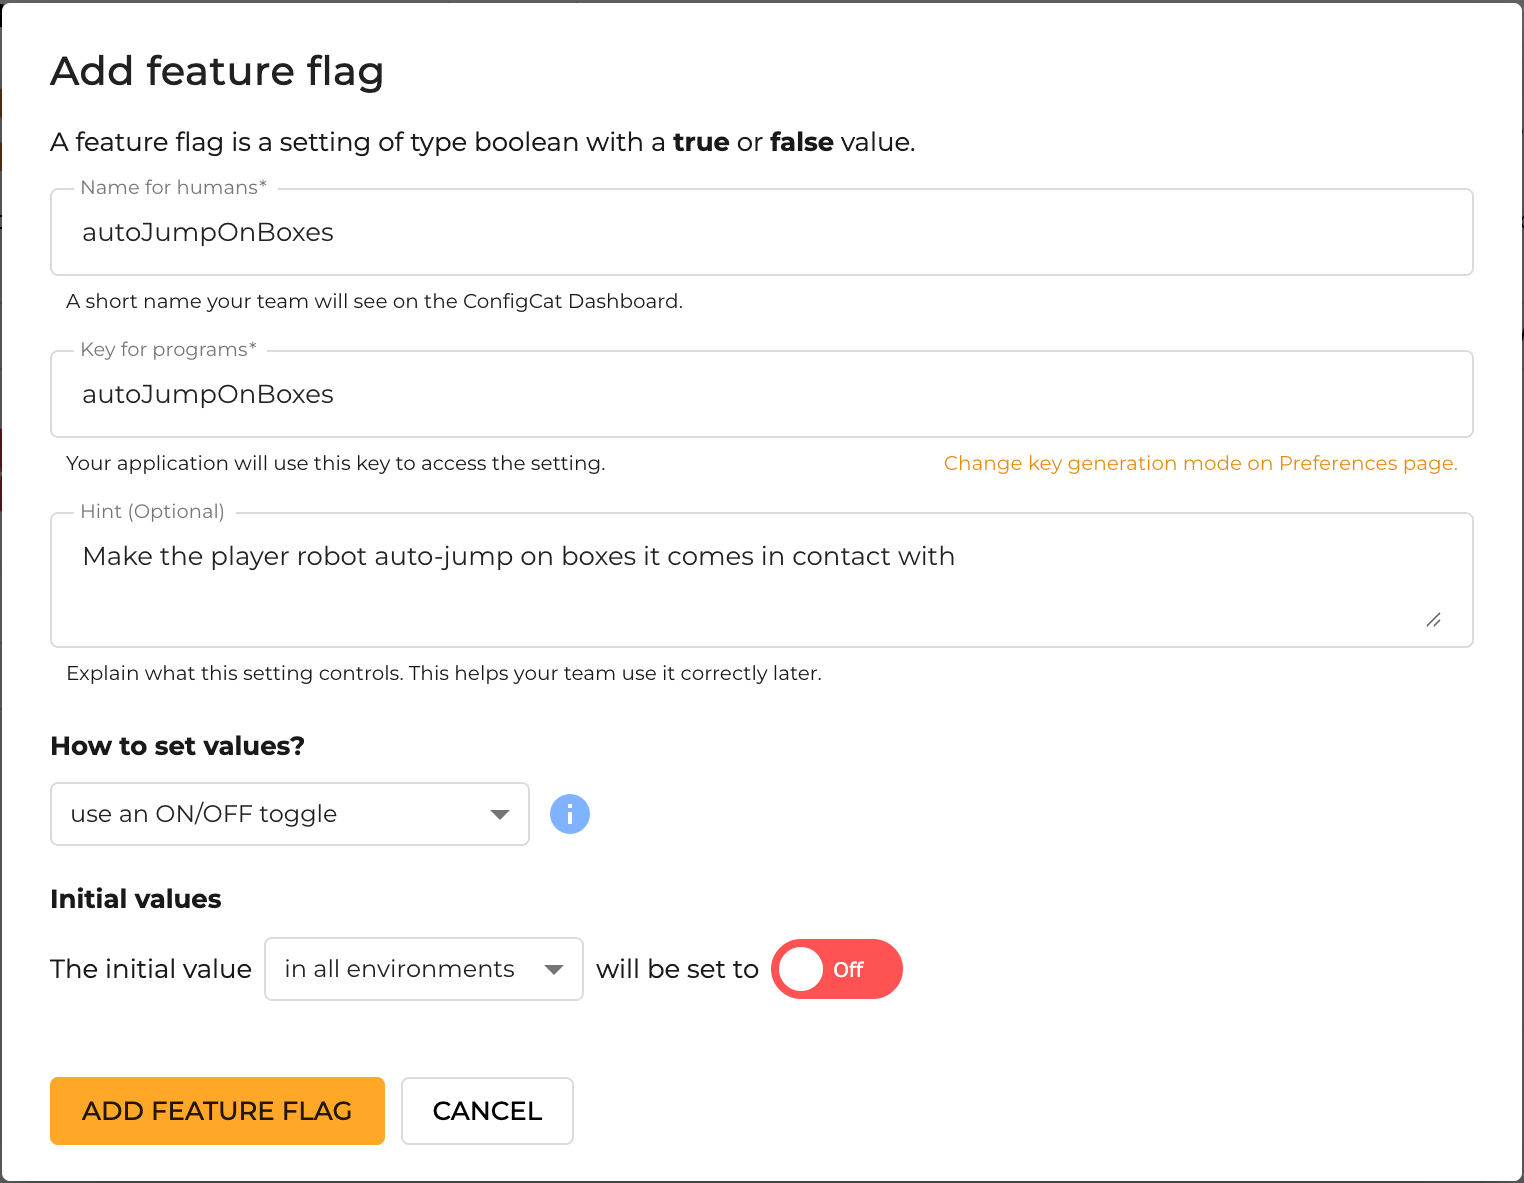
-
To use the ConfigCat SDK in a Unity project, you'll need to create a script that we'll attach to the SingletonServices GameObject in the Loading_Scene to instantiate the
ConfigCatClientwhen your game starts. Create a folder namedScriptsin your project'sAssetsfolder. Inside, create a file calledSingletonServices.cswith the following content.infoReplace
YOUR-CONFIGCAT-SDK-KEY-FOR-DEVELOPMENTandYOUR-CONFIGCAT-SDK-KEY-FOR-PRODUCTIONwith the SDK Keys of your development and production environments.Assets/Scripts/SingletonServices.csusing System;using System.Globalization;using System.Threading.Tasks;using ConfigCat.Client;using UnityEngine;using UnityEngine.Diagnostics;using UnityEngine.SceneManagement;public class SingletonServices : MonoBehaviour{private static SingletonServices instance;public static SingletonServices Instance => instance;[field: NonSerialized]public IConfigCatClient ConfigCatClient { get; private set; }[NonSerialized]private volatile IConfigCatClientSnapshot latestConfigCatClientSnapshot;public IConfigCatClientSnapshot LatestConfigCatClientSnapshot => latestConfigCatClientSnapshot;private void Awake(){// Ensure only one instance exists.if (instance != null && instance != this){Destroy(gameObject);return;}instance = this;// Keep the service available across scene changes.DontDestroyOnLoad(gameObject);#if DEBUGvar sdkKey = "YOUR-CONFIGCAT-SDK-KEY-FOR-DEVELOPMENT";var pollInterval = TimeSpan.FromSeconds(5);#elsevar sdkKey = "YOUR-CONFIGCAT-SDK-KEY-FOR-PRODUCTION";var pollInterval = TimeSpan.FromSeconds(60);#endif// Initialize the ConfigCat client with Auto Polling.try{ConfigCatClient = ConfigCat.Client.ConfigCatClient.Get(sdkKey,options =>{options.PollingMode = PollingModes.AutoPoll(pollInterval);options.Logger =new ConfigCatToUnityDebugLogAdapter(LogLevel.Warning);// Update the snapshot when the feature flag data changes using the ConfigChanged hook// (https://configcat.com/docs/sdk-reference/dotnet/#hooks).options.ConfigChanged += (s, _) =>latestConfigCatClientSnapshot = ((IConfigCatClient)s).Snapshot();});}catch (Exception ex){Debug.LogError($"[{nameof(SingletonServices)}] Failed to create ConfigCat client. {ex}");#if !DEBUGUtils.ForceCrash(ForcedCrashCategory.FatalError);#endif}}async void Start(){try{float start = Time.time;// Wait until the client is ready before creating the first snapshot.Debug.Log($"[{nameof(SingletonServices)}] Loading feature flags...");await ConfigCatClient.WaitForReadyAsync();latestConfigCatClientSnapshot ??= ConfigCatClient.Snapshot();Debug.Log($"[{nameof(SingletonServices)}] Feature flags loaded.");AsyncOperation op = SceneManager.LoadSceneAsync("GetStarted_Scene");op.allowSceneActivation = false;while (op.progress < 0.9f){await Task.Yield();}// Ensure the loading screen is visible for at least minimumDisplayTimeconst float minimumDisplayTime = 2f;float elapsed = Time.time - start;if (elapsed < minimumDisplayTime){await Task.Delay((int)((minimumDisplayTime - elapsed) * 1000));}op.allowSceneActivation = true;}catch (Exception ex){Debug.LogError($"[{nameof(SingletonServices)}] Start up failed. {ex}");#if !DEBUGUtils.ForceCrash(ForcedCrashCategory.FatalError);#endif}}private void OnDestroy(){if (instance != this){return;}ConfigCatClient?.Dispose();ConfigCatClient = null;latestConfigCatClientSnapshot = null;instance = null;}private sealed class ConfigCatToUnityDebugLogAdapter : IConfigCatLogger{private readonly LogLevel logLevel;public ConfigCatToUnityDebugLogAdapter(LogLevel logLevel){this.logLevel = logLevel;}public LogLevel LogLevel{get => logLevel;set => throw new NotSupportedException();}public void Log(LogLevel level,LogEventId eventId,ref FormattableLogMessage message,Exception exception = null){var eventIdString =eventId.Id.ToString(CultureInfo.InvariantCulture);var exceptionString = exception == null? string.Empty: Environment.NewLine + exception;var logMessage =$"ConfigCat[{eventIdString}] " +$"{message.InvariantFormattedMessage}{exceptionString}";switch (level){case LogLevel.Error:Debug.LogError(logMessage);break;case LogLevel.Warning:Debug.LogWarning(logMessage);break;case LogLevel.Info:Debug.Log(logMessage);break;case LogLevel.Debug:Debug.Log(logMessage);break;}}}} -
In the Loading_Scene, select the SingletonServices game object, and attach the
SingletonServices.csscript to it. This way, when the scene loads, the ConfigCat client will be available to use in other scripts throughout your game.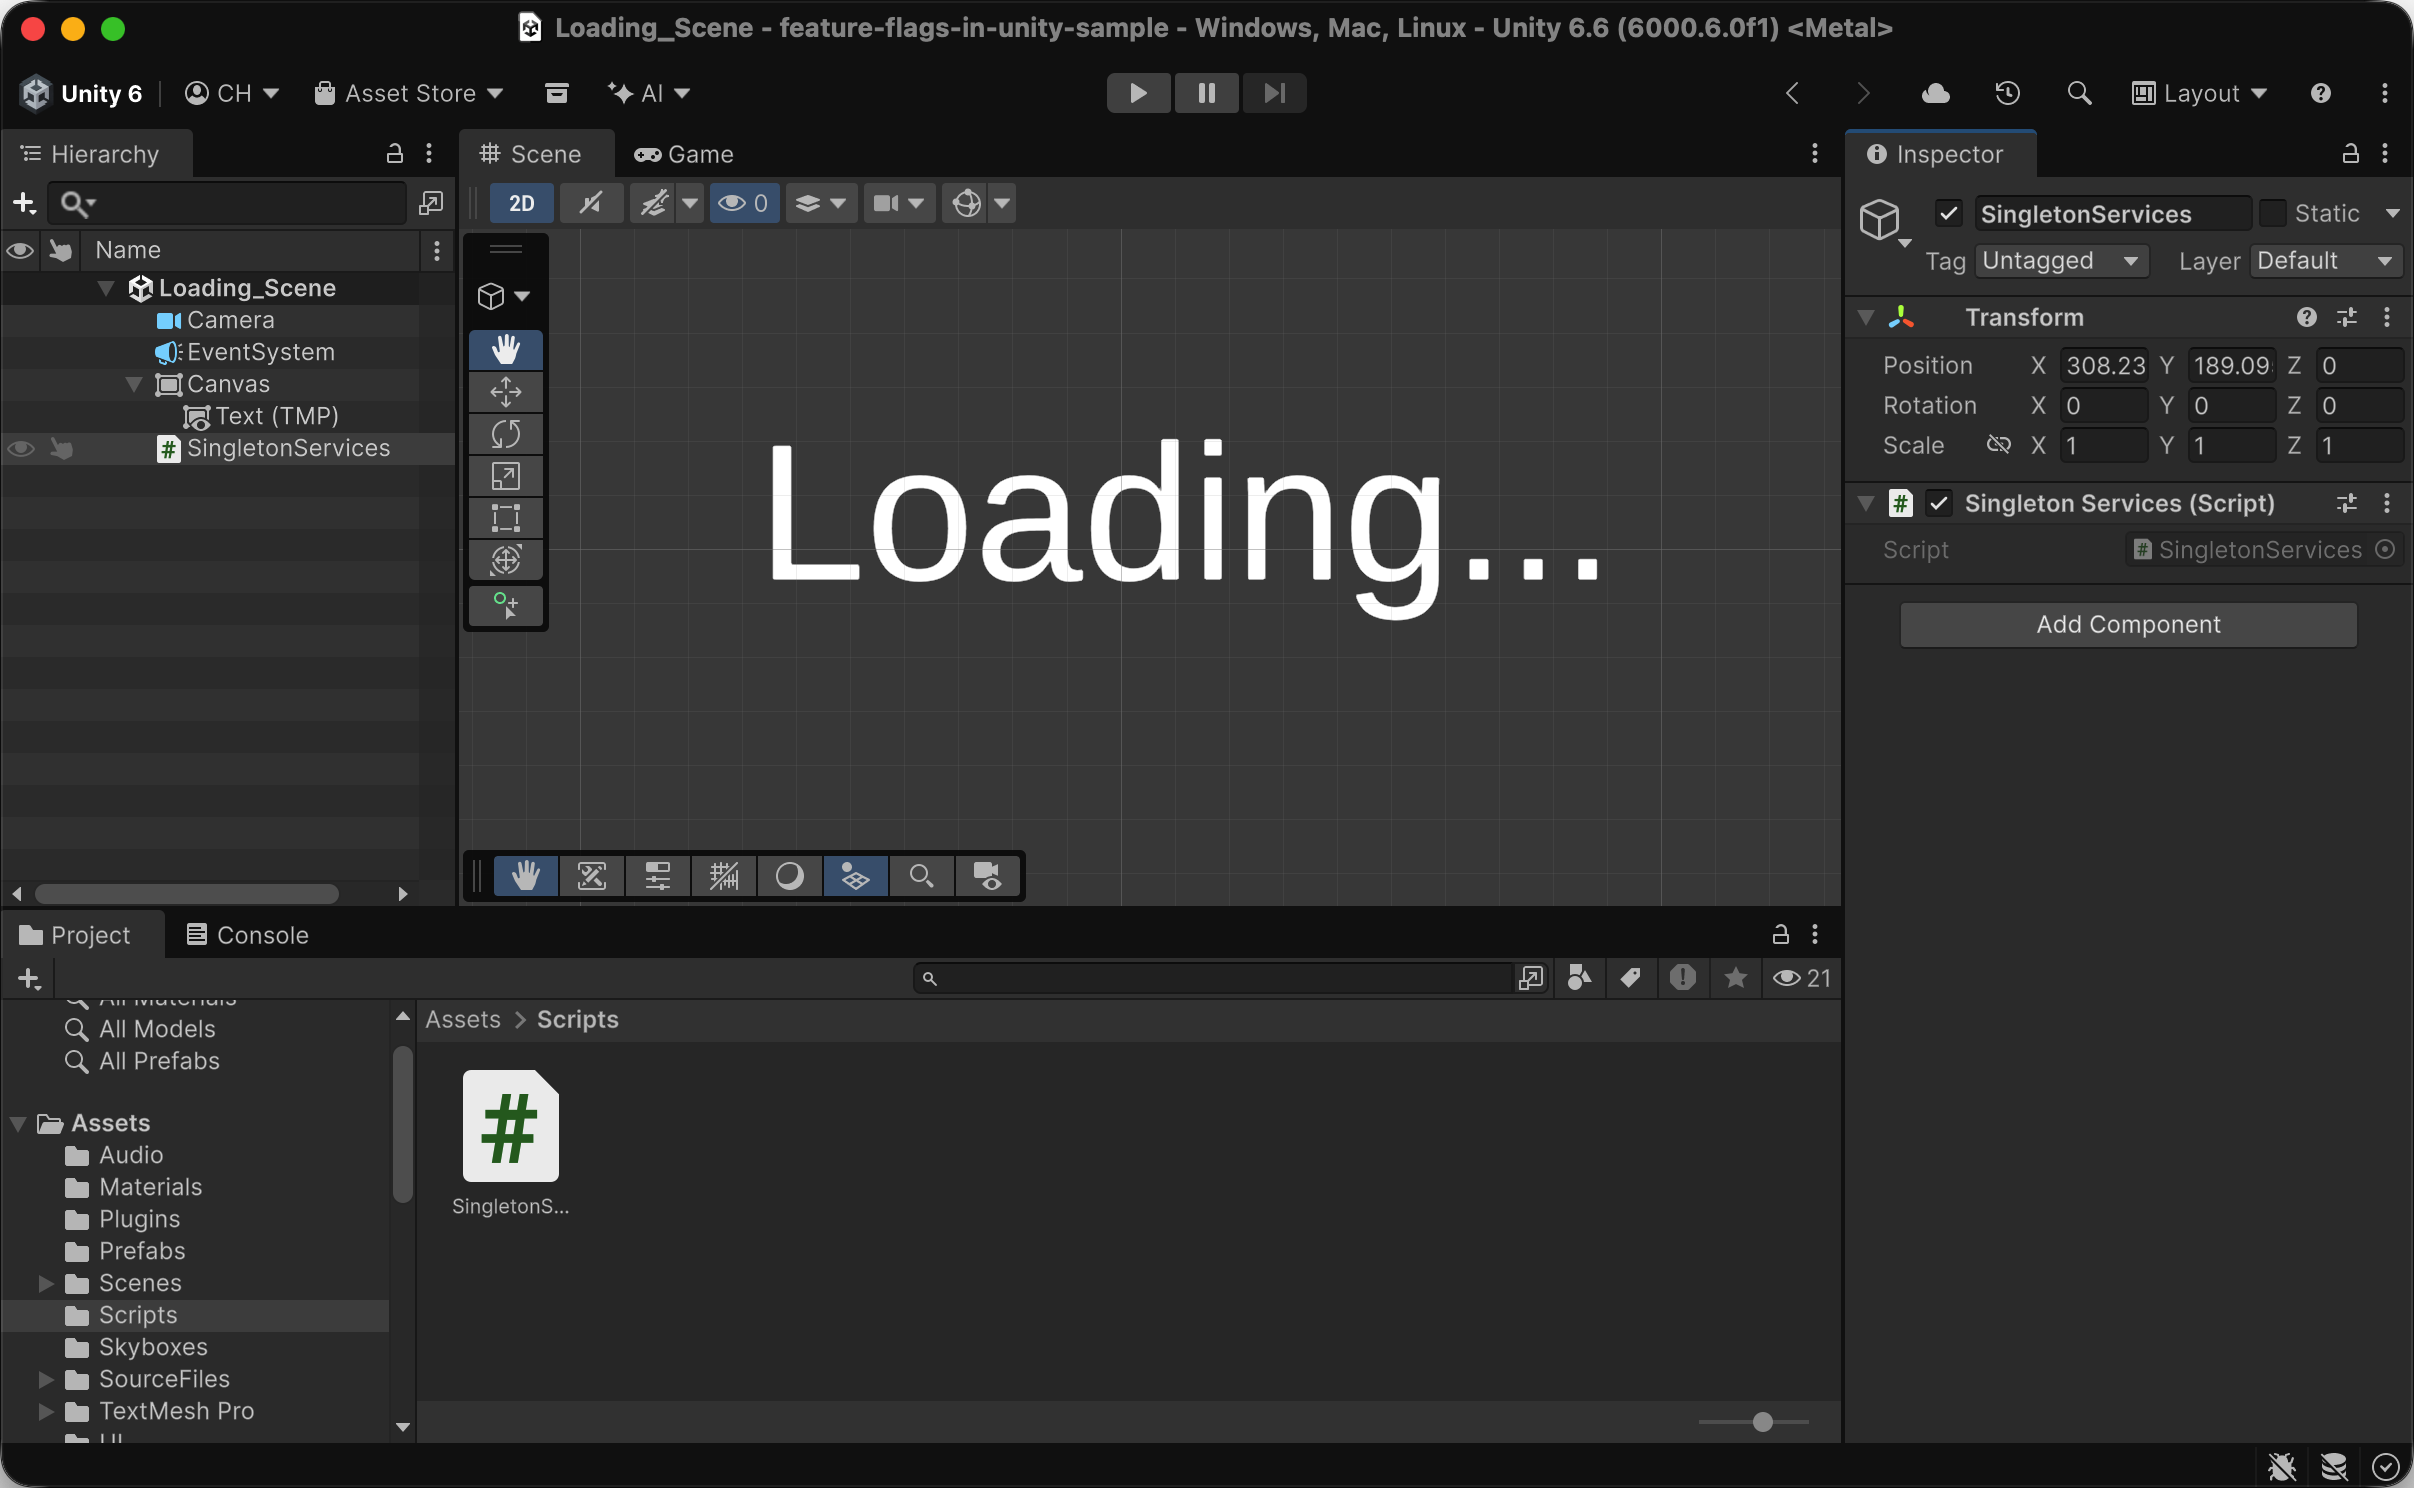
Control Gameplay with Feature Flags in Unity
Now for the fun part: using our feature flag to control the Player Robot's auto-jump ability.
-
Add a
TriggerJumpmethod to theThirdPersonControllerclass inAssets/SourceFiles/Scripts/ThirdPersonController.cs. Currently, the Player Robot only jumps when the player presses the Space key. This method allows the script we'll create in step 3 to trigger a jump at a specific height.Assets/SourceFiles/Scripts/ThirdPersonController.csnamespace StarterAssets{public class ThirdPersonController : MonoBehaviour{// Existing code...public void TriggerJump(float height){if (!Grounded || height <= 0f || Gravity >= 0f){return;}_verticalVelocity = Mathf.Sqrt(height * -2f * Gravity);if (_hasAnimator){_animator.SetBool(_animIDJump, true);}}}} -
Open GetStarted_Scene and assign the boxes to a dedicated layer so the script can detect them. Select a box, open the Layer dropdown at the top of the Inspector, and choose Add Layer... to create a new layer named
boxLayer. Then select all the boxes and assign them to the newboxLayerlayer.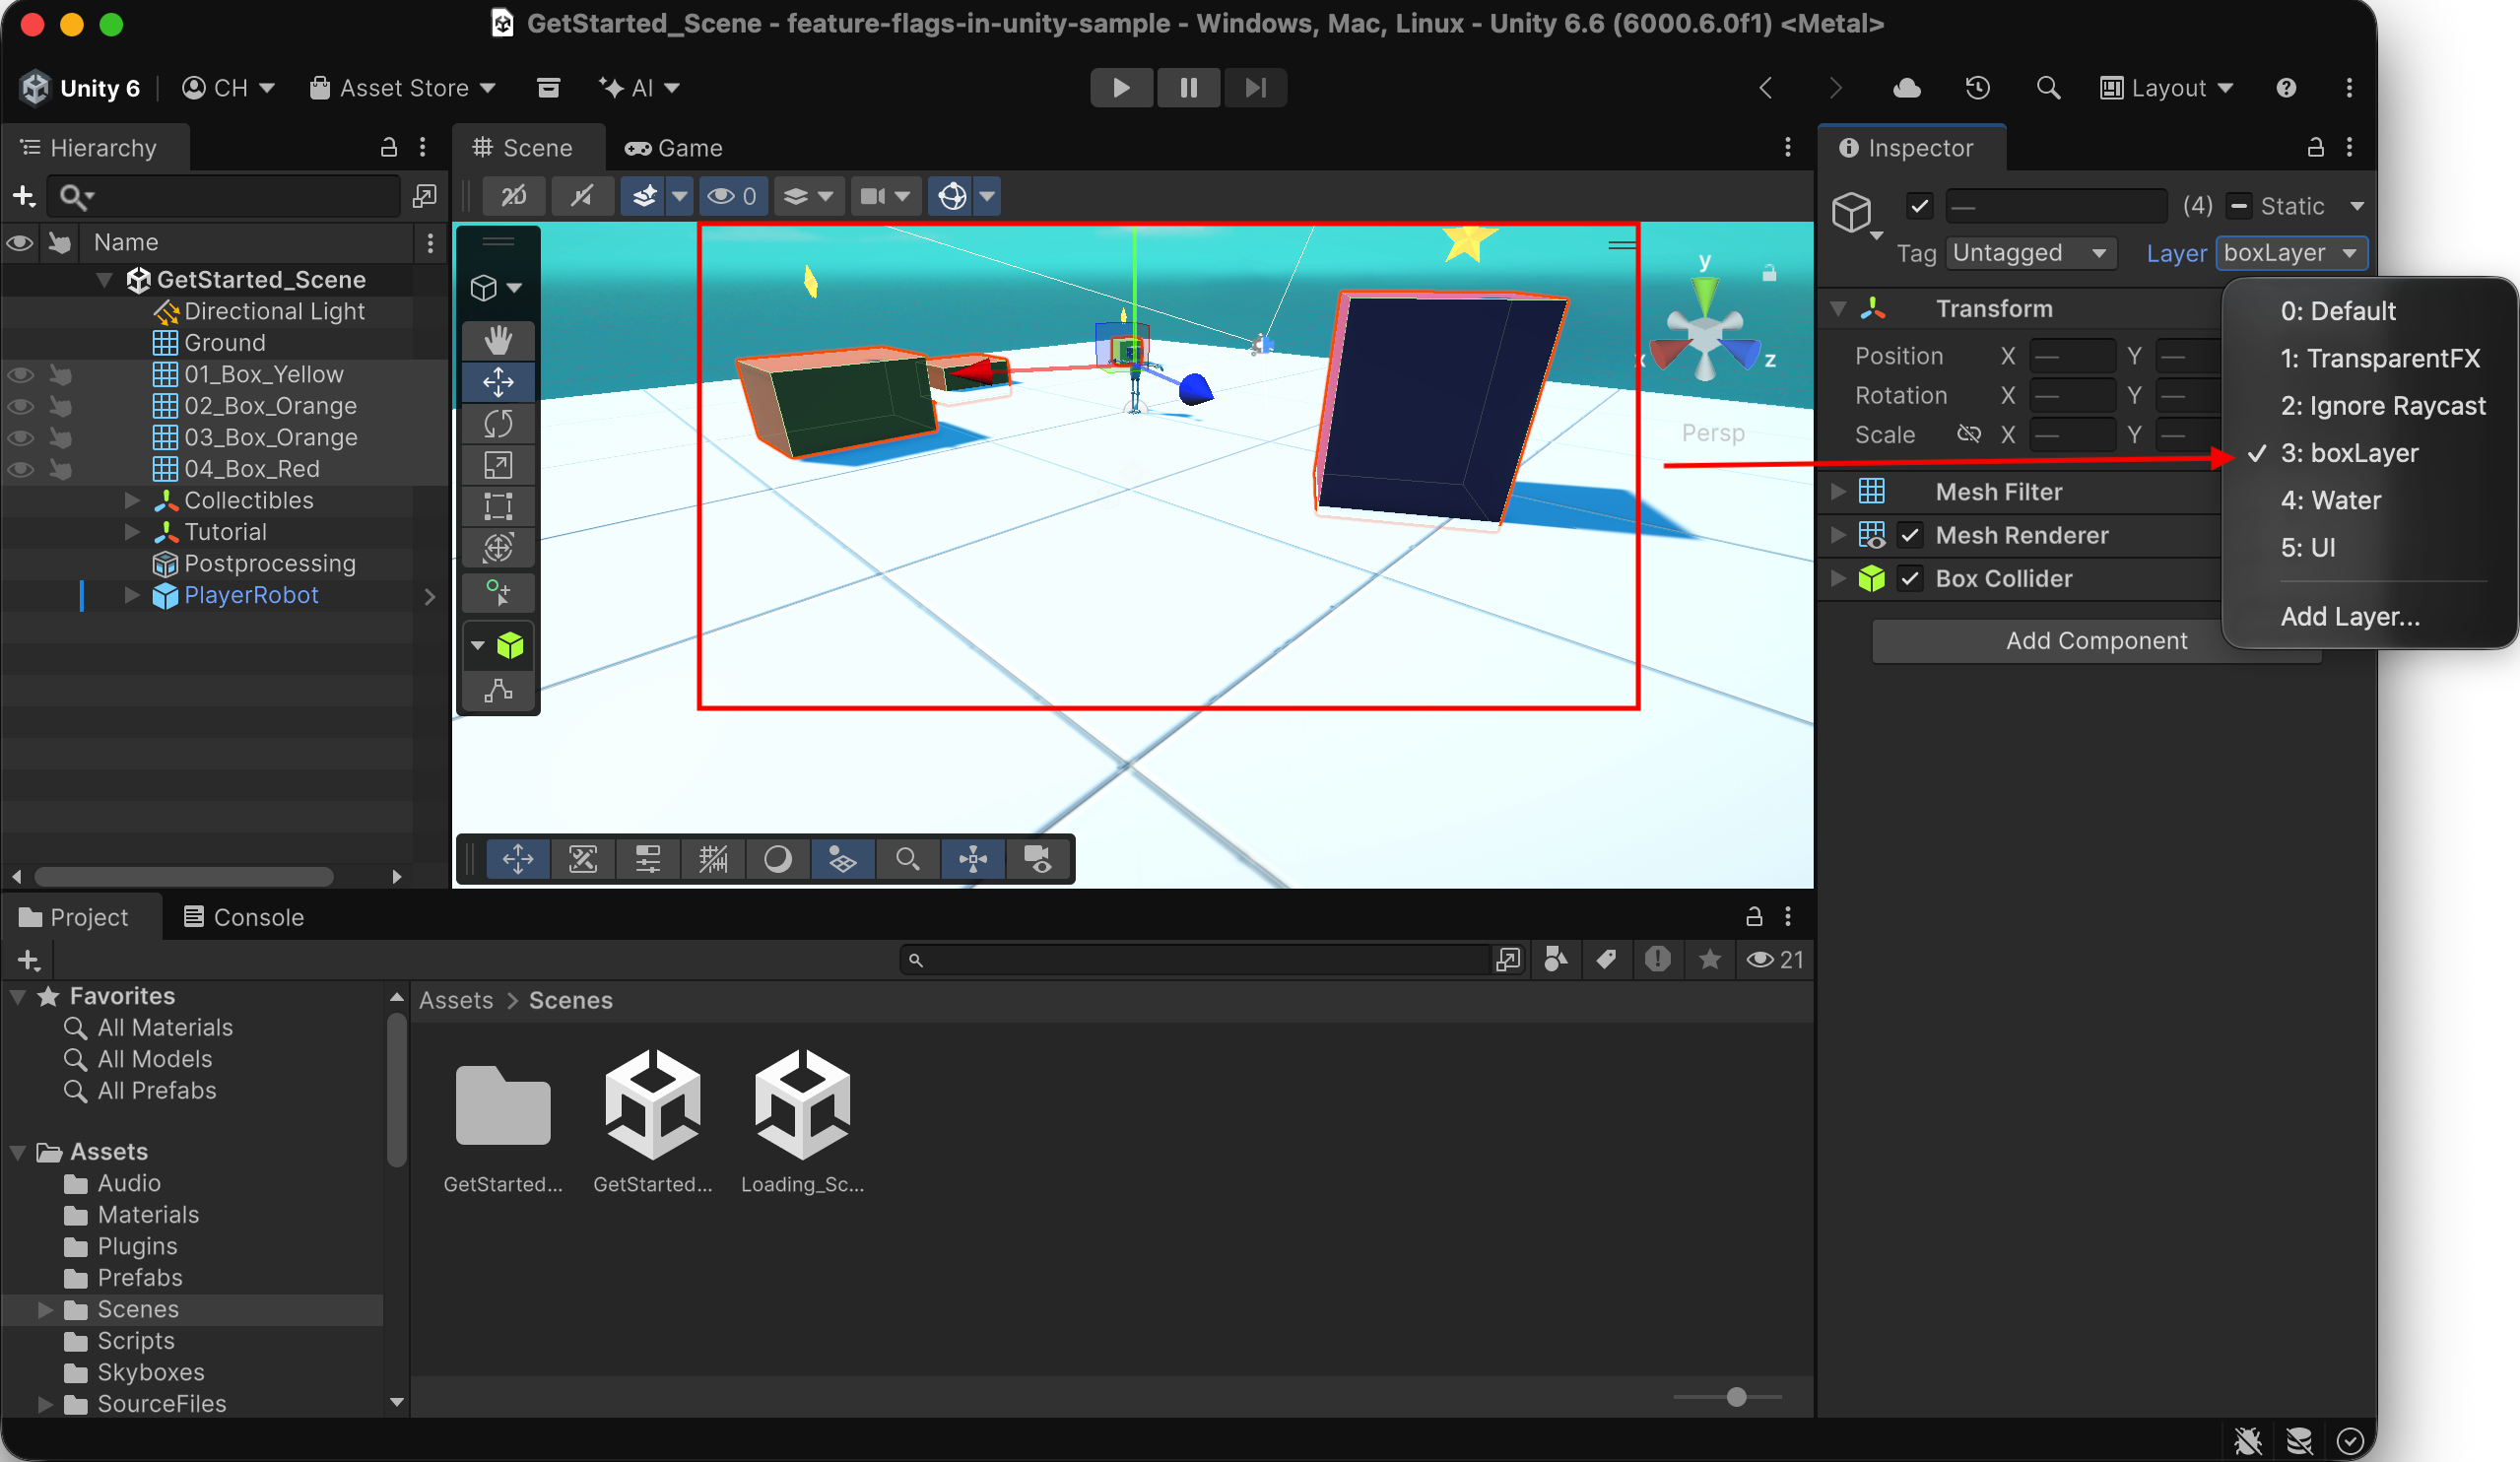
-
Create the script that controls the robot's auto-jump behavior.
Here's how the script works:
- Every frame, Unity calls the script's
Update()method, which reads theautoJumpOnBoxesfeature flag value from the latest ConfigCat snapshot. If the snapshot isn't available, automatic jumping remains disabled. - If the flag is enabled, the robot is grounded, and a box is detected just ahead, the script calculates the height needed to clear the box and calls
thirdPersonController.TriggerJump(requiredHeight)to make the robot jump. - The
lastCheckedBoxguard prevents repeated jump attempts against the same box. The script waits for the duration specified byretryInterval(1 second by default) before trying again.
In Debug builds, we set the ConfigCat client's
pollIntervalto 5 seconds for faster updates, while Release builds use the default interval of 60 seconds. When the configuration changes, theConfigChangedhook inSingletonServices.csrefreshes the snapshot, allowing the robot to respond to feature flag changes without restarting the game.In the
Assets/Scriptsfolder (alongside theSingletonServices.csscript), create a new script calledAutoJumpOnBoxes.cswith the code below:Assets/Scripts/AutoJumpOnBoxes.csusing StarterAssets;using UnityEngine;[RequireComponent(typeof(ThirdPersonController))]public class AutoJumpOnBoxes : MonoBehaviour{[SerializeField] private string featureFlagKey = "autoJumpOnBoxes";[SerializeField] private LayerMask boxLayer;[SerializeField] private float overlapRadius = 0.45f;[SerializeField] private float forwardOffset = 0.3f;[SerializeField] private float clearanceMargin = 0.15f;[SerializeField] private float retryInterval = 1f;private const int MaxOverlaps = 8;private ThirdPersonController thirdPersonController;private Collider lastCheckedBox;private float lastCheckTime = -999f;private readonly Collider[] overlapBuffer = new Collider[MaxOverlaps];private bool? lastLoggedFlagValue;private void Awake(){thirdPersonController = GetComponent<ThirdPersonController>();}private bool IsAutoJumpEnabled(){// The snapshot variable is null until the ConfigCat client is ready.var snapshot = SingletonServices.Instance.LatestConfigCatClientSnapshot;if (snapshot == null){return false;}bool featureFlagValue = snapshot.GetValue(featureFlagKey, false);if (lastLoggedFlagValue != featureFlagValue){Debug.Log($"[{nameof(AutoJumpOnBoxes)}] {featureFlagKey} = {featureFlagValue}");lastLoggedFlagValue = featureFlagValue;}return featureFlagValue;}private void Update(){if (!IsAutoJumpEnabled() || !thirdPersonController.Grounded){return;}// Use an overlap radius to check boxes that are slightly ahead of the robotVector3 overlapCenter =transform.position +Vector3.up * overlapRadius +transform.forward * forwardOffset;int overlapCount = Physics.OverlapSphereNonAlloc(overlapCenter,overlapRadius,overlapBuffer,boxLayer);for (int i = 0; i < overlapCount; i++){Collider box = overlapBuffer[i];if (box == null){continue;}float boxTop = box.bounds.max.y;// Skip boxes the robot is already standing on.if (transform.position.y >= boxTop - 0.05f){continue;}if (box == lastCheckedBox &&Time.time - lastCheckTime < retryInterval){continue;}float requiredHeight =boxTop - transform.position.y + clearanceMargin;if (requiredHeight <= 0f){continue;}lastCheckedBox = box;lastCheckTime = Time.time;thirdPersonController.TriggerJump(requiredHeight);break;}}} - Every frame, Unity calls the script's
-
Add the script to the Robot. In the Hierarchy, expand PlayerRobot and select its Robot child, the object that has the Third Person Controller (Script) component. Click Add Component, add the Auto Jump On Boxes script, and set its Box Layer to
boxLayer.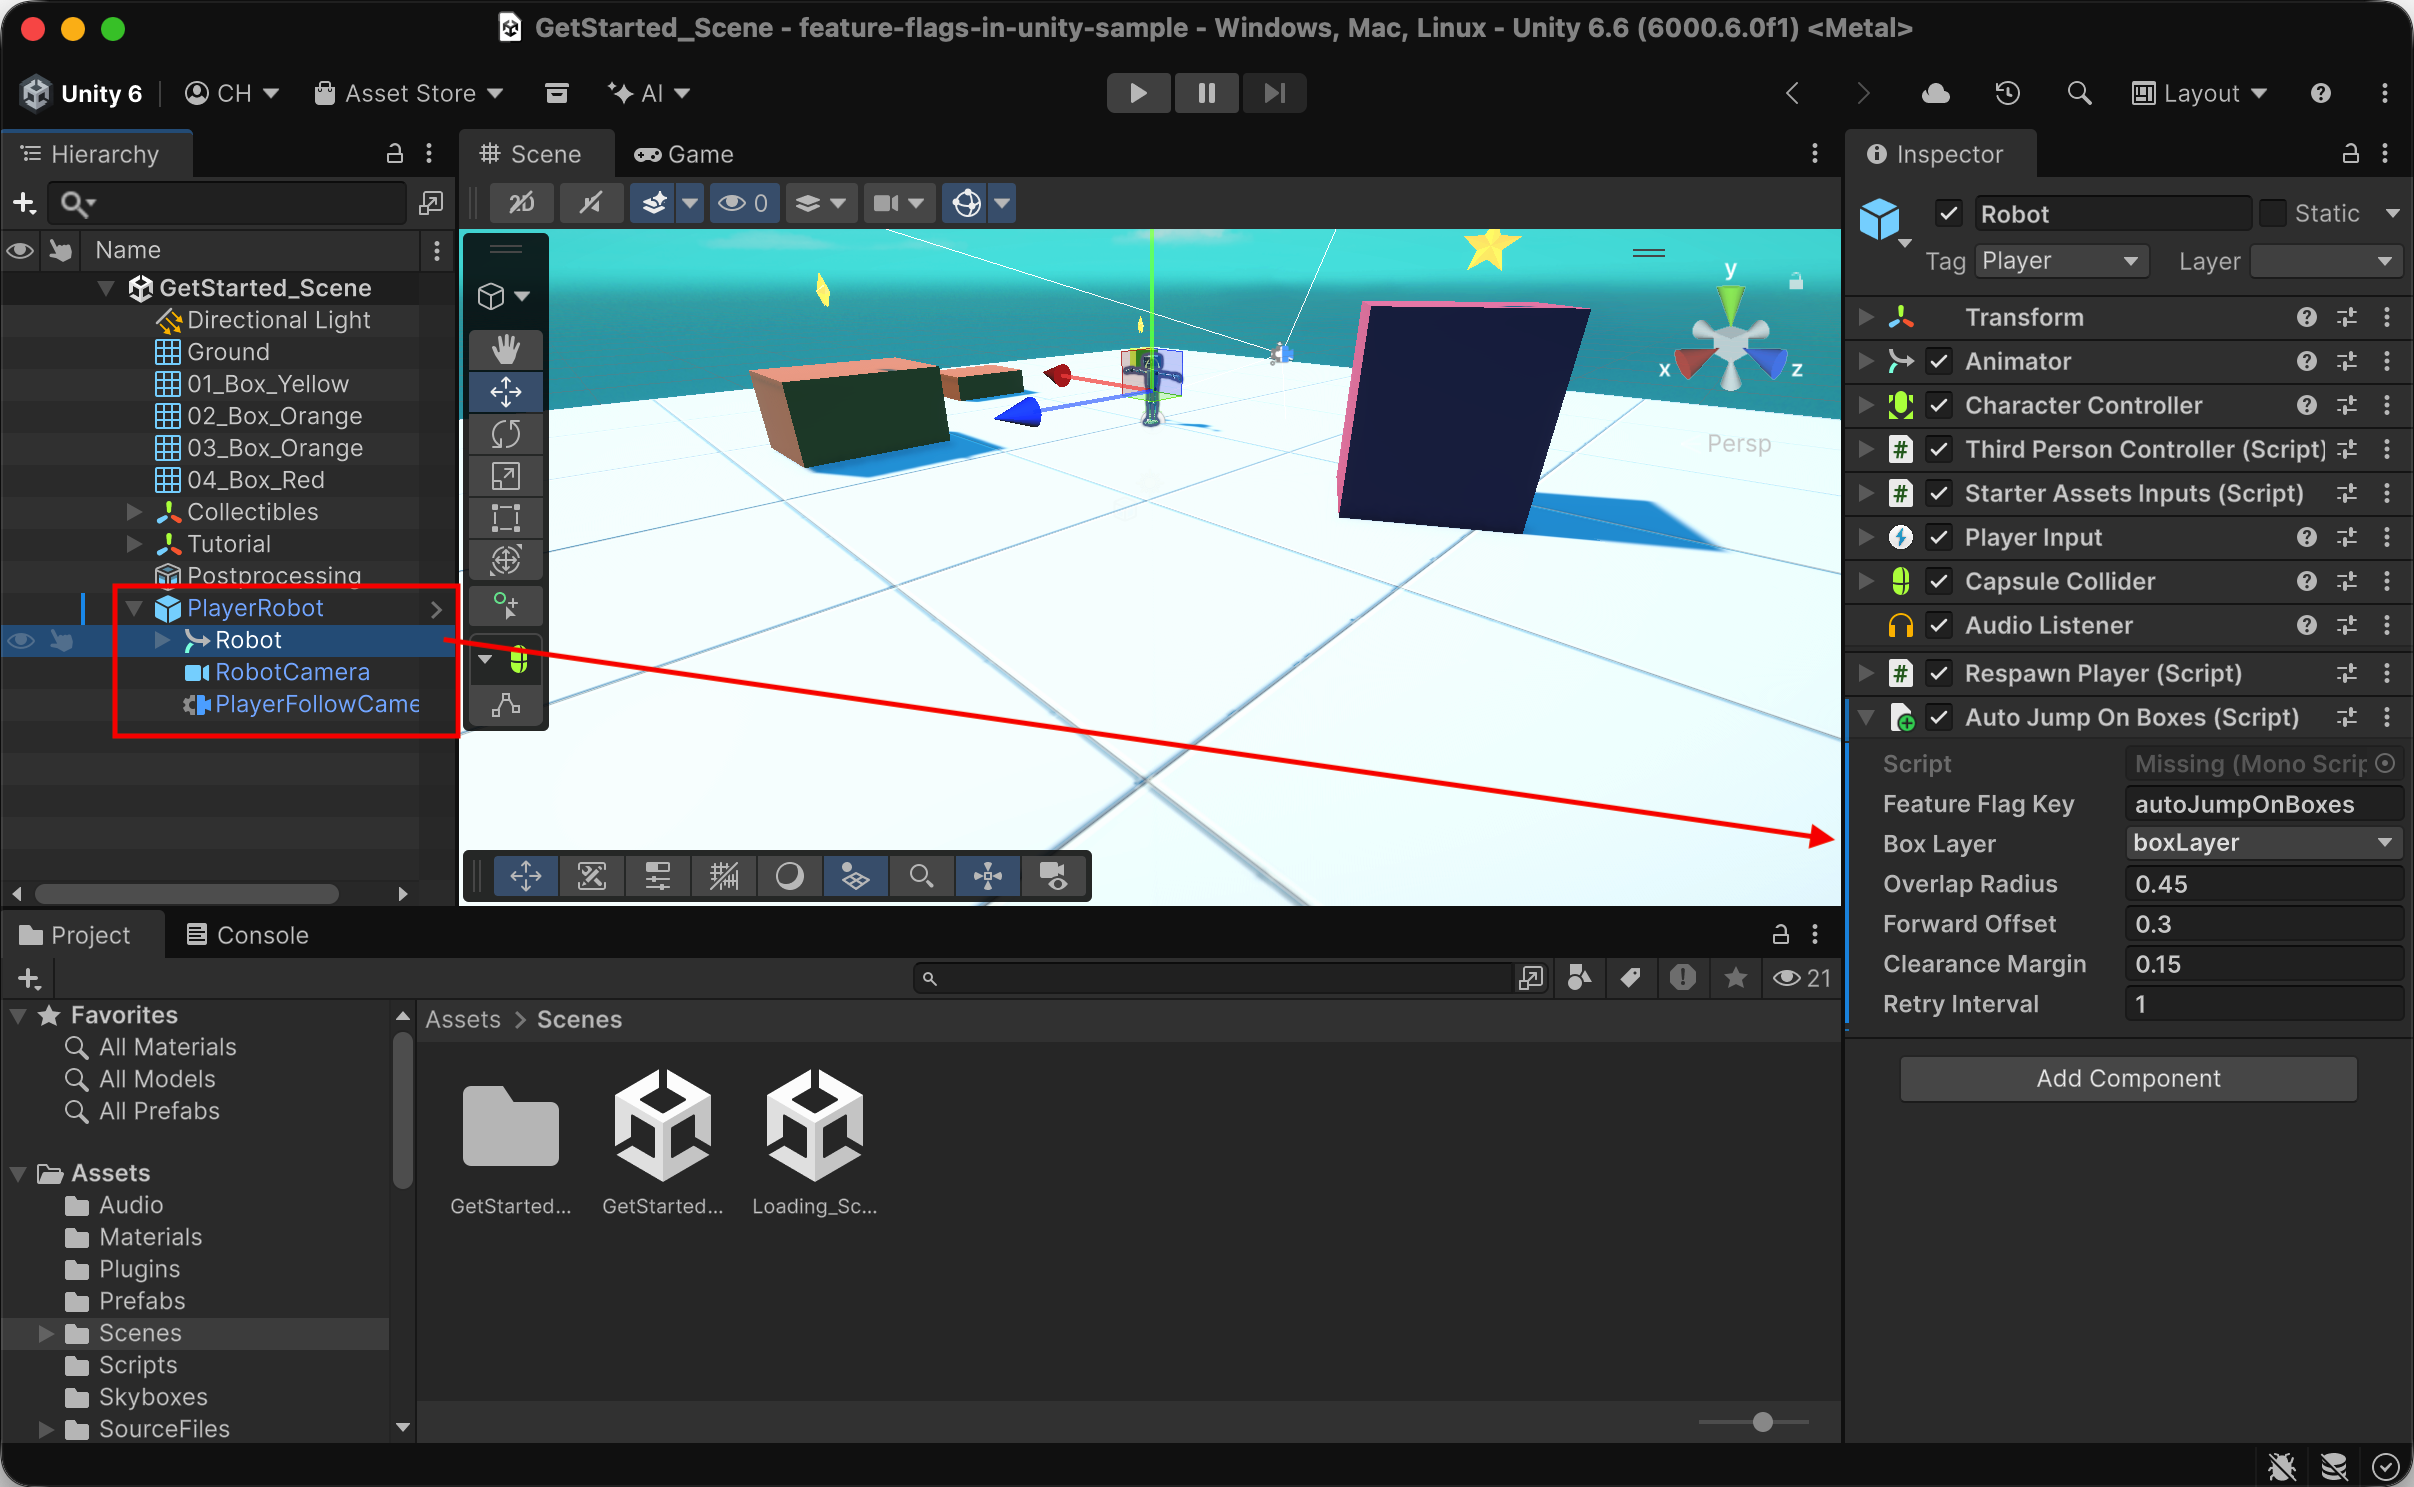
-
While Robot is still selected, find the Ground Layers field on the Third Person Controller (Script) component and select both
DefaultandboxLayer. This lets the robot count as grounded when it lands on a box. Finally, save the scene.
Demo: Test Your Unity Feature Flag
Let's see our Unity feature flag in action! The easiest way to understand the result is to compare how the robot behaves when the feature flag is disabled and enabled.
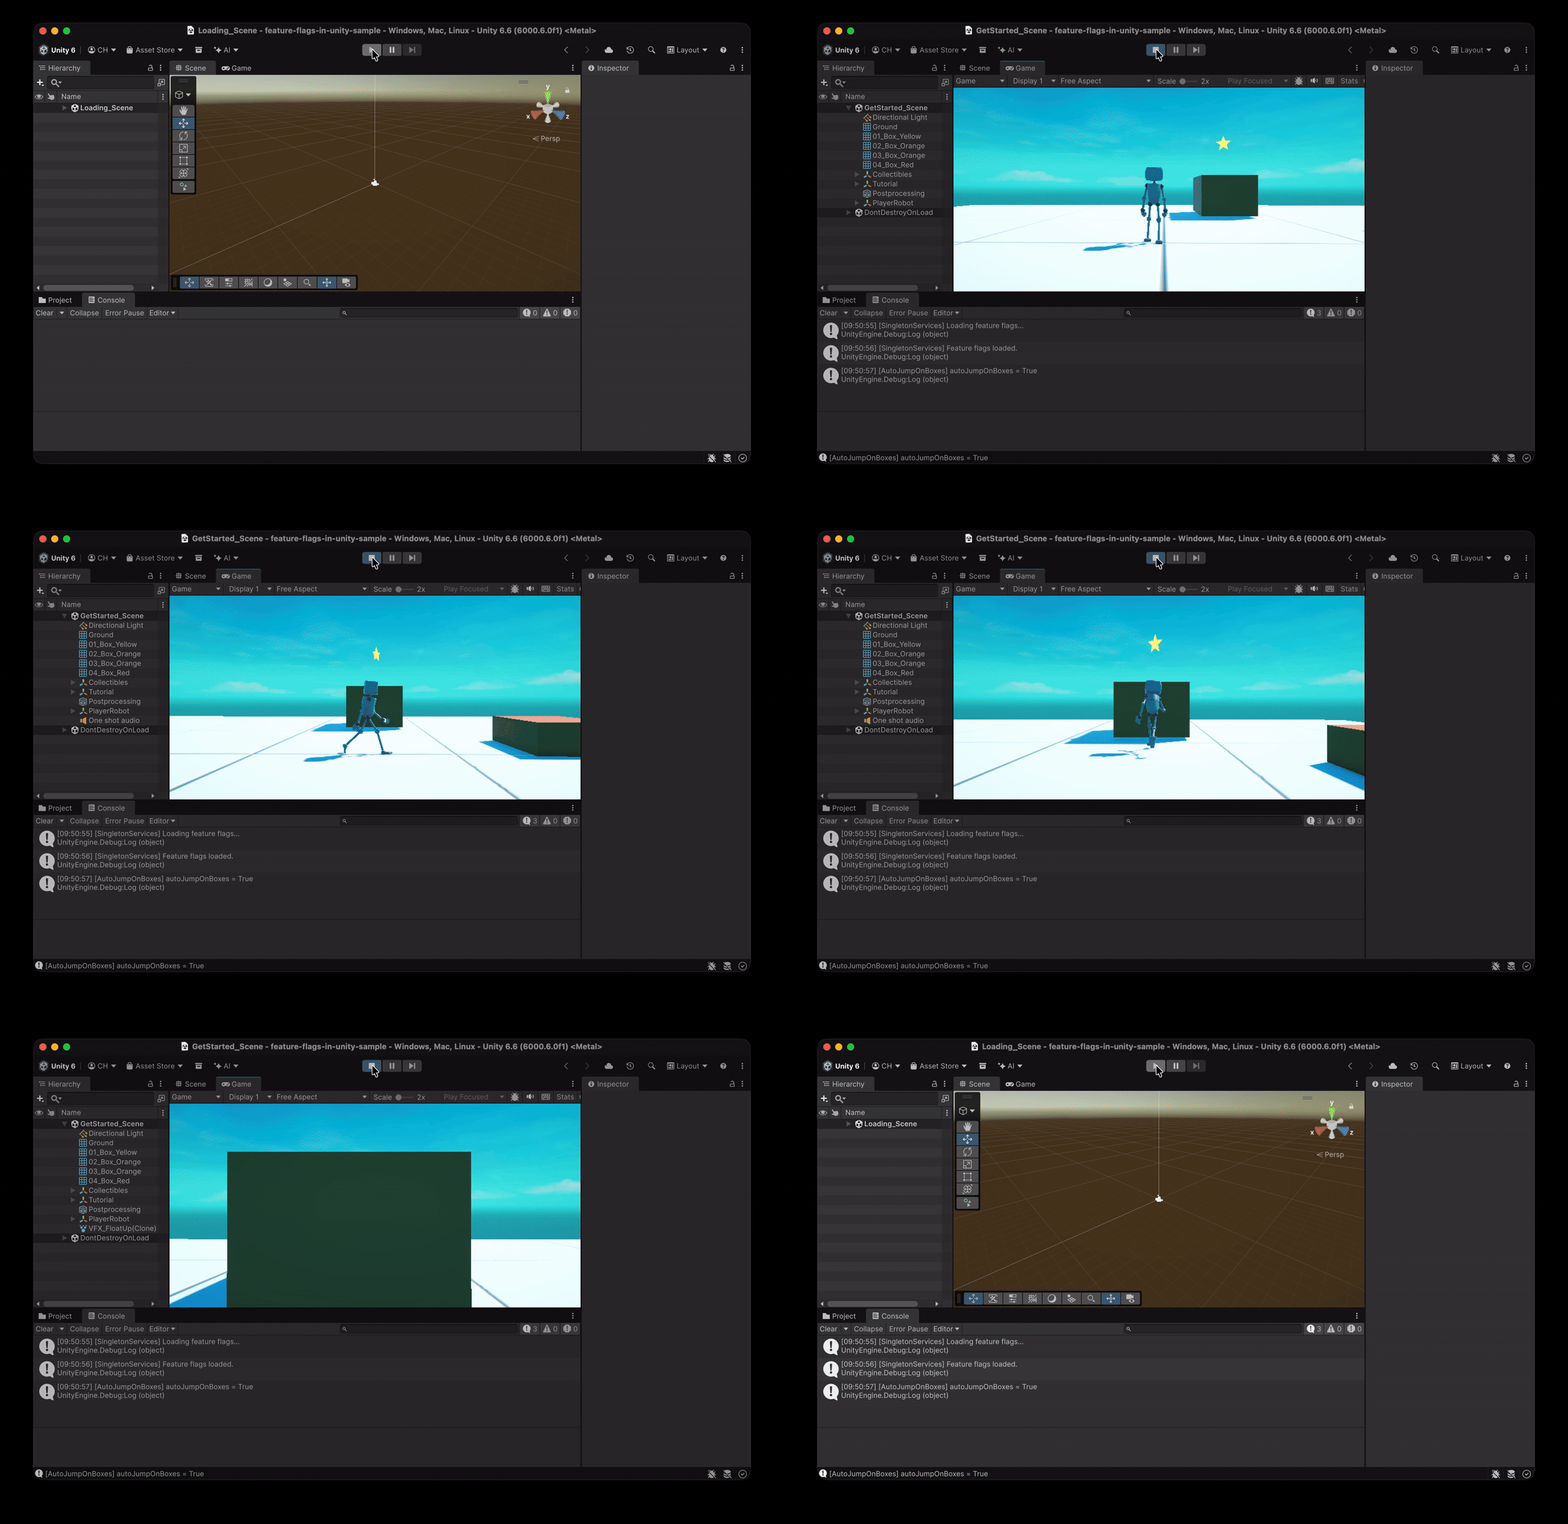
Before each test below, open Loading_Scene and press Play from there, because it initializes the ConfigCat client before loading the GetStarted_Scene.
1. Test with the feature flag disabled
In your ConfigCat Dashboard, toggle the autoJumpOnBoxes flag Off. Start the game in Unity and move the robot toward a box. Since the feature flag is disabled, the robot should not automatically jump onto it.
2. Enable the feature flag
Toggle the feature flag On and start the game. Walking or running the Player Robot into a box triggers a jump, and the robot lands on top of it. The Console shows [AutoJumpOnBoxes] autoJumpOnBoxes = True when the game starts and logs the value again whenever it changes.
3. Change the feature flag during gameplay
Now try changing the flag while the game is running. Switch the autoJumpOnBoxes flag Off. Once the SDK has received the updated configuration, approach another box and check whether the auto-jump behavior has changed.
After the SDK receives the updated configuration, the Console logs [AutoJumpOnBoxes] autoJumpOnBoxes = False, and the robot stops jumping onto boxes. No restart is needed.
That's the main benefit of using feature flags in Unity: you can control gameplay functionality remotely while keeping deployment and feature release separate.
Final Thoughts
You've now learned how to use feature flags in Unity with ConfigCat's .NET SDK. By controlling the robot's auto-jump ability with a feature flag, you've seen how to enable or disable gameplay functionality without changing the game's code or deploying a new build once the flag is in place.
You can take this further by using targeting rules to test features with specific players or percentage-based rollouts to gradually introduce gameplay mechanics. To do this, you'll also need to provide the relevant player attributes when evaluating your flags.
Ready to try it yourself? Create a free ConfigCat account to start experimenting with feature flags in your own Unity game.
Deploy anytime, release when confident! 🚀
You can stay up to date with ConfigCat on X, Facebook, LinkedIn, GitHub, and the News & Product Updates page.