How to Use Feature Flags in ASP.NET Core MVC


Want to enable or disable features in your ASP.NET Core MVC application without deploying new code? With feature flags, you can control which features users see and change their availability remotely.
In this tutorial, you'll learn how to implement feature flags in ASP.NET Core MVC using the ConfigCat .NET SDK. We'll build a simple application where a feature flag controls the visibility of a mailing list subscription button. You'll see how to integrate ConfigCat, evaluate a feature flag in an MVC controller, and conditionally render elements in a Razor view.
By the end, you'll be able to turn the button on or off directly from the ConfigCat Dashboard, without rebuilding or redeploying your application.
What Is a Feature Flag?
A feature flag (also called a feature toggle) is a mechanism that allows developers to enable or disable application functionality without changing or redeploying code.
In ASP.NET Core applications, feature flags can control which UI elements are displayed, which code paths are executed, or which features are available to specific users.
Beyond simple on/off switching, feature flags allow for user targeting and segmentation, in-production testing, canary releases, and A/B testing.
What We'll Build: An ASP.NET Core MVC Feature Flag Example
For our demo, we'll use a simple home page that displays a registration confirmation message.
The marketing department wants to promote a new mailing list on this page. However, they don't want the subscription button to appear until the campaign is ready to launch.
We'll use a ConfigCat feature flag named mailingListEnabled to control the button's visibility:
- When the flag is on, the "Join our mailing list" button appears.
- When the flag is off, the button is hidden.
This example demonstrates how to control UI elements with feature flags in ASP.NET Core MVC. We'll keep the application simple and focus on integrating the SDK, evaluating the flag, and passing its value to a Razor view.
The demo app is based on the ASP.NET Core Web App (Model-View-Controller) template. You can see the complete source code on GitHub.
Prerequisites
Before starting to code, make sure you have the following:
- The Microsoft .NET SDK, version 10 or newer. (Be sure to download the SDK, not only the runtime, because you'll need it to restore NuGet packages and build the project.)
- A ConfigCat account. You can sign up for the Forever Free plan.
- Visual Studio Code with the C# Dev Kit extension installed.
- Basic familiarity with C# and ASP.NET Core MVC. Some knowledge of HTML and Razor syntax will also help.
Step 1: Create a Feature Flag in ConfigCat
-
Log in to your ConfigCat account, or sign up for the Forever Free plan here.
-
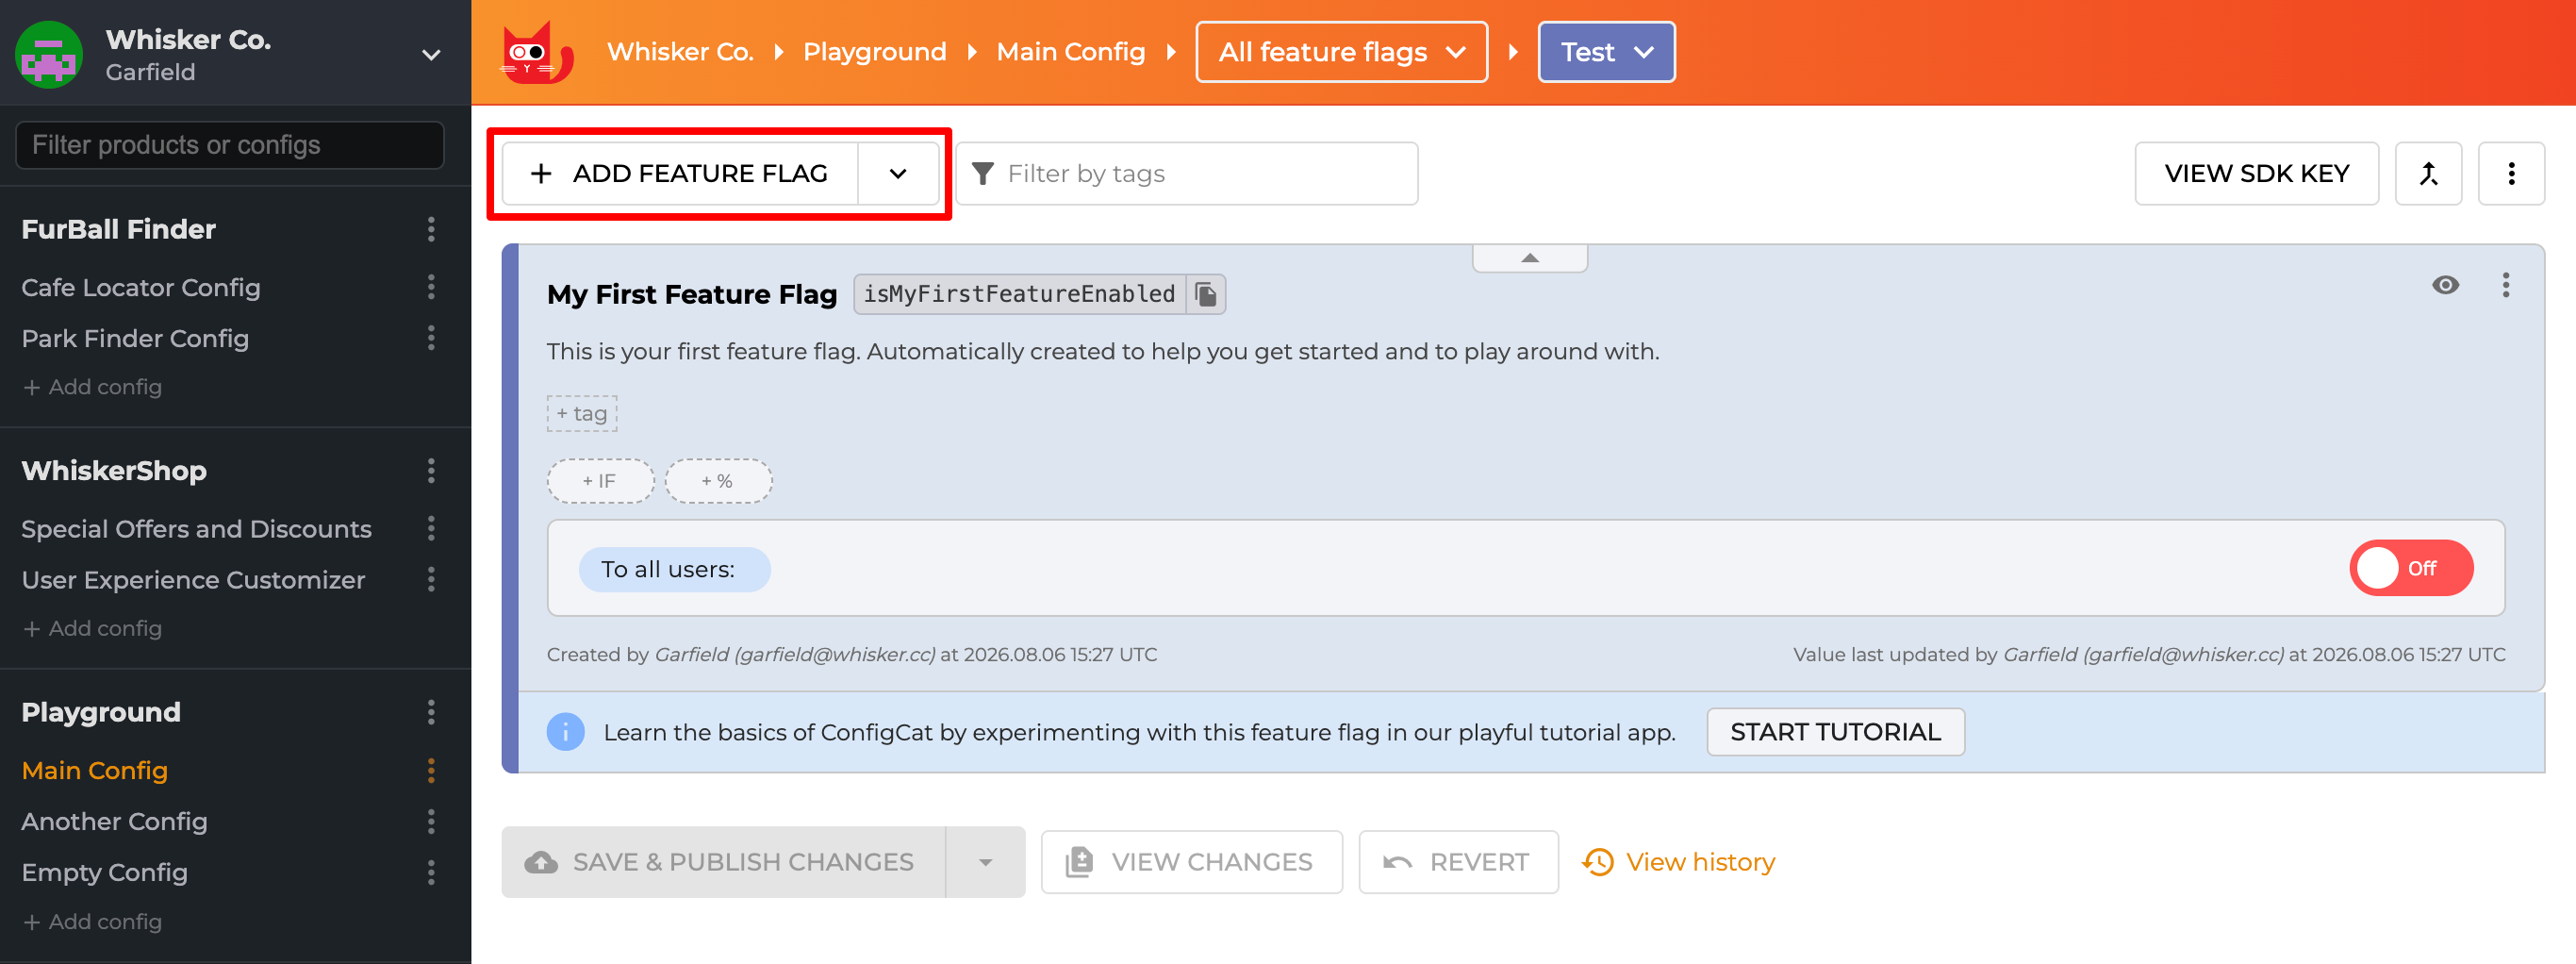
In the ConfigCat Dashboard, click the ADD FEATURE FLAG button.
-
Create a boolean feature flag named Mailing List, with
mailingListEnabledas the Key for programs. Leave its initial value set to Off. We'll turn it on later to make the button appear.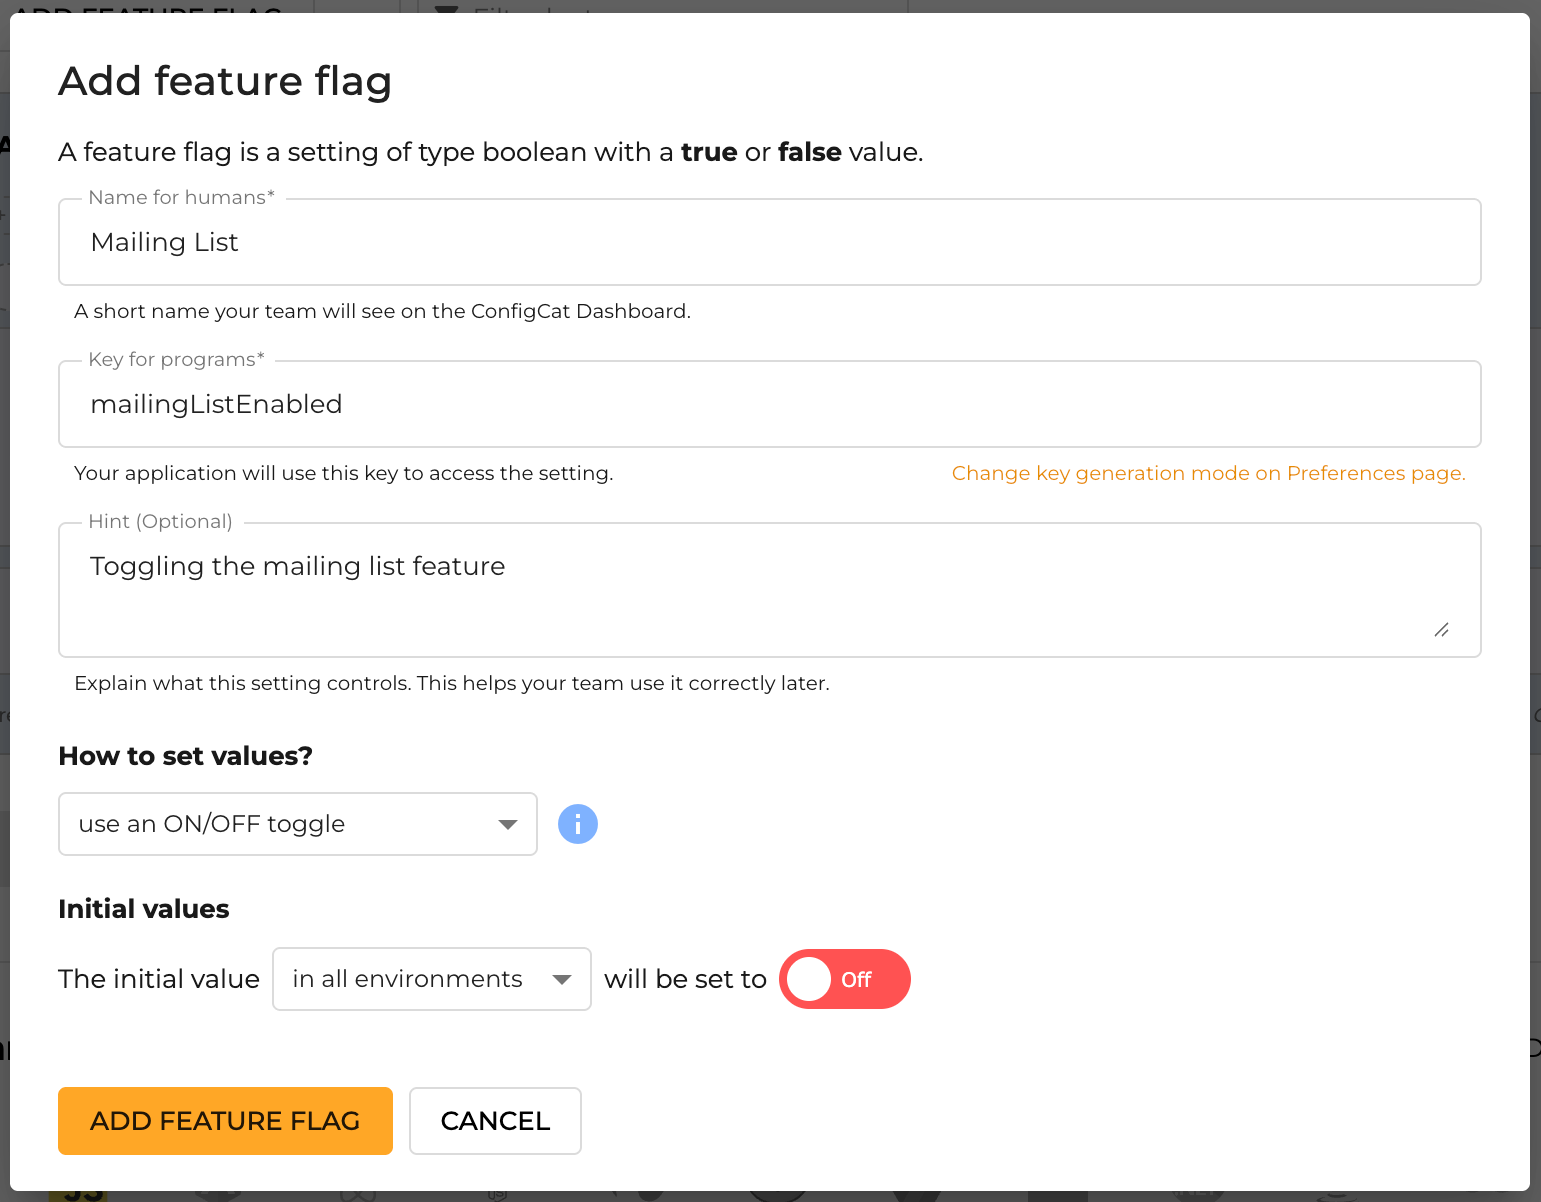
Now that the flag is in place, let's build the application that uses it.
Step 2: Create an ASP.NET Core MVC Application
-
In your development environment, create a new folder named
feature_flags_in_dotnet_mvc_samplefor the project and open it in VS Code. Then create a new MVC application from the terminal:dotnet new mvcinfoMVC stands for Model-View-Controller, a pattern that splits responsibility across three layers. For this tutorial, we'll cover all three.
-
Install the local web development certificate for the project:
dotnet dev-certs https --trustinfoThis installs and trusts a local HTTPS development certificate, allowing your browser to open your application over HTTPS without displaying a security warning.
-
Open
Views/Home/Index.cshtmland replace its contents with the markup below. It's a simple page with a message and a subscribe button:Views/Home/Index.cshtml@{ViewData["Title"] = "Home Page";}<div class="text-center"><p>Thank you for registering on our website.</p><button class="btn btn-danger">Join our mailing list</button></div> -
Launch the app with the command below, then open the link that the host is listening on:
dotnet run --launch-profile httpsYou should see the static page, with the button always visible:
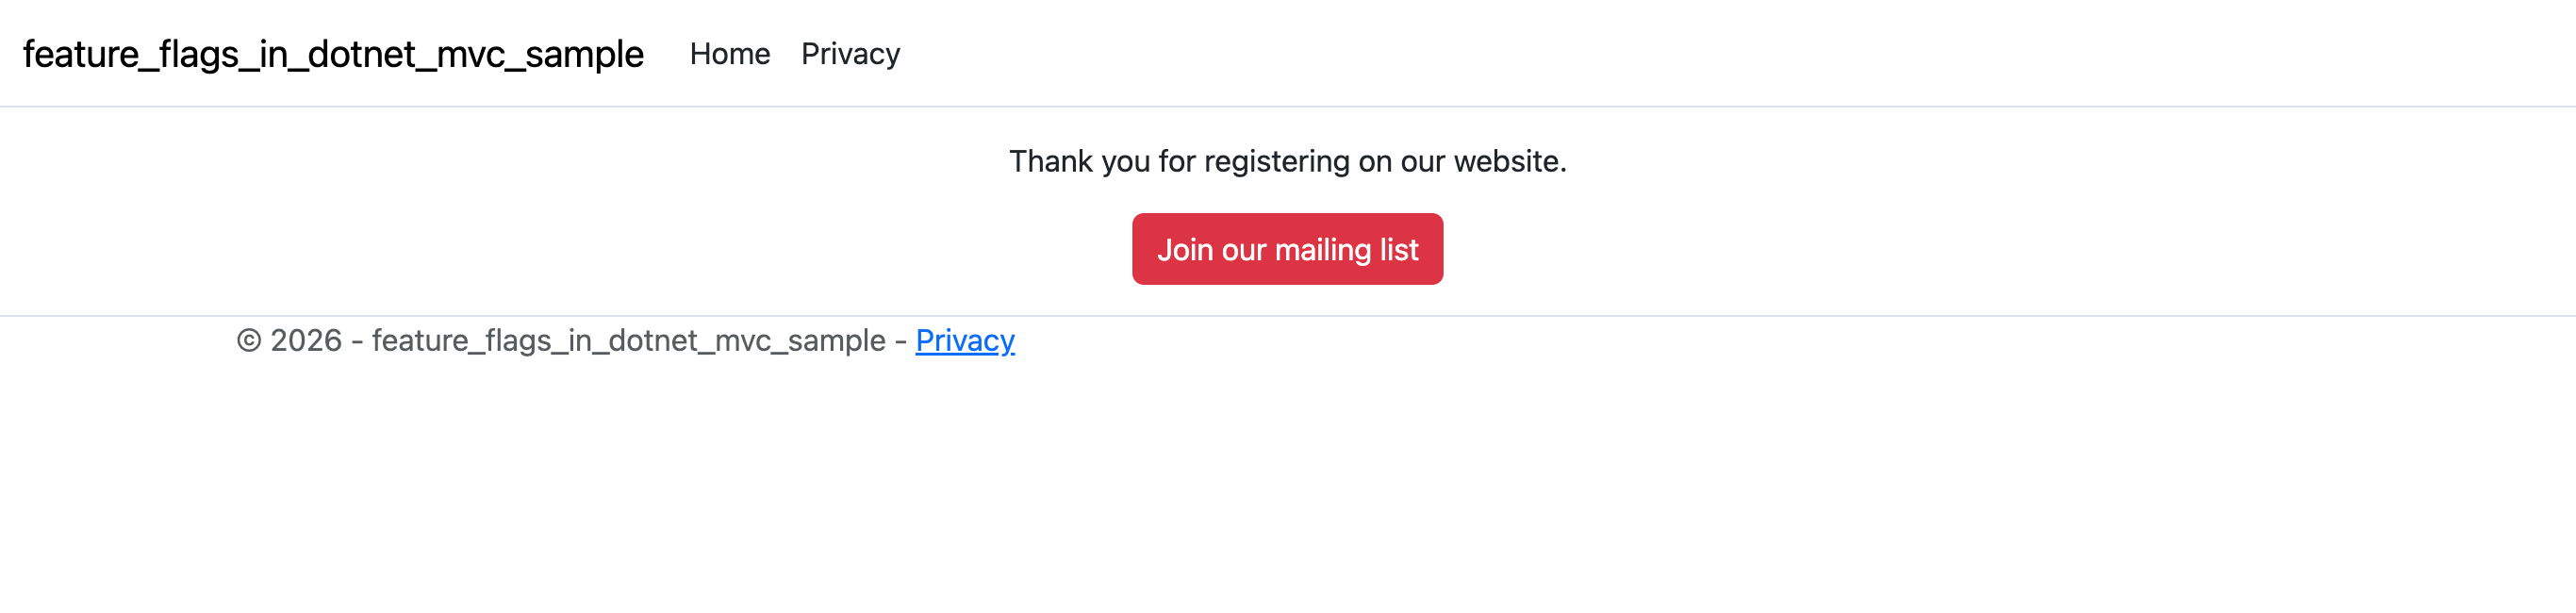
At this point, the button is part of the Razor view and appears every time the page loads. Next, we'll integrate ConfigCat so its visibility depends on a feature flag instead.
Step 3: Install and Configure the ConfigCat .NET SDK
To use feature flags in ASP.NET Core MVC, we need to connect our application to ConfigCat. The ConfigCat .NET SDK lets us retrieve and evaluate feature flag values directly in our C# code.
Install the ConfigCat SDK
To connect the application to the feature flag we created, install the ConfigCat SDK for .NET (more precisely, its integration package for ASP.NET Core):
dotnet add package ConfigCat.Extensions.Hosting
The integration package sets up your ASP.NET Core application so it manages the ConfigCat client automatically, from initialization at startup to disposal at shutdown.
Configure your ConfigCat SDK Key
In your appsettings.json file, add a block for ConfigCat and specify your ConfigCat SDK Key, which you'll find by clicking the VIEW SDK KEY button in the ConfigCat Dashboard.
{
  "ConfigCat": {
    "DefaultClient": {
      "SdkKey": "YOUR-CONFIGCAT-SDK-KEY-FOR-PRODUCTION"
    }
  },
  // rest of configs...
}
Use separate ConfigCat environments and SDK Keys for development and production. For example, you can add a corresponding ConfigCat block with your development SDK Key to appsettings.Development.json.
Environment-specific configuration can also be supplied through other .NET configuration providers, such as environment variables, rather than being hard-coded into source code.
Using separate environments allows you to test feature flag changes in development before enabling them in production. For production applications, avoid committing environment-specific credentials to source control.
Register ConfigCat with ASP.NET Core dependency injection
In the Program.cs file, hook ConfigCat up via the application builder. ASP.NET Core uses dependency injection (DI) to provide services to controllers and other application components. The builder.UseConfigCat() call makes sure that ConfigCat services are registered in the DI container, so we can inject IConfigCatClient into our controller to look up a feature flag's value.
var builder = WebApplication.CreateBuilder(args);

builder.UseConfigCat();

// rest of code...
By default, the SDK downloads and caches the latest flag values every 60 seconds. You can change this and other behavior via the SDK's polling modes, described in the .NET SDK reference.
Step 4: Evaluate the Feature Flag in an ASP.NET Core MVC Controller
Now that ConfigCat is configured, let's retrieve the value of our mailingListEnabled feature flag and use it to decide if the subscription button should appear.
In an ASP.NET Core MVC application, the controller handles the request and prepares data for the view. We'll evaluate the flag in the controller, store the result in a view model, and pass it to the Razor view.
Create a view model
Add a view model for the index page. Create a new file in the Models directory and name it IndexViewModel.cs. We'll use it to pass the flag's value to the view in the next step.
namespace feature_flags_in_dotnet_mvc_sample.Models;

public class IndexViewModel
{
    public required bool MailingListEnabled { get; set; }
}
Get the feature flag value in HomeController
Evaluate the flag in Controllers/HomeController.cs and pass its value to the corresponding view. The code comments explain what each part does:
using System.Diagnostics;
using ConfigCat.Client; // Import types from the ConfigCat SDK's namespace
using feature_flags_in_dotnet_mvc_sample.Models;
using Microsoft.AspNetCore.Mvc;

namespace feature_flags_in_dotnet_mvc_sample.Controllers;

// Inject the ConfigCat client via a constructor parameter
// so we can read the feature flag's value and pass it to the Views/Home/Index.cshtml file
// to control whether the "Join our mailing list" button is rendered
public class HomeController(IConfigCatClient configCatClient) : Controller
{
    public async Task<IActionResult> Index()
    {
        // Get the flag's latest value
        var mailingListEnabled = await configCatClient.GetValueAsync("mailingListEnabled", false);

        // Return its value to the view
        return View(new IndexViewModel { MailingListEnabled = mailingListEnabled });
    }
}
Step 5: Conditionally Render the Button in a Razor View
With the feature flag value available in the view model, we can use a Razor @if statement to conditionally render the subscription button.
In Views/Home/Index.cshtml, declare the model with @model IndexViewModel, then wrap the button in a condition so it only renders when the flag is on:
@model IndexViewModel

@{
    ViewData["Title"] = "Home Page";
}

<div class="text-center">
    <p>Thank you for registering on our website.</p>
    @if (Model.MailingListEnabled)
    {
        <button class="btn btn-danger">Join our mailing list</button>
    }
</div>
The Razor view checks Model.MailingListEnabled before rendering the button. If the value is true, the button is included in the HTML response. If it's false, the button isn't rendered at all.
This is one way to use feature flags in ASP.NET Core MVC to control the user interface without modifying the view every time the feature's availability changes.
This example demonstrates how to use a feature flag to control the visibility of a UI element. The button is for demonstration purposes and doesn't submit a subscription request.
In a real application, hiding a button doesn't prevent users from accessing underlying functionality directly. If you want to disable a feature completely, make sure to check the feature flag in the corresponding server-side logic as well.
Step 6: Test Your ASP.NET Core Feature Flag
Now let's test the feature flag to confirm that changing its value in ConfigCat updates the MVC application's UI.
Restart the application and reload the page. The button won't show up because the flag is still set to Off.

Now go back to the ConfigCat Dashboard, toggle the flag On, and click the SAVE & PUBLISH CHANGES button. Wait for the polling interval to elapse, then reload the page. The button should now reappear.
The default polling interval is 60 seconds. To avoid long waits, set it lower in development mode.
That's it! You can now show or hide the mailing list subscription button directly from the ConfigCat Dashboard, without rebuilding or redeploying your ASP.NET Core MVC application.
Conclusion
You've now implemented feature flags in an ASP.NET Core MVC application using ConfigCat. We created a boolean feature flag, integrated the ConfigCat .NET SDK, evaluated the flag in an MVC controller, and used its value to conditionally render a button in a Razor view.
By separating feature releases from deployments, you can control application behavior remotely and decide when new functionality becomes available to users.
Want to try it in your own .NET application? Create a free ConfigCat account and start experimenting with feature flags.
Resources
Here are some useful resources to help you continue working with feature flags in ASP.NET Core and .NET applications:
- ConfigCat .NET SDK documentation — Learn more about evaluating feature flags, polling modes, and SDK configuration.
- ConfigCat ASP.NET Core and dependency injection integration — Explore the integration package used in this tutorial.
- Using ConfigCat Feature Flags in ASP.NET Core Web API — Learn how to use feature flags in an ASP.NET Core API.
- Feature Flag Best Practices — Explore common mistakes and practical recommendations for managing feature flags.
- ConfigCat GitHub — Explore SDK repositories and example applications.
For more awesome content, keep up with ConfigCat on X, Facebook, LinkedIn, GitHub, and the News & Product Updates page. Deploy any time, release when confident.