A/B Testing in .NET: An ASP.NET Core Tutorial


A/B testing lets you compare two versions of a feature with real users and measure which one performs better. In an ASP.NET Core application, feature flags can handle which variation a user sees, while an analytics platform measures what happens afterward.
In this guide, we'll show you how to run an A/B test in ASP.NET Core using .NET 10, ConfigCat for experiment assignment, and Amplitude for analytics. We'll split users between two versions of an Add to Cart button and measure whether the change affects user behavior.
What Is A/B Testing?
A/B testing is a method used to compare two variations of a software product, such as a website, against a predefined metric to see how each variation performs. Typically, the variations are Variation A (the original) and Variation B (the variant).
Instead of relying on assumptions about which version users will prefer, you can expose different groups of users to each variation and compare how the groups behave.
Although A/B testing is commonly associated with marketing and conversion optimization, the same approach can be used for product features, onboarding flows, checkout experiences, UI changes, and many other parts of an application.
If you want a deeper look at the experimentation side before getting into the .NET implementation, see A/B Testing with Feature Flags: How It Works and When to Use It.
The Role of Feature Flags in A/B Testing
Feature flags are a convenient way to deliver the different variations of an A/B test. They are software toggles that let you change the visibility, appearance, or behavior of specific parts of your application.
For an experiment, a feature flag or setting can determine which variation each user receives. Percentage-based targeting can then divide users into experiment groups, such as 50% seeing Variation A and 50% seeing Variation B.
It's worth making an important distinction here: a percentage rollout and an A/B test can use the same feature flag mechanism, but their goal is different. A rollout gradually exposes users to a feature to control release risk. An A/B test compares variations against a predefined metric to understand their effect on user behavior.
To create and manage the feature flag in the upcoming demo experiment, we'll use ConfigCat. They offer a cloud-based solution with an easy-to-use dashboard for creating and managing feature flags.
Collecting Data During the Experiment
Assigning users to different variations is only one part of an A/B test. You also need to measure what happens after users see those variations.
In this tutorial, ConfigCat handles the experiment assignment, ASP.NET Core renders the selected experience, and Amplitude handles the measurement.
For a reliable experiment, it's useful to think about two types of events:
- Exposure: the user actually saw a particular variation.
- Conversion: the user performed the action you're trying to influence.
Tracking both lets you compare conversion rates rather than just raw event totals. Amplitude also recommends tracking experiment exposure so that experiment results can be tied to the variation a user actually experienced.
The Demo A/B Test Experiment
Let's explore a hypothetical scenario: an online cat store is seeing low engagement with on of its product cards. After reviewing live session recordings of how customers interact with the website, the team suspects that the Add to Cart button might not stand out enough.
This leads to a simple hypothesis: will changing the button color increase the percentage of users who click Add to Cart?
In Variation A (the original), the button color is dark. Variation B changes the button color to green, making the Add to Cart button more noticeable.
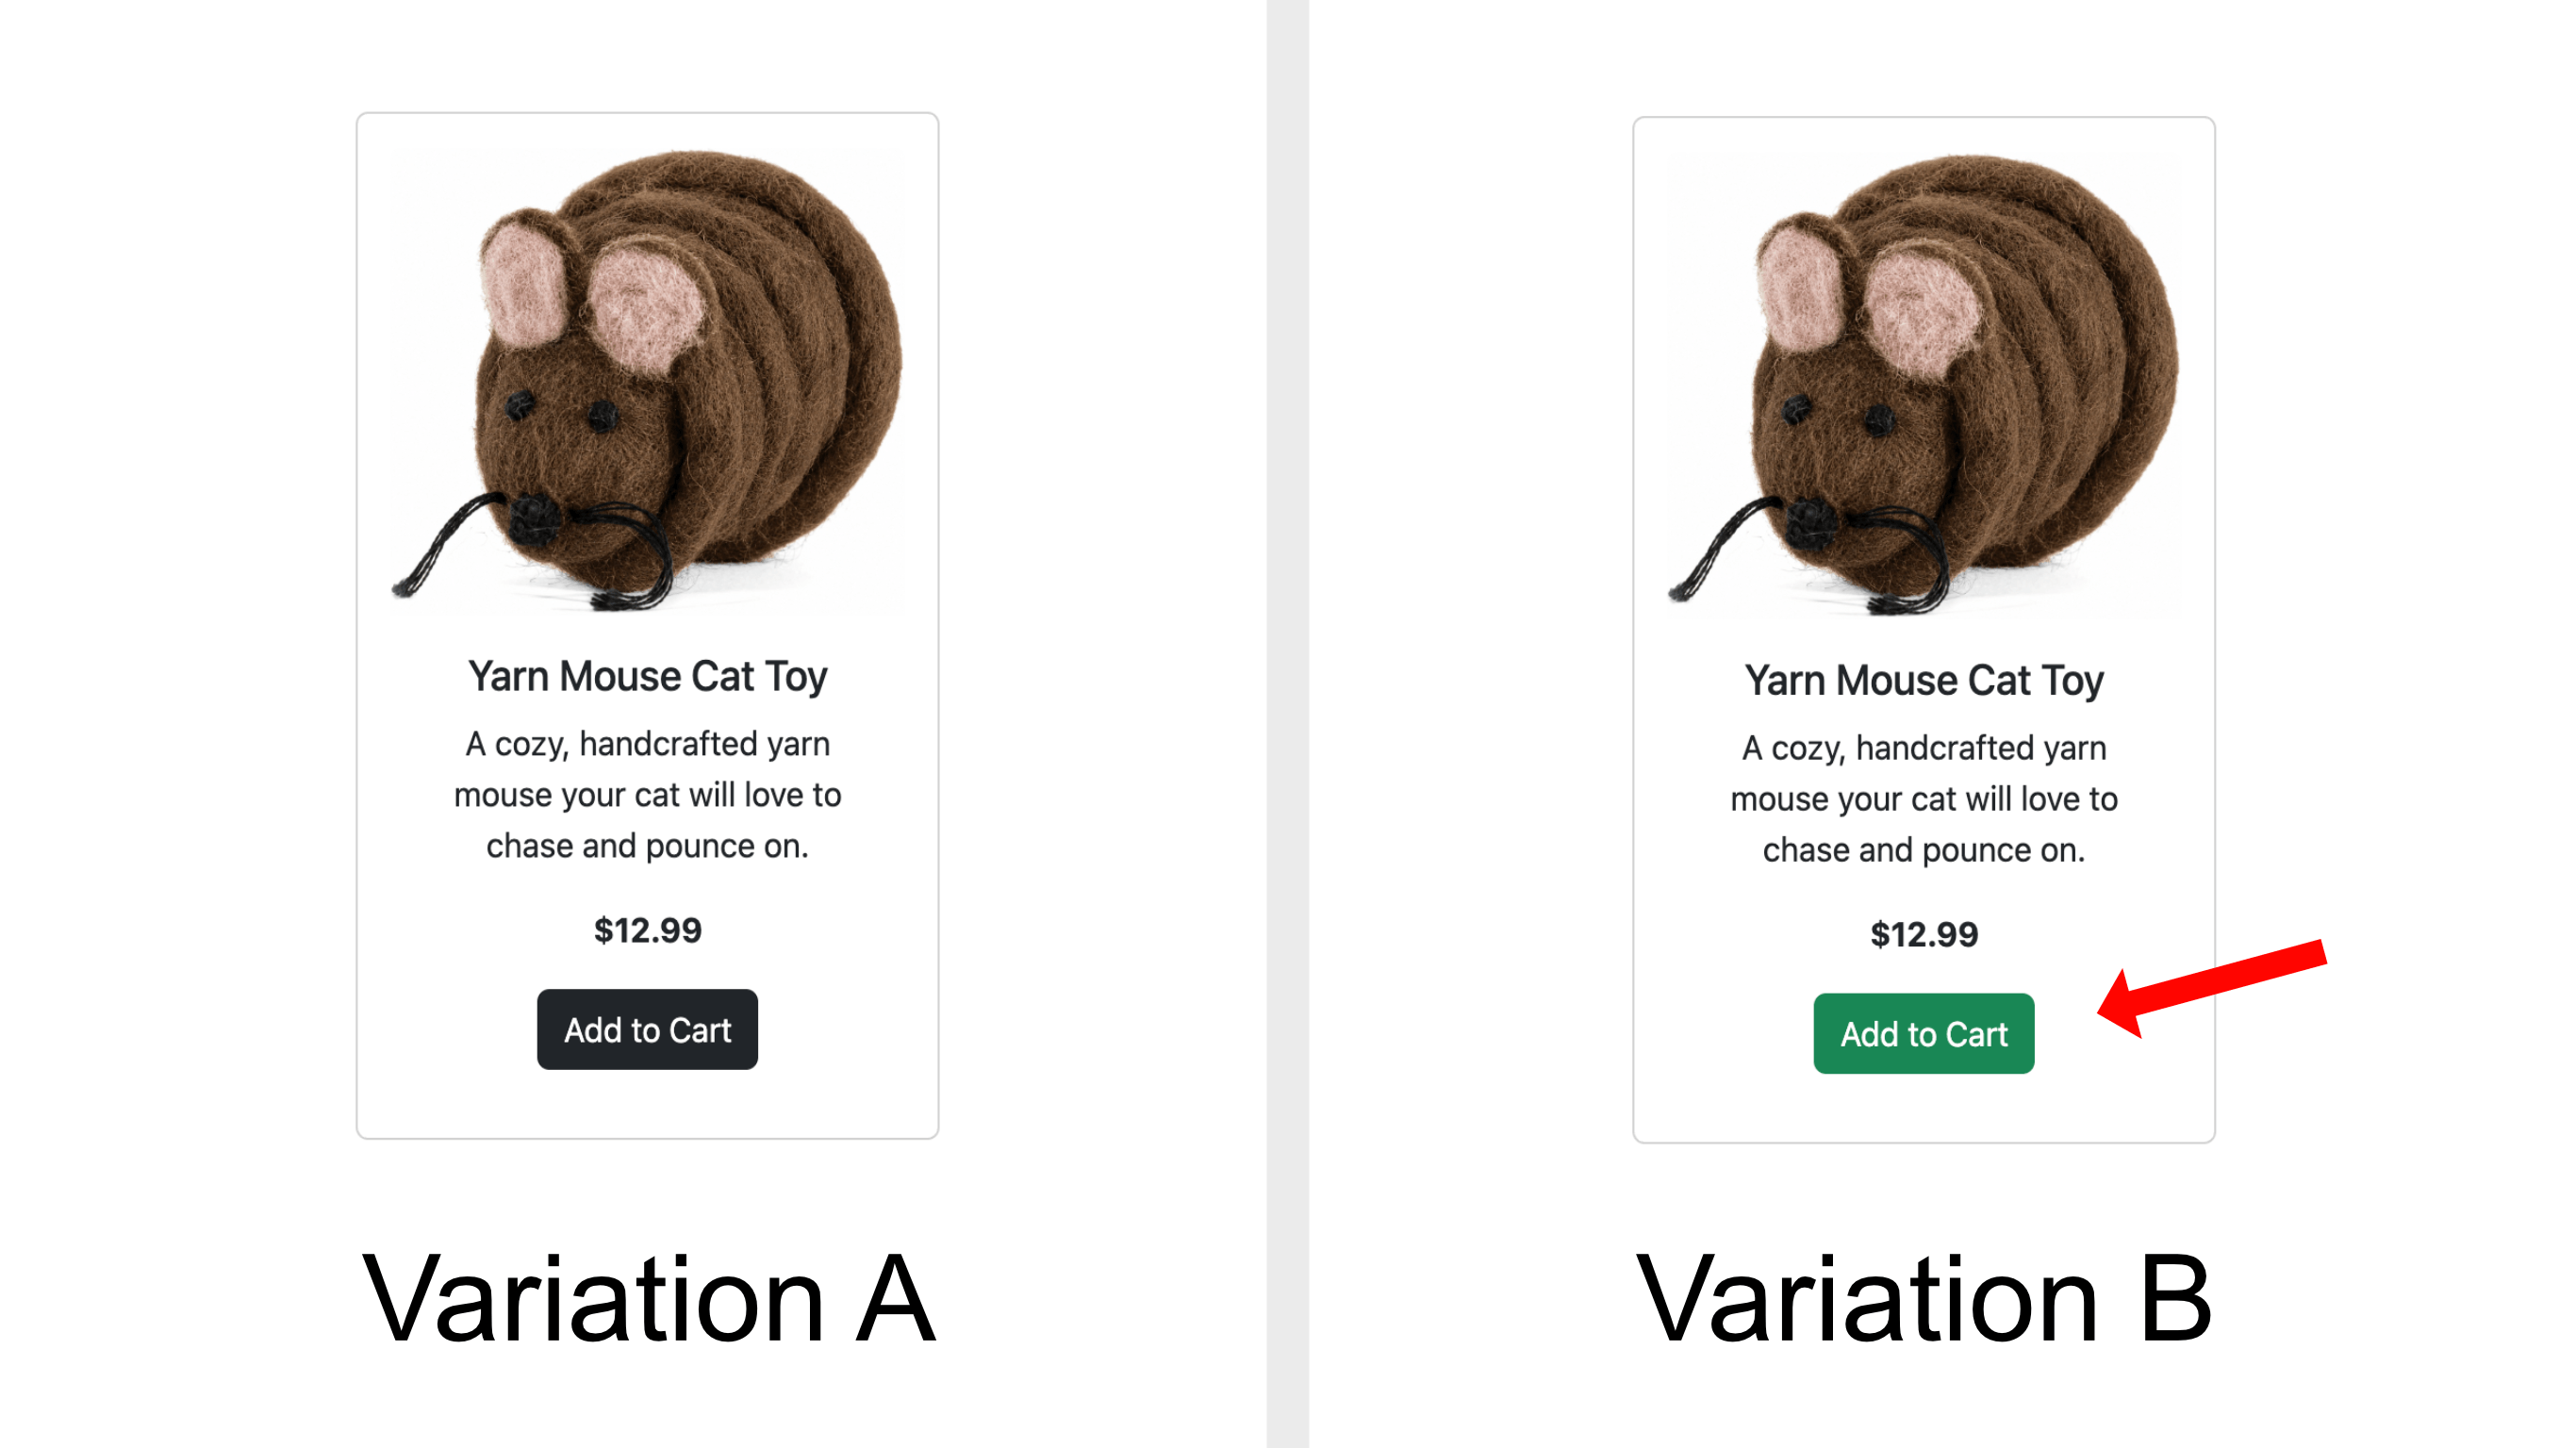
Here's how we'll define the experiment:
- Control: dark Add to Cart button
- Treatment: green Add to Cart button
- Traffic allocation: 50% / 50%
- Primary metric: percentage of exposed users who click Add to Cart
The flow will look like this:
- A user opens the ASP.NET Core application.
- The application passes a stable user identifier to ConfigCat.
- ConfigCat assigns that user to the
darkorgreenvariation. - ASP.NET Core renders the assigned button.
- The application records the user's variation in Amplitude.
- If the user clicks Add to Cart, a conversion event is recorded.
- The behavior of the two groups can then be compared.
The demo app is based on the ASP.NET Core Web App (Model-View-Controller) template. You can see the complete source code on GitHub.
Prerequisites
Before starting the tutorial, make sure you have the following:
- The Microsoft .NET SDK, version 10 or newer. (Be sure to download the SDK, not only the runtime, because you'll need it to restore NuGet packages and build the project.)
- A ConfigCat account. You can sign up for the Forever Free plan.
- An Amplitude account.
- A clone of the sample app with the
starter-codebranch checked out. - Visual Studio Code with the C# Dev Kit extension installed.
- Git installed, so you can clone the sample project.
This sample project uses .NET 10. Make sure the version you install is compatible with the project's target framework.
Create a feature flag in ConfigCat
-
Log in to your ConfigCat account or sign up for the Forever Free plan here.
-
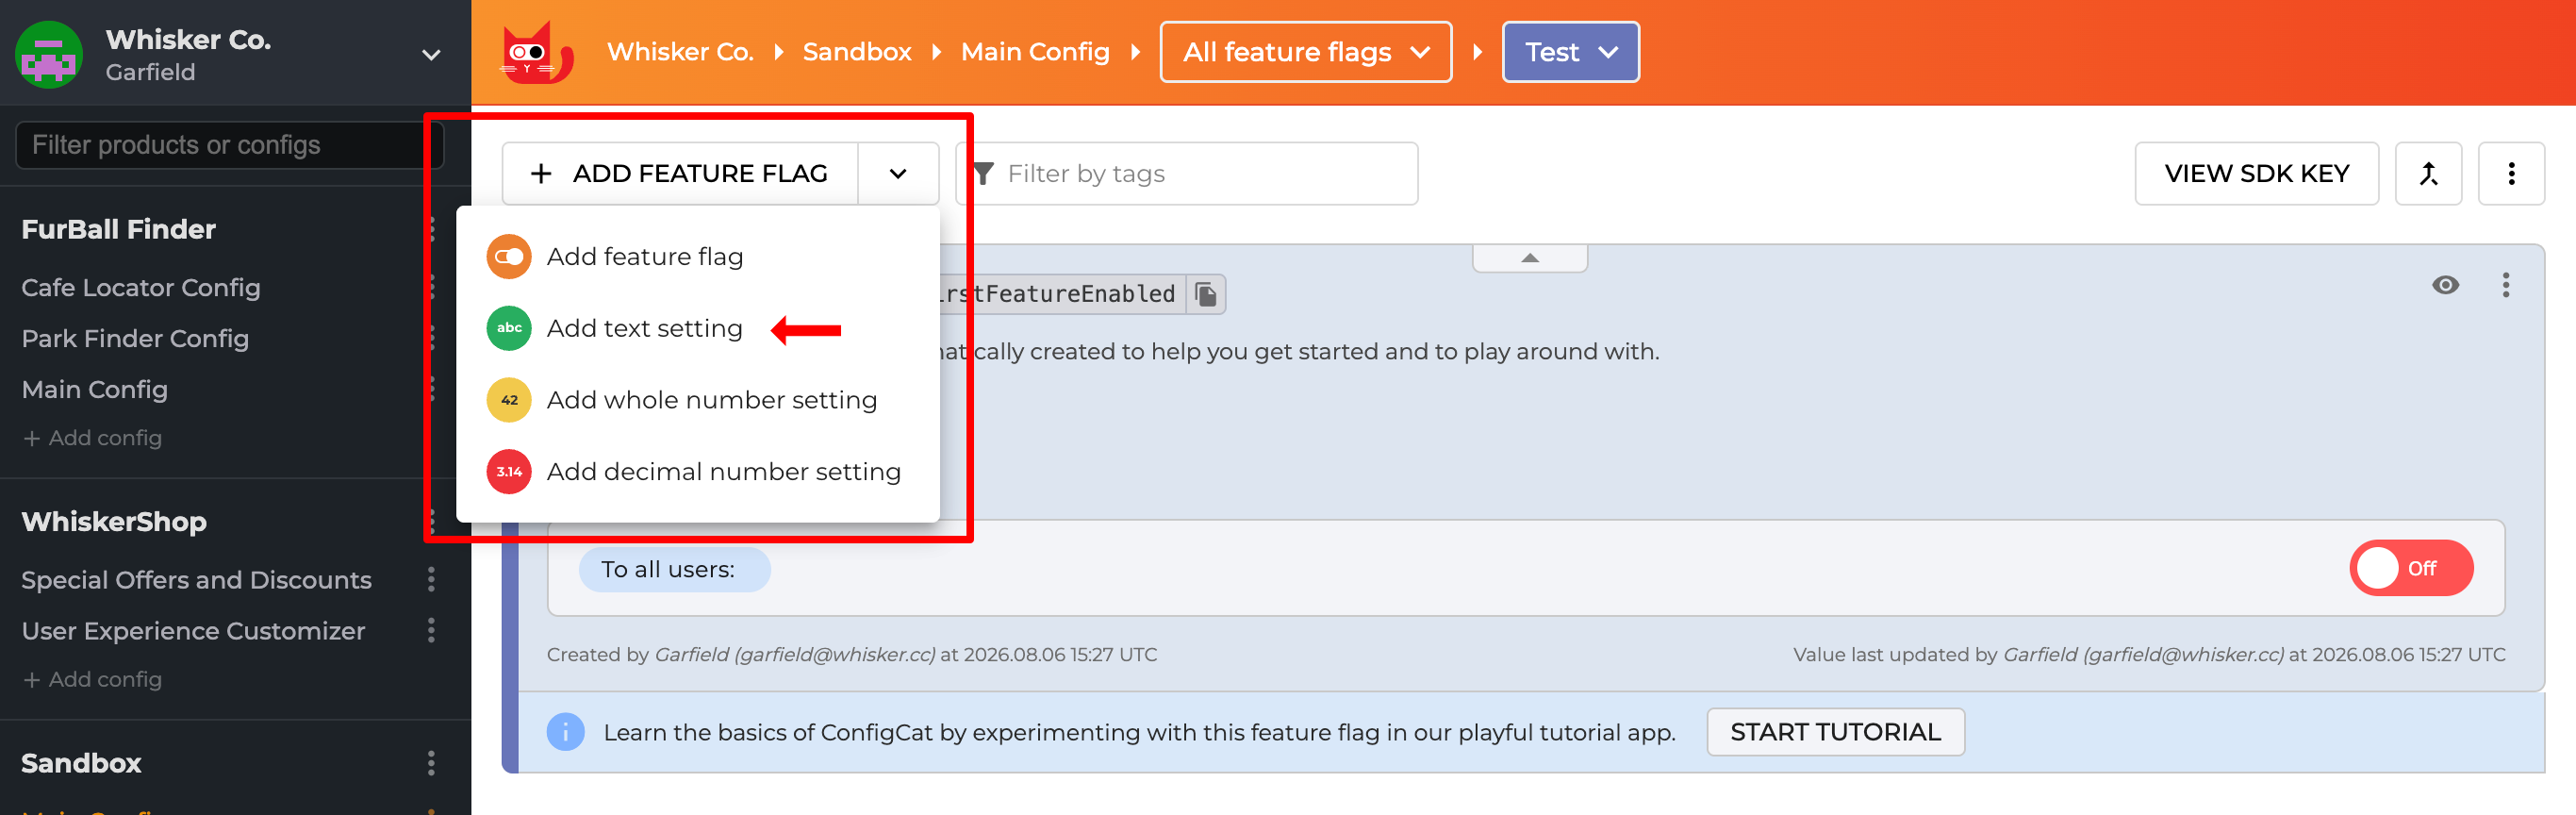
In the ConfigCat Dashboard, expand the dropdown next to the ADD FEATURE FLAG button, then click Add text setting.
-
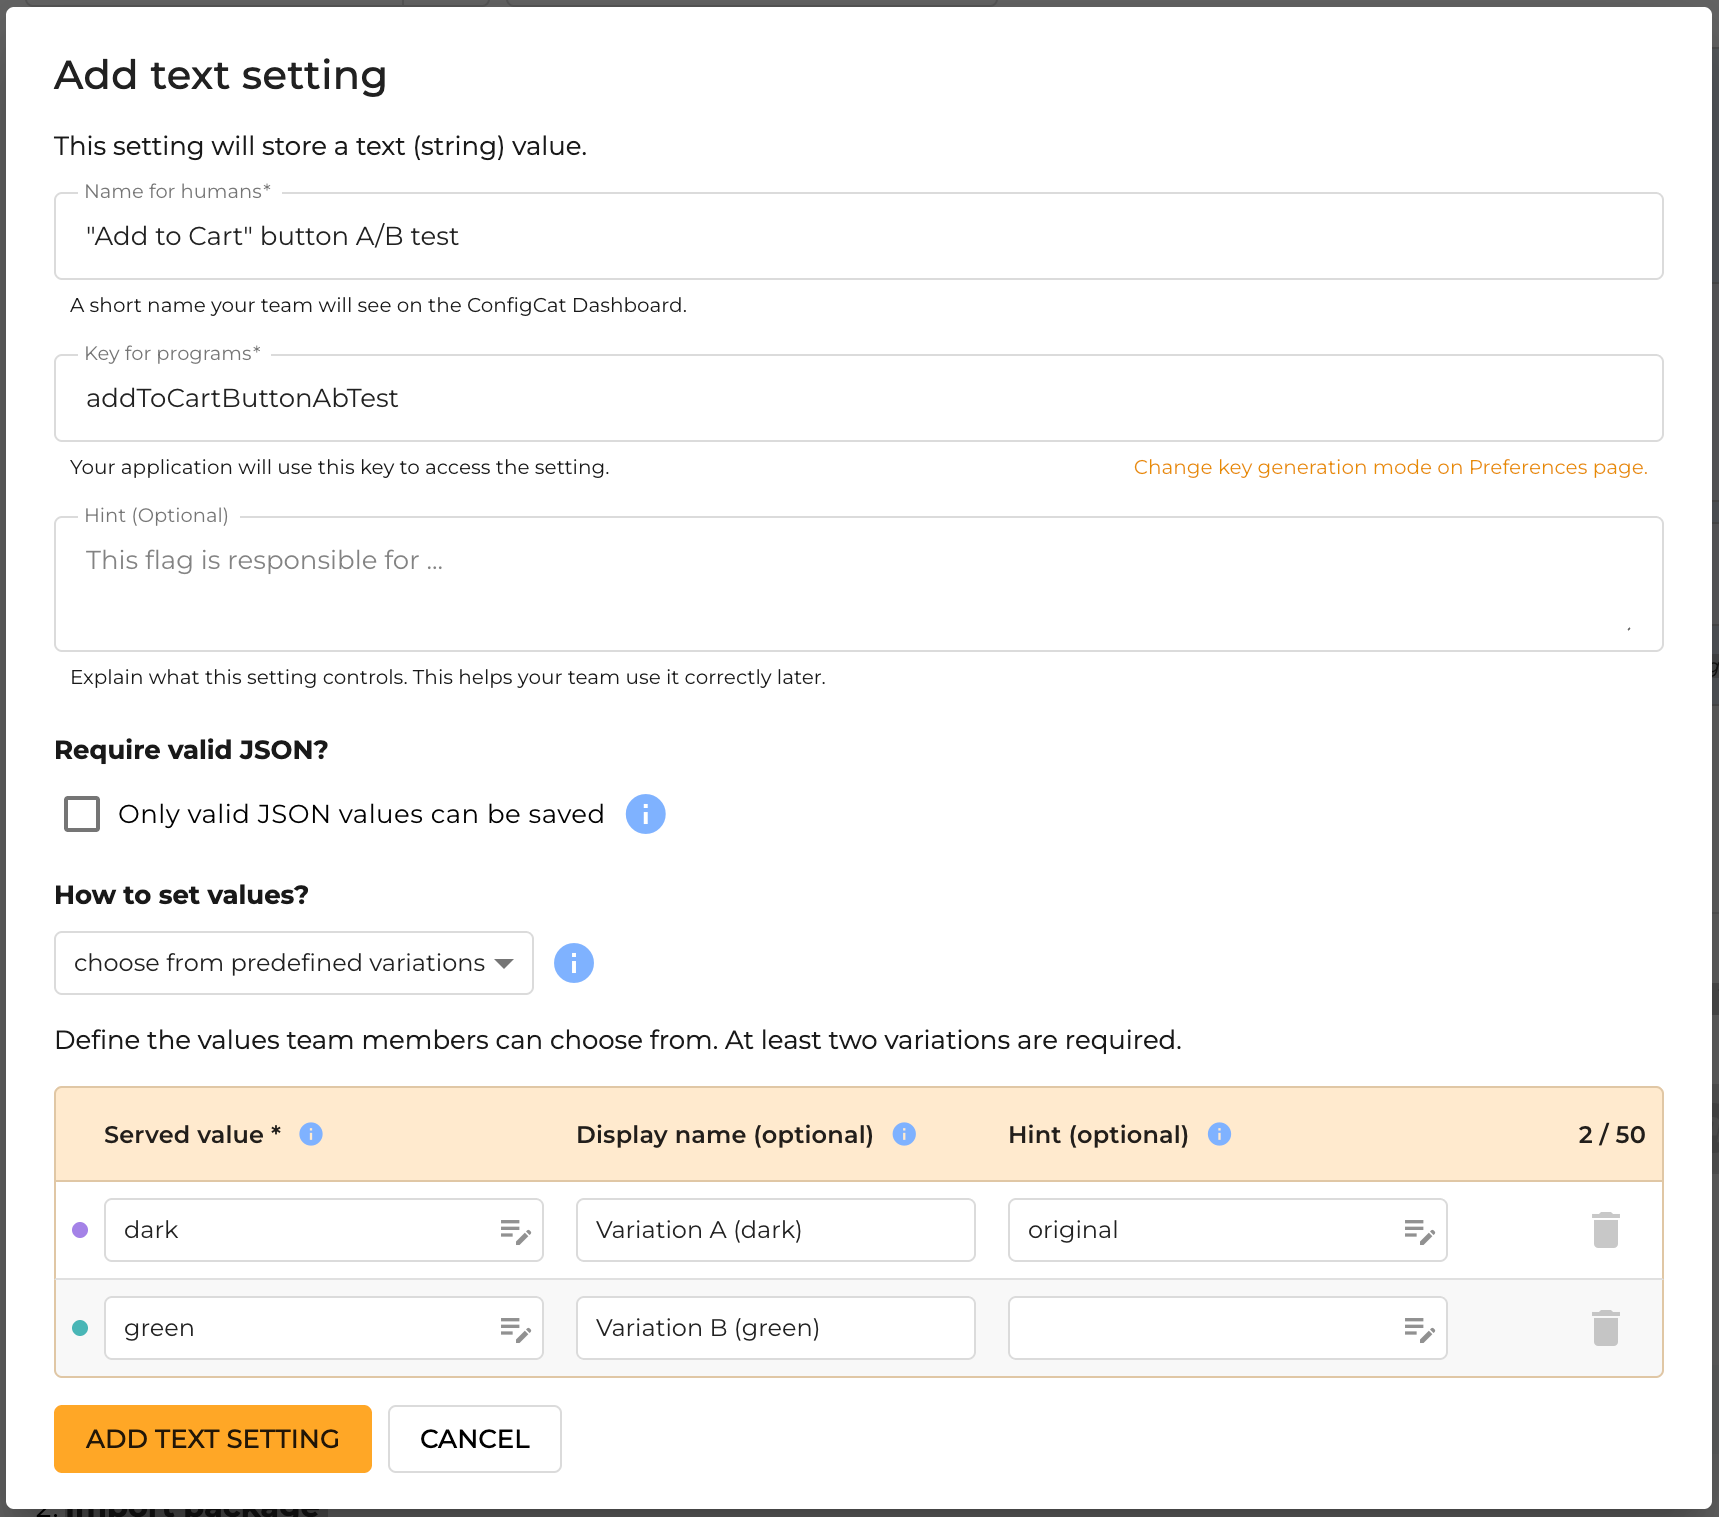
In the popup, enter the following data, then click the ADD TEXT SETTING button.
 info
infoIn the example above, I use predefined variations to specify the possible variations upfront for easy selection later.
-
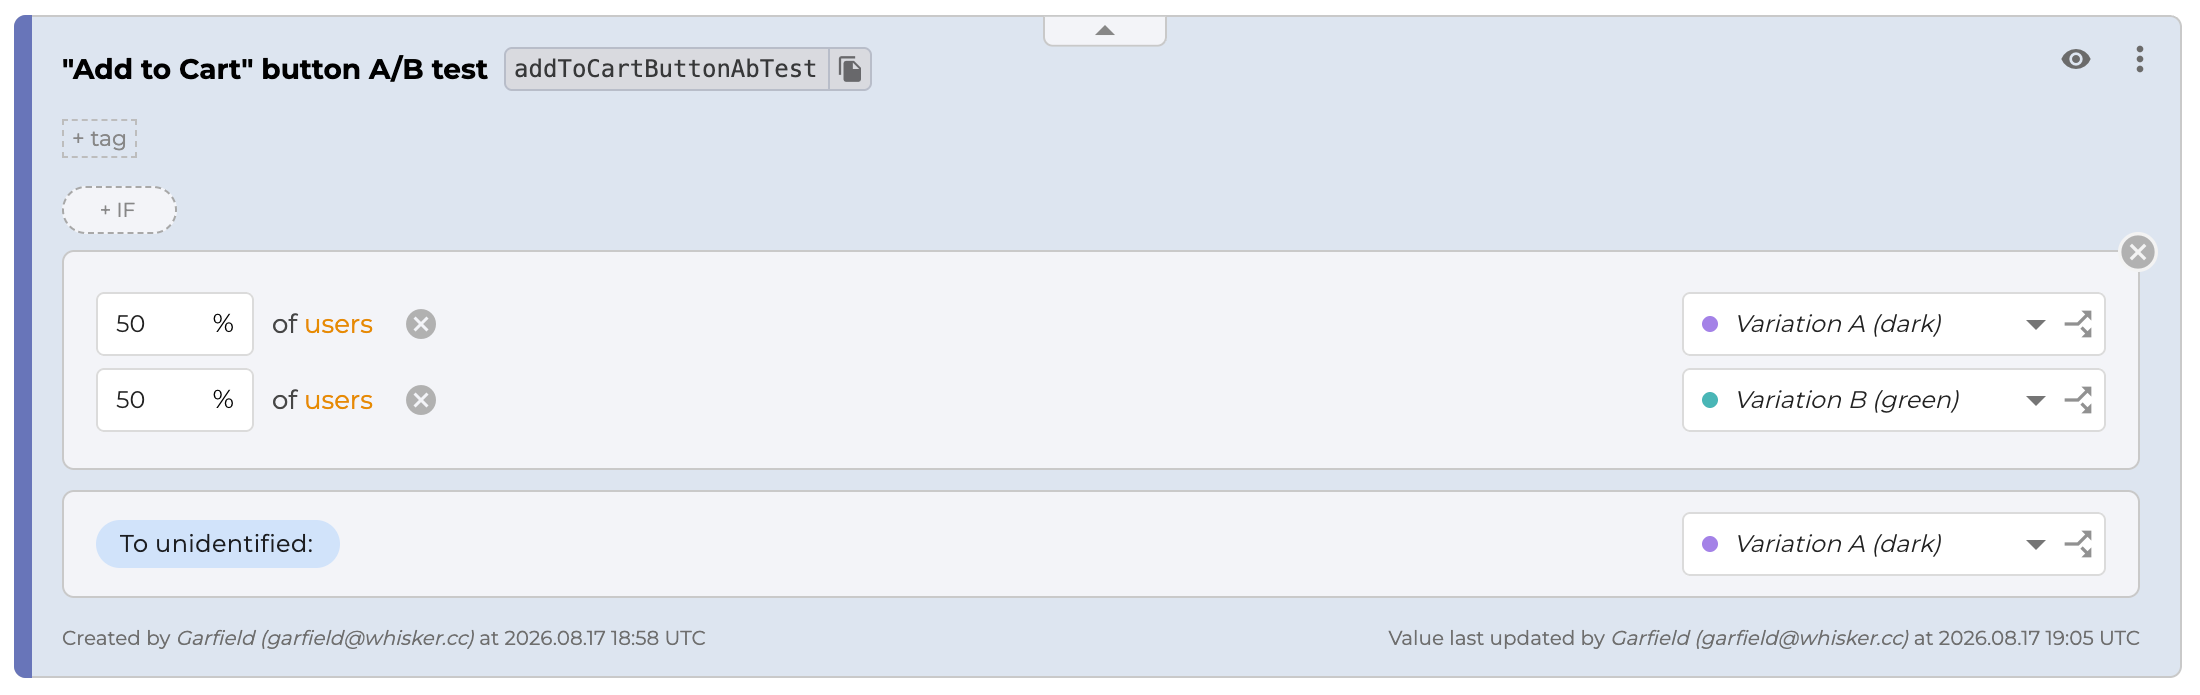
Add percentage options by clicking the +% button on the setting. This creates an option for each variation. Set both to 50% so half your users see Variation B while the other half continue to see Variation A.
Why the user identifier matters
Before we connect ConfigCat to the application, there's an important detail about percentage-based targeting to understand. ConfigCat doesn't randomly choose a new variation every time the user loads the page. Percentage evaluation is deterministic: using the same setting and the same user identifier results in the user being assigned consistently to the same percentage bucket.
This is important for A/B testing because you don't want someone to see the dark button on one request and the green button on the next. In a real application, use a stable identifier from your authentication or user system. For anonymous users, use a persistent anonymous identifier rather than creating a new value for every request.
You can pass this identifier to the ConfigCat SDK via the User Object when evaluating targeting rules and percentage options.
Adding ConfigCat to the app
-
To connect the app to the ConfigCat feature flag, install the ConfigCat SDK for .NET (more precisely, its integration package for ASP.NET Core).
dotnet add package ConfigCat.Extensions.HostinginfoThe integration package sets up your ASP.NET Core application to manage the ConfigCat client automatically, from initialization at startup to disposal at shutdown.
-
In your
appsettings.jsonfile, set your ConfigCat SDK Key in theConfigCatblock:appsettings.json{"ConfigCat": {"DefaultClient": {"SdkKey": "YOUR-CONFIGCAT-SDK-KEY-FOR-PRODUCTION"}}}infoIt is recommended to use separate SDK Keys for development and production. Add a similar
ConfigCatblock with your development SDK Key to yourappsettings.Development.jsonfile. -
In the
Program.csfile, hook ConfigCat up via the application builder. This lets you inject the ConfigCat client into any controller or service class to look up a feature flag's value.Program.csvar builder = WebApplication.CreateBuilder(args);builder.UseConfigCat();// rest of code... -
Add a view model for the index page in
Models/IndexViewModel.cs. We'll use it to pass the flag's value from theHomeControllerin the next step.Models/IndexViewModel.csnamespace ab_testing_dotnet_sample.Models;public class IndexViewModel{public required string AddToCartButtonVariation { get; set; }} -
To control the Add to Cart button's appearance using the feature flag, let's edit the
Controllers/HomeController.csfile. I've added code comments to explain what each part does:Controllers/HomeController.csusing ConfigCat.Client; // Import types from the ConfigCat SDK's namespacenamespace ab_testing_dotnet_sample.Controllers;// Inject the ConfigCat client via a constructor parameter// so we can read the feature flag's value and pass it to the Views/Home/Index.cshtml file to control the "Add to Cart" button's appearancepublic class HomeController(IConfigCatClient configCatClient) : Controller{public async Task<IActionResult> Index(){var configCatUser = CreateConfigCatUser();// Get the flag's latest valuevar addToCartButtonVariation = await configCatClient.GetValueAsync("addToCartButtonAbTest", "dark", configCatUser);// Return its value to the viewreturn View(new IndexViewModel { AddToCartButtonVariation = addToCartButtonVariation });}[HttpPost]public async Task<IActionResult> AddToCartForm([FromForm] string addToCartButtonVariation){// Redirect back to the same pagereturn RedirectToAction("Index");}private static User CreateConfigCatUser(){// A unique user id is required when creating a ConfigCat User Object// (we use a hard-coded user id here but you usually obtain it from HttpContext.User)return new User("user-id-123"){Country = "United Kingdom",};}// rest of code...}Notice that the
AddToCartFormPOST action receives the variation that was evaluated in theIndex()action and rendered with the page. This ensures that if the feature flag changes between the page load and the form submission, the variation sent to Amplitude still matches the one the user actually saw. -
In the
Views/Home/Index.cshtmlfile, adjust the color of the Add to Cart button based on the value of the feature flag. Declare the model with@model IndexViewModel, wrap the button in a form that posts to theAddToCartFormaction, and carry the current variation along in a hidden field so you can access it in the action handler. Then set the button's color (dark or green) via a CSS class based onModel.AddToCartButtonVariation.Views/Home/Index.cshtml@model IndexViewModel@{ViewData["Title"] = "Home Page";}<div class="text-center mb-4"><h1 class="display-4">Whisker Shop</h1></div><div class="row justify-content-center"><div class="col-auto"><div class="card p-3" style="width: 18rem;">@using (Html.BeginForm("AddToCartForm", "Home", FormMethod.Post)){<!-- existing code... --><div class="card-body text-center"><h5 class="card-title">Yarn Mouse Cat Toy</h5><p class="card-text">A cozy, handcrafted yarn mouse your cat will love to chase and pounce on.</p><p class="fw-bold">$12.99</p>@Html.HiddenFor(m => m.AddToCartButtonVariation)<input type="submit" value="Add to Cart" class="btn @(Model.AddToCartButtonVariation == "green" ? "btn-success" : "btn-dark")" /></div>}</div></div></div>
Tracking the experiment with Amplitude
Now let's add analytics so we can measure what happens in each group.
-
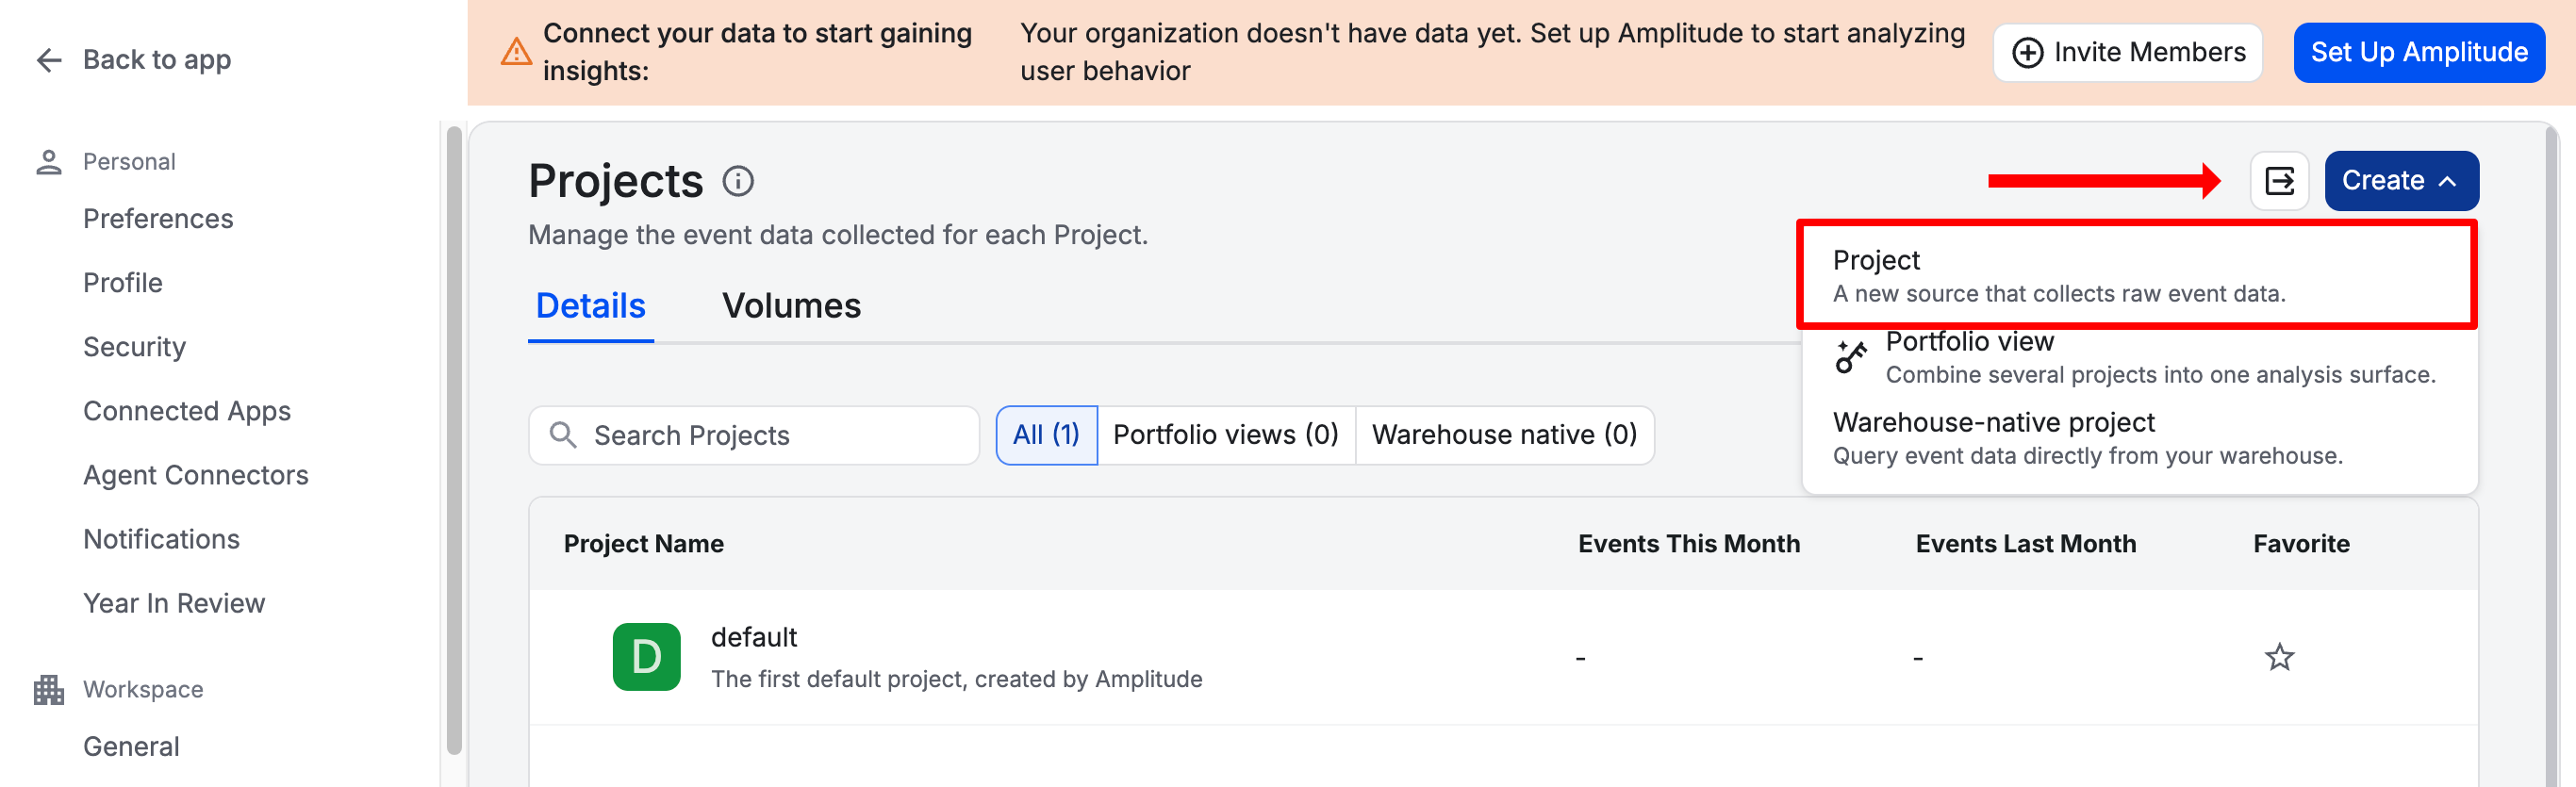
In your Amplitude Dashboard, navigate to Settings > Projects, then click the Create button at the top of the screen.
-
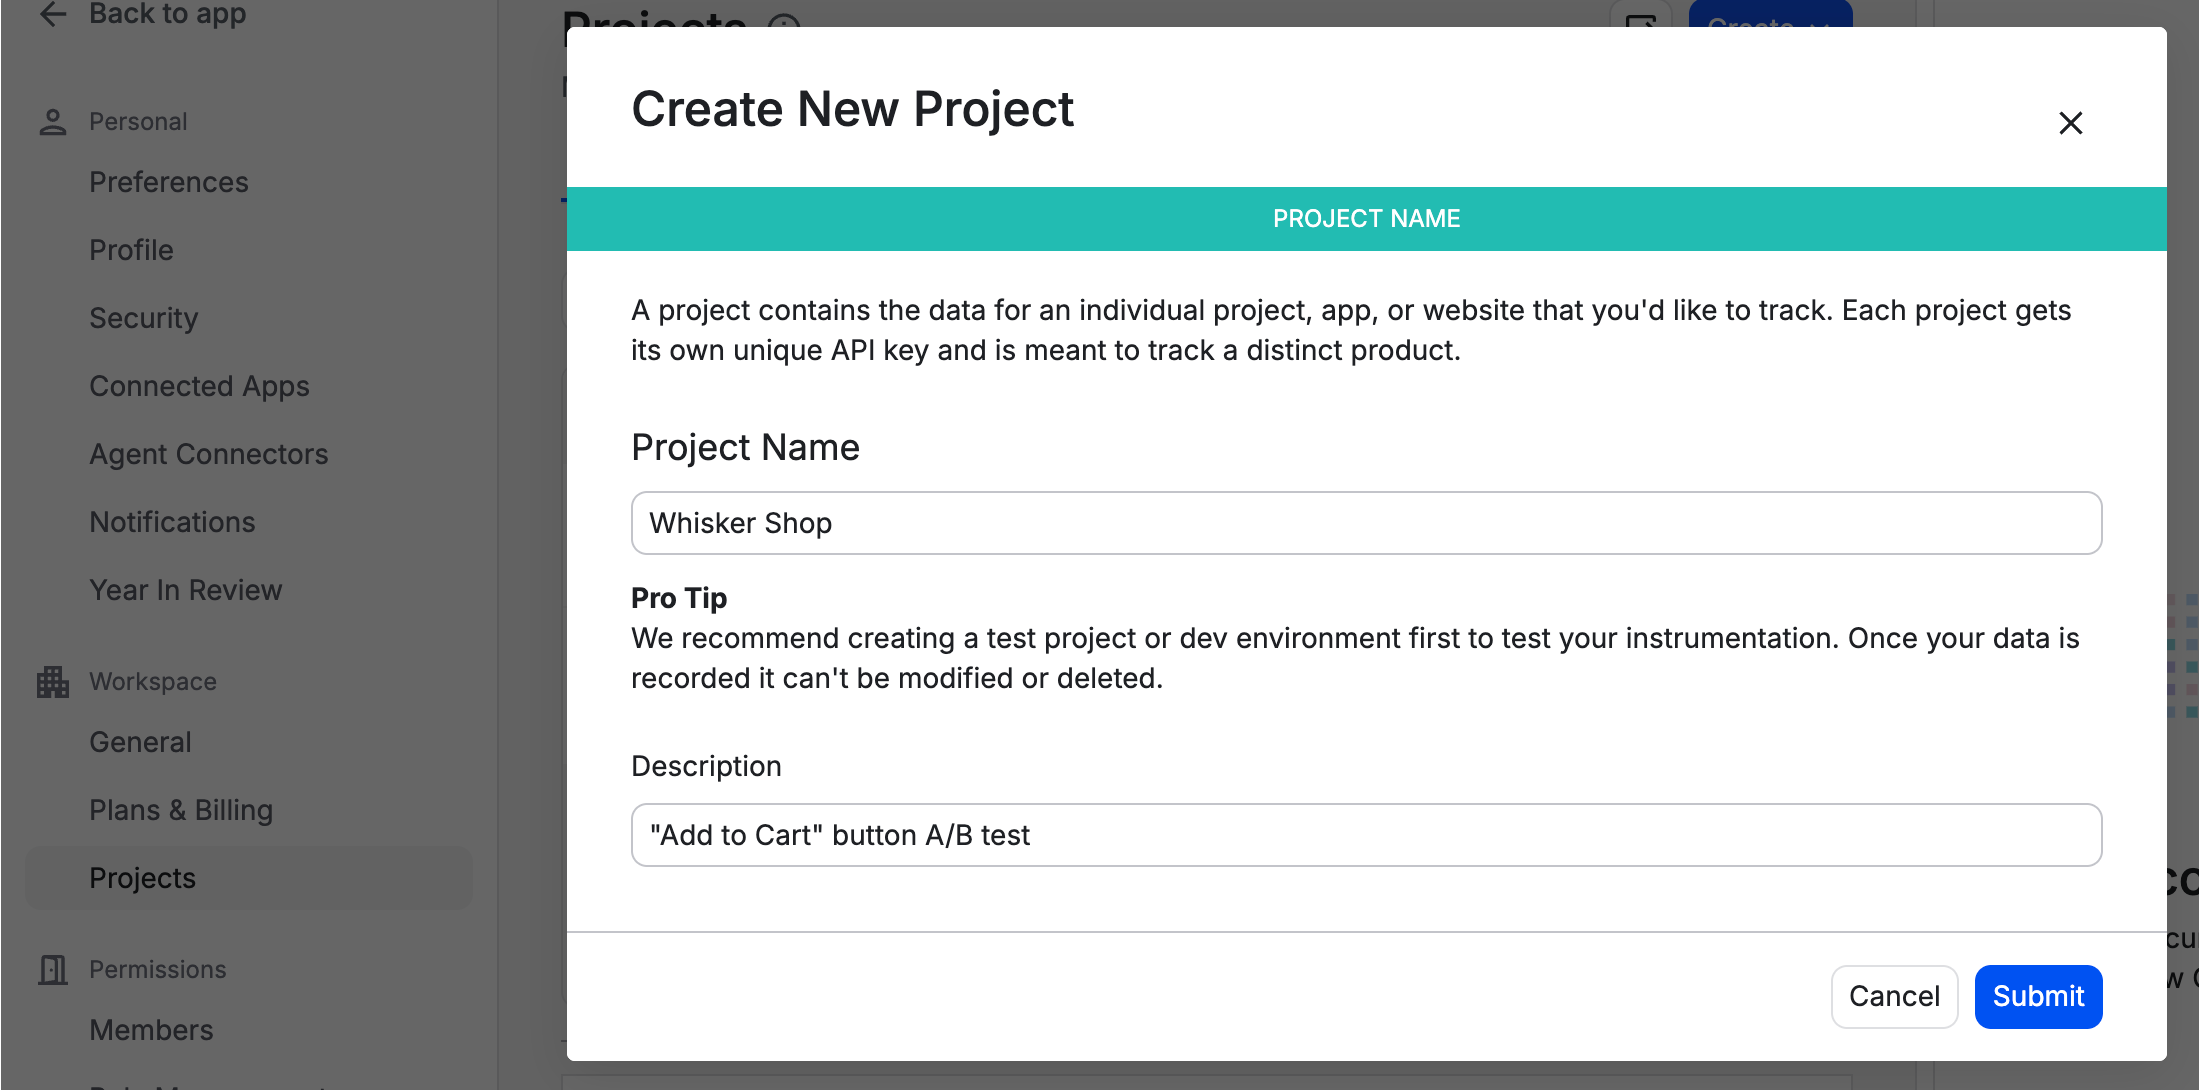
Enter the following details to create a new project:
-
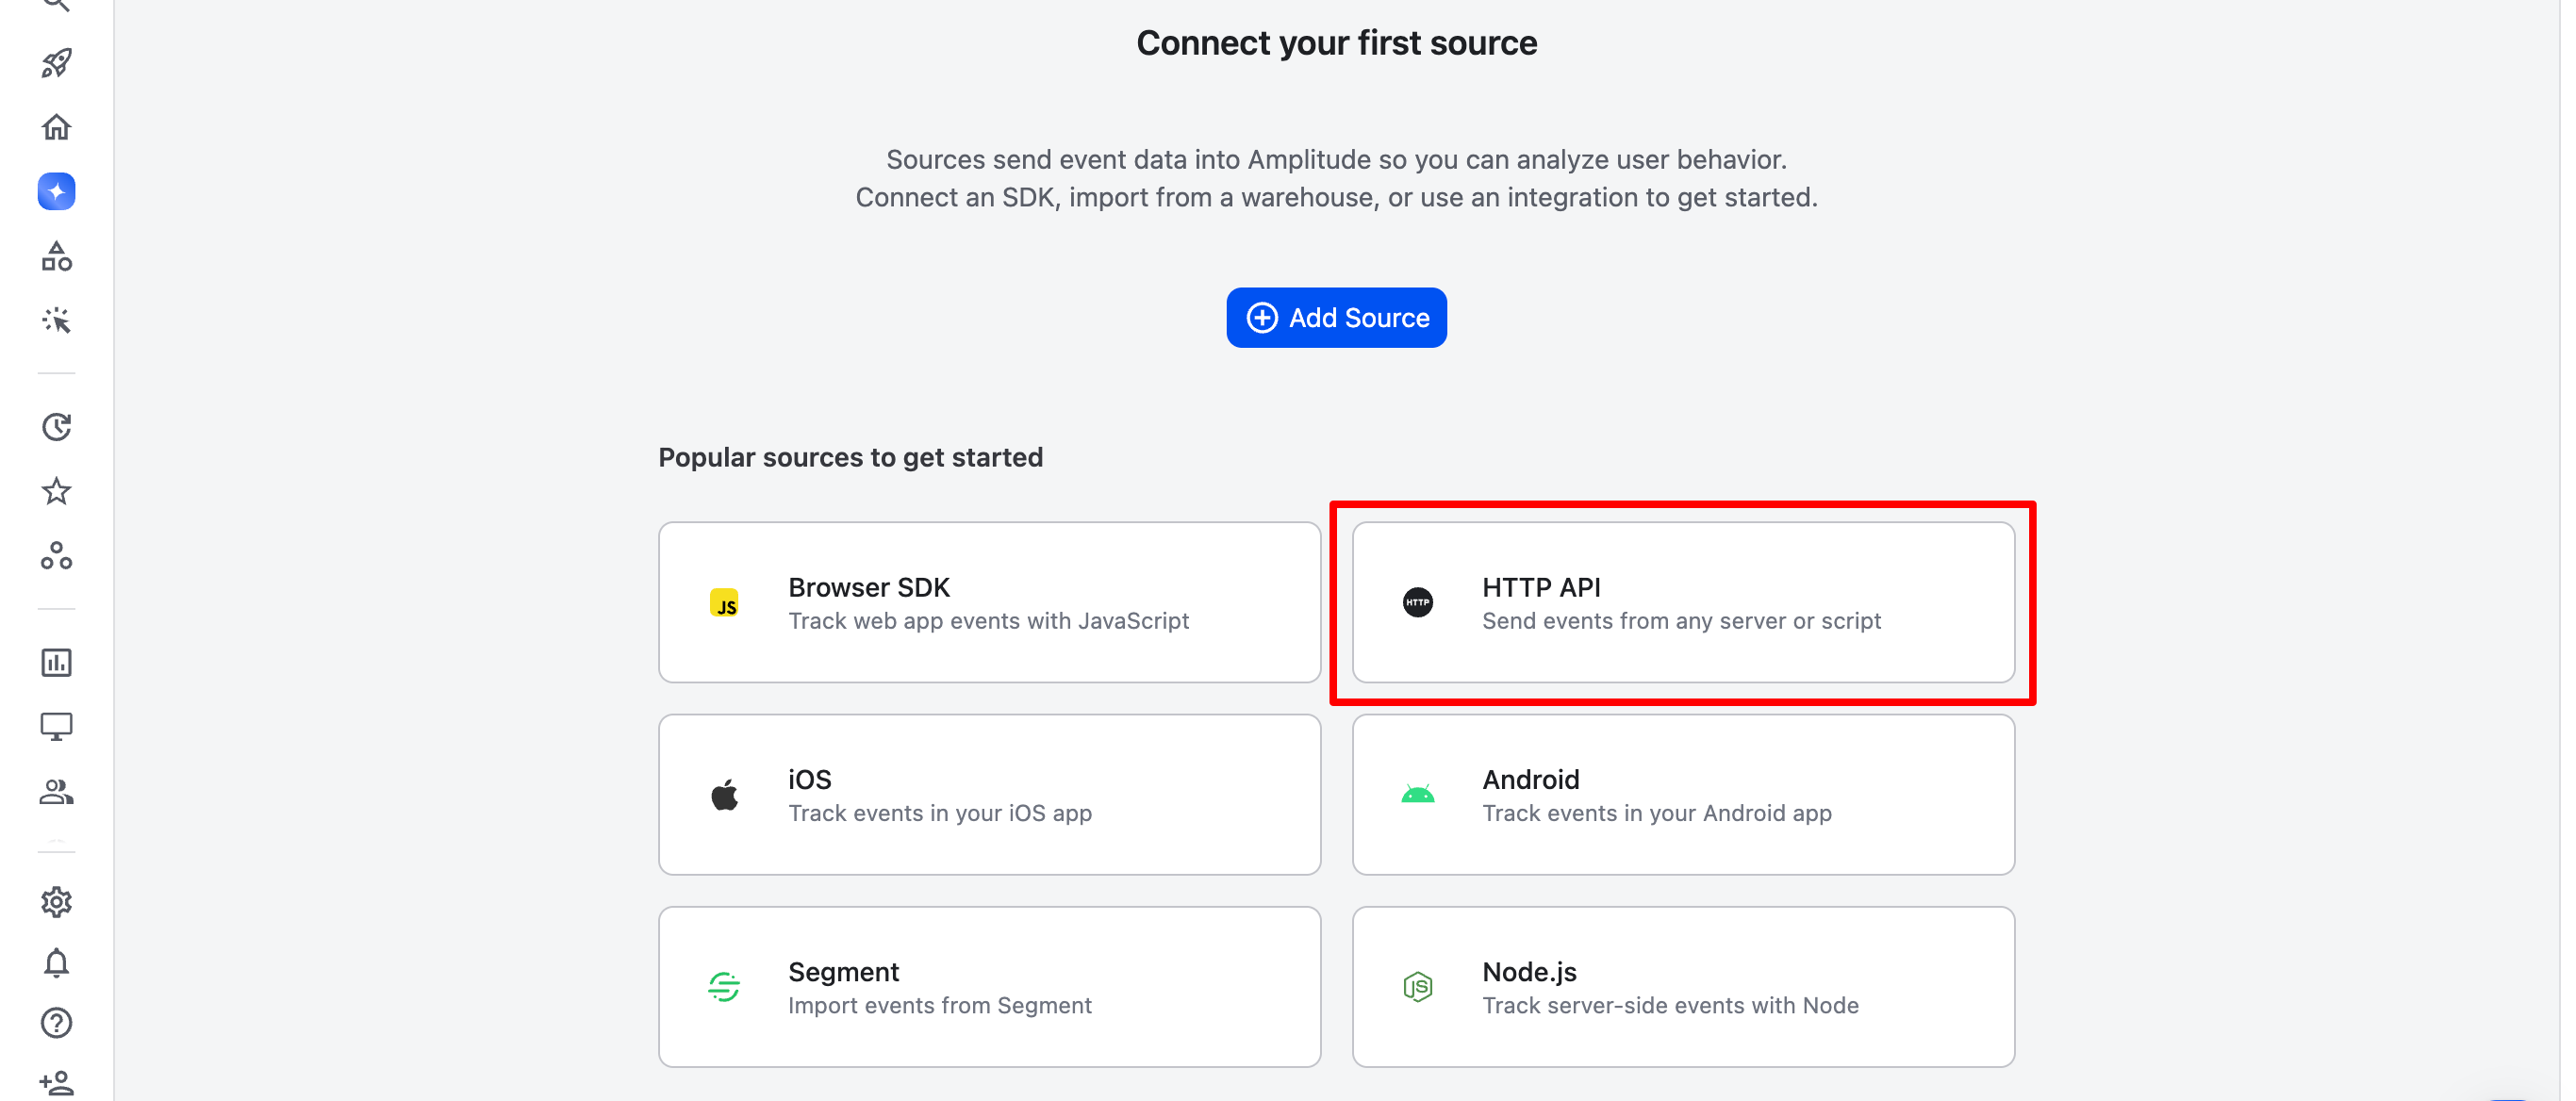
On the screen that follows, you'll be prompted to select a data source. Pick the one labeled HTTP API to see the instructions page for adding it to the project. We'll follow those instructions next.
Sending events to Amplitude
-
In the
appsettings.jsonfile, add a block for Amplitude and specify your Amplitude API Key:appsettings.json{"Amplitude": {"ApiKey": "YOUR-AMPLITUDE-API-KEY-FOR-PRODUCTION"}} -
Add a matching options class in
Configuration/AmplitudeOptions.csso the settings above can be injected into the controller:Configuration/AmplitudeOptions.csnamespace ab_testing_dotnet_sample.Configuration;public class AmplitudeOptions{public string ApiKey { get; set; } = "";} -
In the
Program.csfile, configure the application builder to use the Amplitude settings from the previous step and register an HTTP client for Amplitude:Program.csusing ab_testing_dotnet_sample.Configuration;// existing code...builder.Services.Configure<AmplitudeOptions>(builder.Configuration.GetSection("Amplitude"));builder.Services.AddHttpClient("amplitude",options => options.BaseAddress = new Uri("https://api2.amplitude.com"));// rest of code...infoThis example uses Amplitude's HTTP V2 API. If your Amplitude project uses EU data residency, use the EU ingestion endpoint documented there instead.
Track exposure and conversion
Simply counting the Add to Cart button clicks isn't enough to compare the two variations accurately. If one group contains more users than the other, it may naturally generate more clicks. Instead, we want to know both which variation the user saw and whether they converted. That lets us calculate a conversion rate for each group.
For this demo, we'll send an event to Amplitude containing the user's assigned variation. For a production experiment, track exposure separately when the user actually sees a variation, then record the conversion event when the target action happens.
First, update the HomeController.cs file so the AddToCartForm() action receives the user's variation and records the click:
using System.Text.Json.Nodes;
using ab_testing_dotnet_sample.Configuration;
using Microsoft.Extensions.Options;

// Inject the ConfigCat client, the HTTP client factory, the options for Amplitude, and the logger for the controller
// via constructor parameters so we can read the feature flag's value and report the event to Amplitude
public class HomeController(
    IConfigCatClient configCatClient,
    IHttpClientFactory httpClientFactory,
    IOptions<AmplitudeOptions> amplitudeOptions,
    ILogger<HomeController> logger)
    : Controller
{
    // existing code...

    [HttpPost]
    public async Task<IActionResult> AddToCartForm([FromForm] string addToCartButtonVariation)
    {
        var configCatUser = CreateConfigCatUser();

        await LogEventToAmplitude(addToCartButtonVariation, configCatUser);

        // Redirect back to the same page
        return RedirectToAction("Index");
    }

    private async Task LogEventToAmplitude(string addToCartButtonVariation, User configCatUser)
    {
        // HTTP POST request body:
        var data = new JsonObject
        {
            ["api_key"] = amplitudeOptions.Value.ApiKey,
            ["events"] = new JsonArray
            {
                new JsonObject()
                {
                    ["user_id"] = configCatUser.Identifier,
                    ["event_type"] = "Add to Cart",
                    ["event_properties"] = new JsonObject
                    {
                        ["buttonColor"] = addToCartButtonVariation
                    }
                }
            }
        };

        // Create an HttpClient
        var client = httpClientFactory.CreateClient("amplitude");

        // Send POST request to Amplitude
        try
        {
            using var requestContent = JsonContent.Create(data);
            using var response = await client.PostAsync("/2/httpapi", requestContent);
            response.EnsureSuccessStatusCode();
        }
        catch (Exception ex)
        {
            logger.LogError(ex, "Failed to send event to Amplitude.");
            return;
        }

        logger.LogInformation("Event successfully sent to Amplitude.");
    }
}
You can view the complete HomeController.cs file here.
The buttonColor property tells us which experiment variation produced the conversion.
For production analytics, consider adding a unique event identifier when sending events, so retries don't accidentally result in duplicate events.
Also remember that the sample above focuses on keeping the implementation easy to follow. A complete experiment should record exposure separately from conversion so you can calculate the percentage of exposed users who converted.
Viewing events in Amplitude
With the tracking code in place, the next step is to view the click events in Amplitude.
-
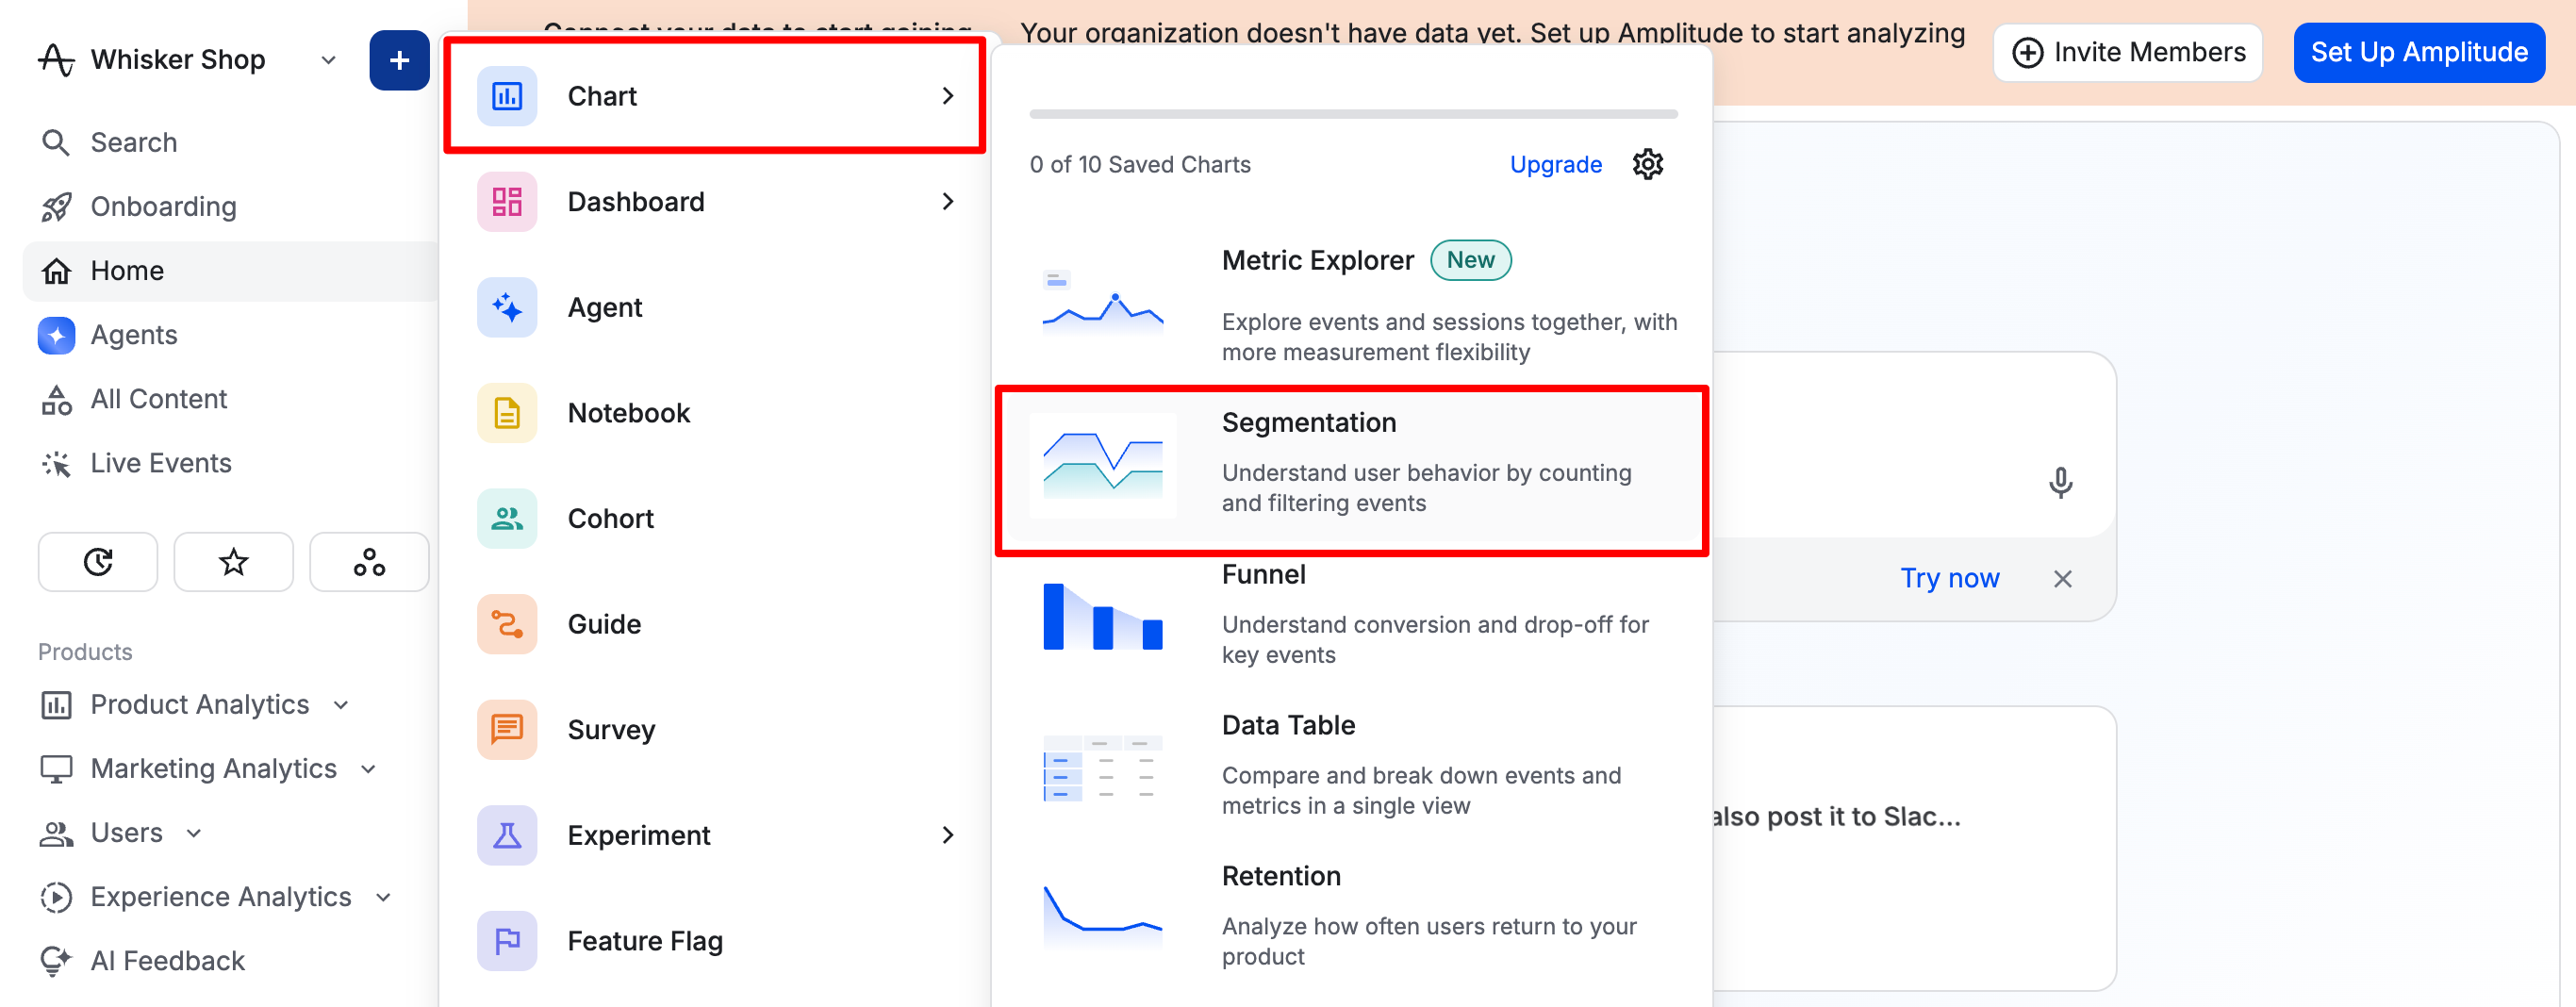
Create a new segmentation chart in Amplitude by clicking the + button in the top left next to the project name, then Chart > Segmentation:
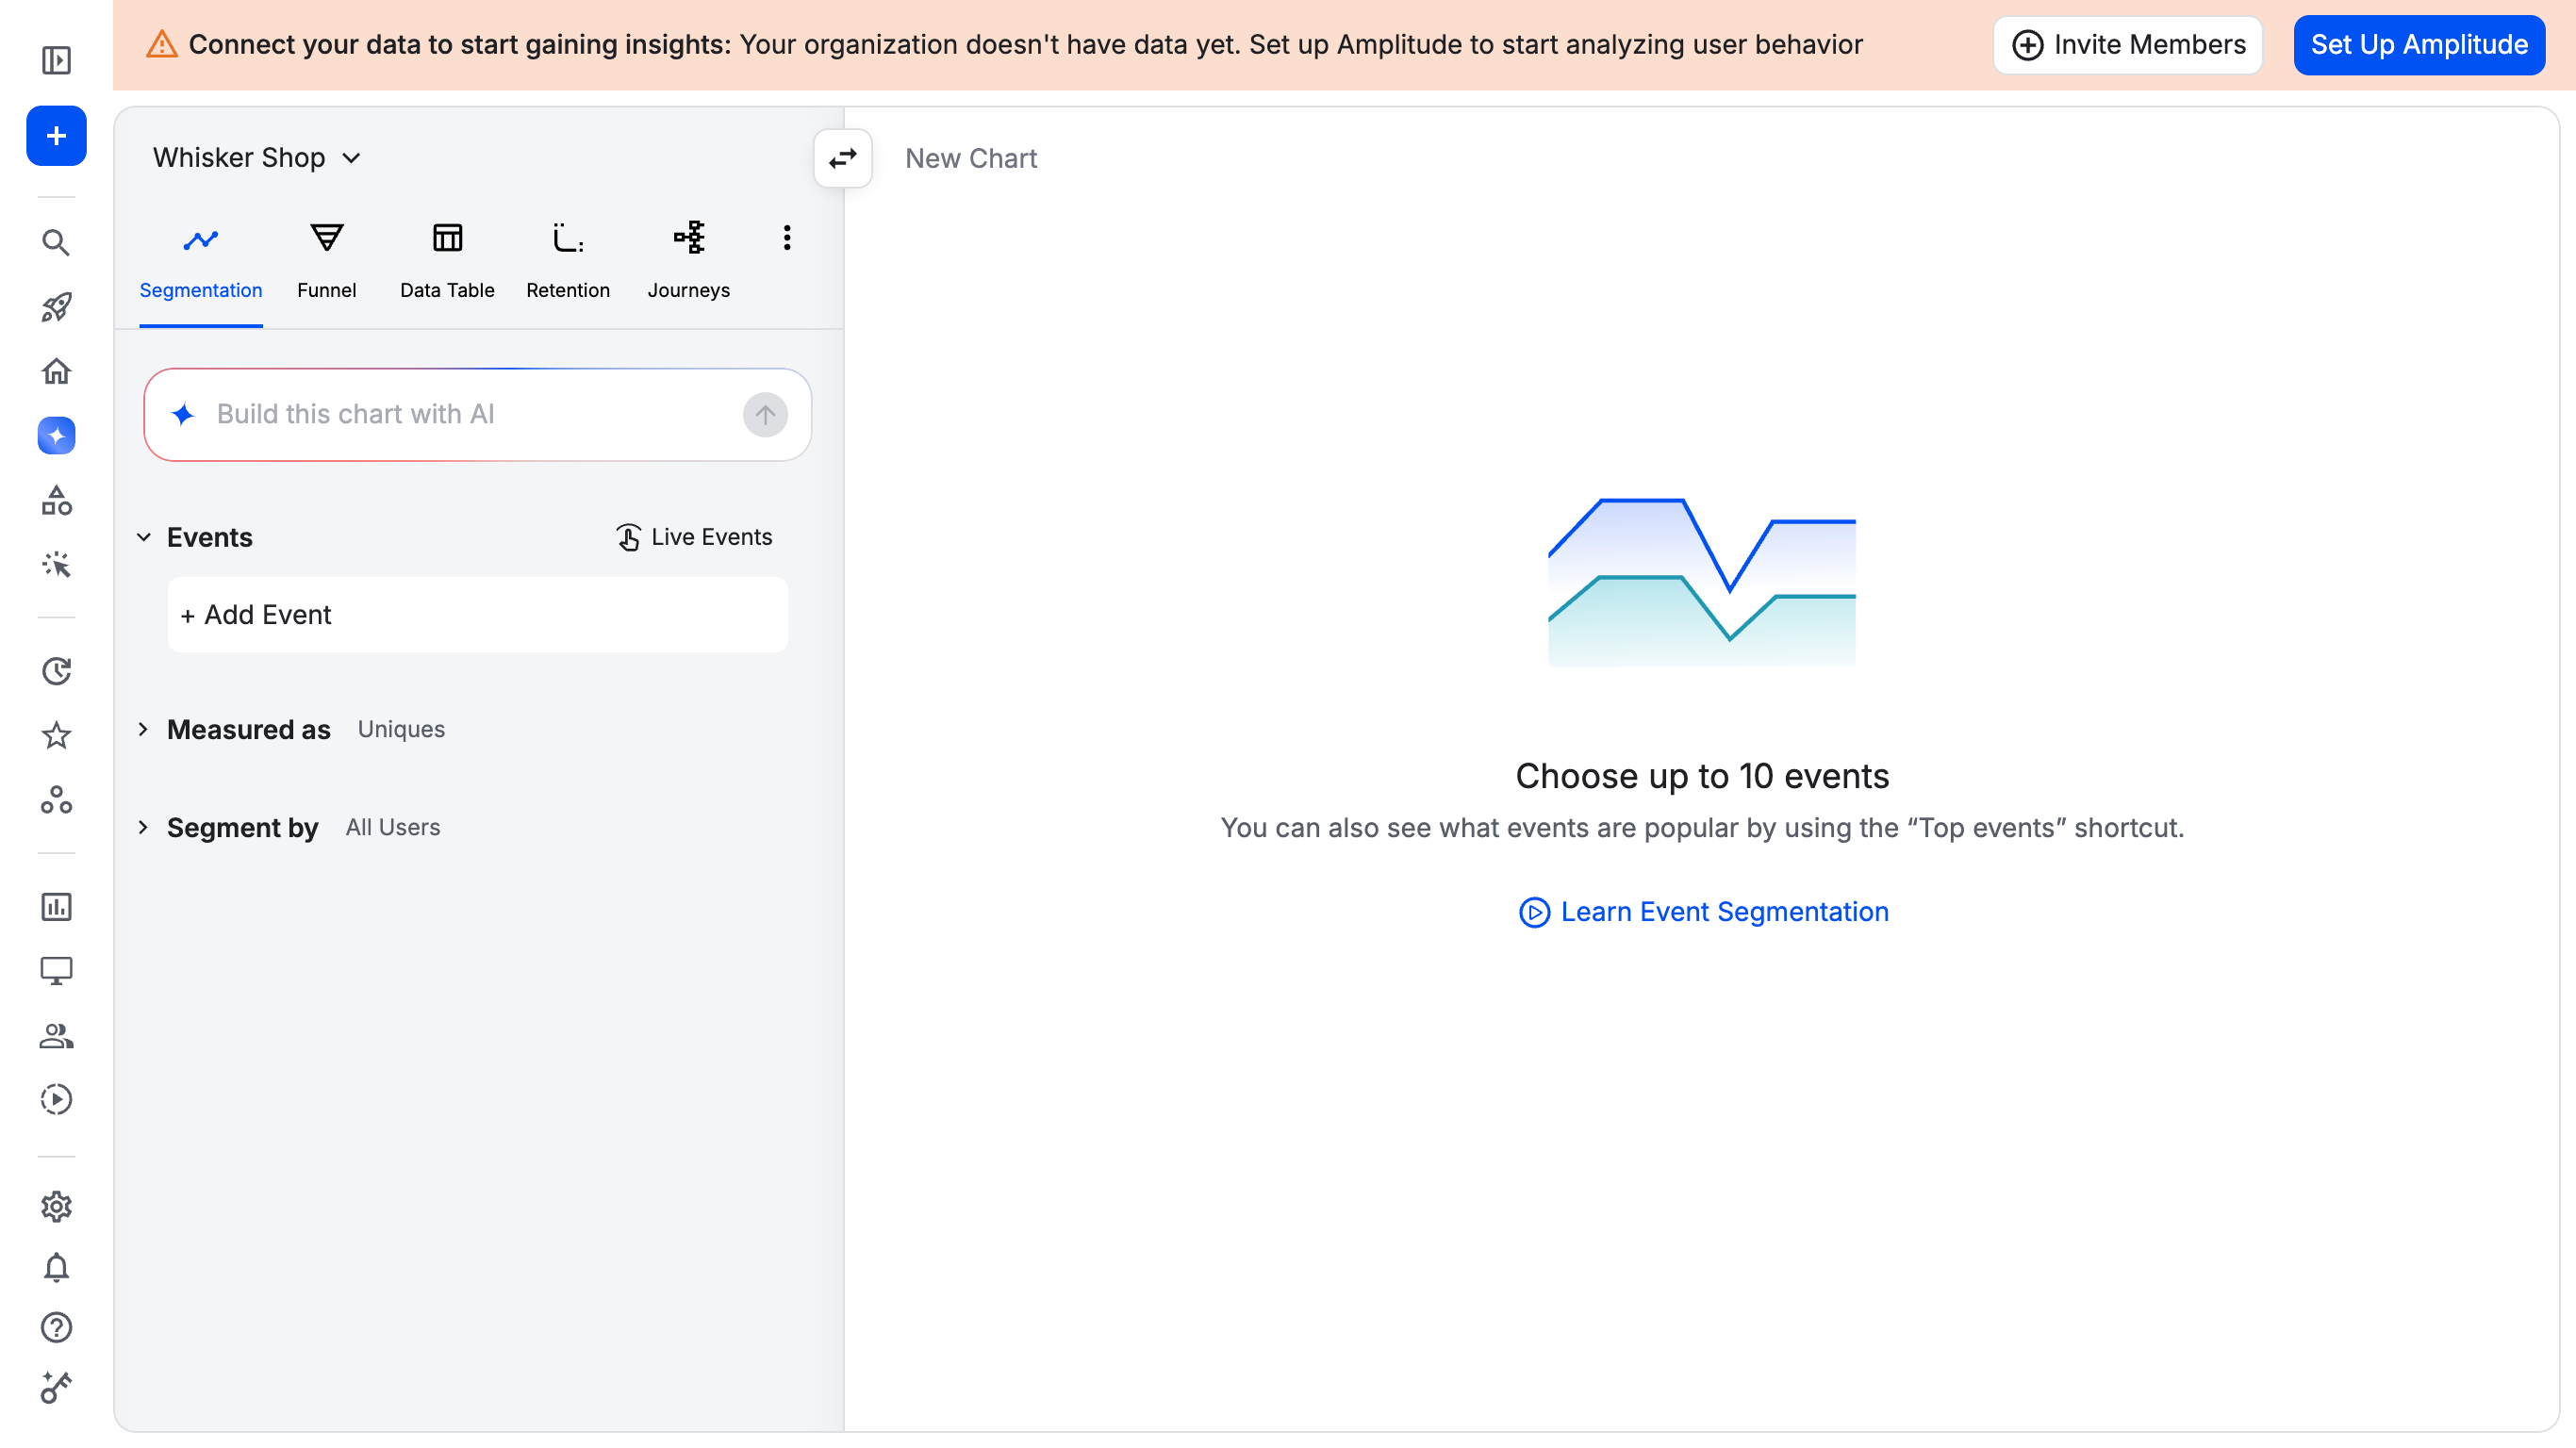
This will create a blank chart as shown below:
-
Start the app and click the button a few times. Afterward, update the user identifier in the
Controllers/HomeController.csfile toreturn new User("user-id-123456");then restart the app to place the user in the other group where Variation B is served. Click the button again a few times.
Analyzing the data
Now that the click events are sent to Amplitude for both variations, let's configure the chart to display them so we can see how each is performing.
In the left panel, configure the segmentation chart. Add the event, group it by button color, and measure the data by event totals. Finally, choose the Bar Chart, then customize the chart's color if you wish. Here is how it should look:
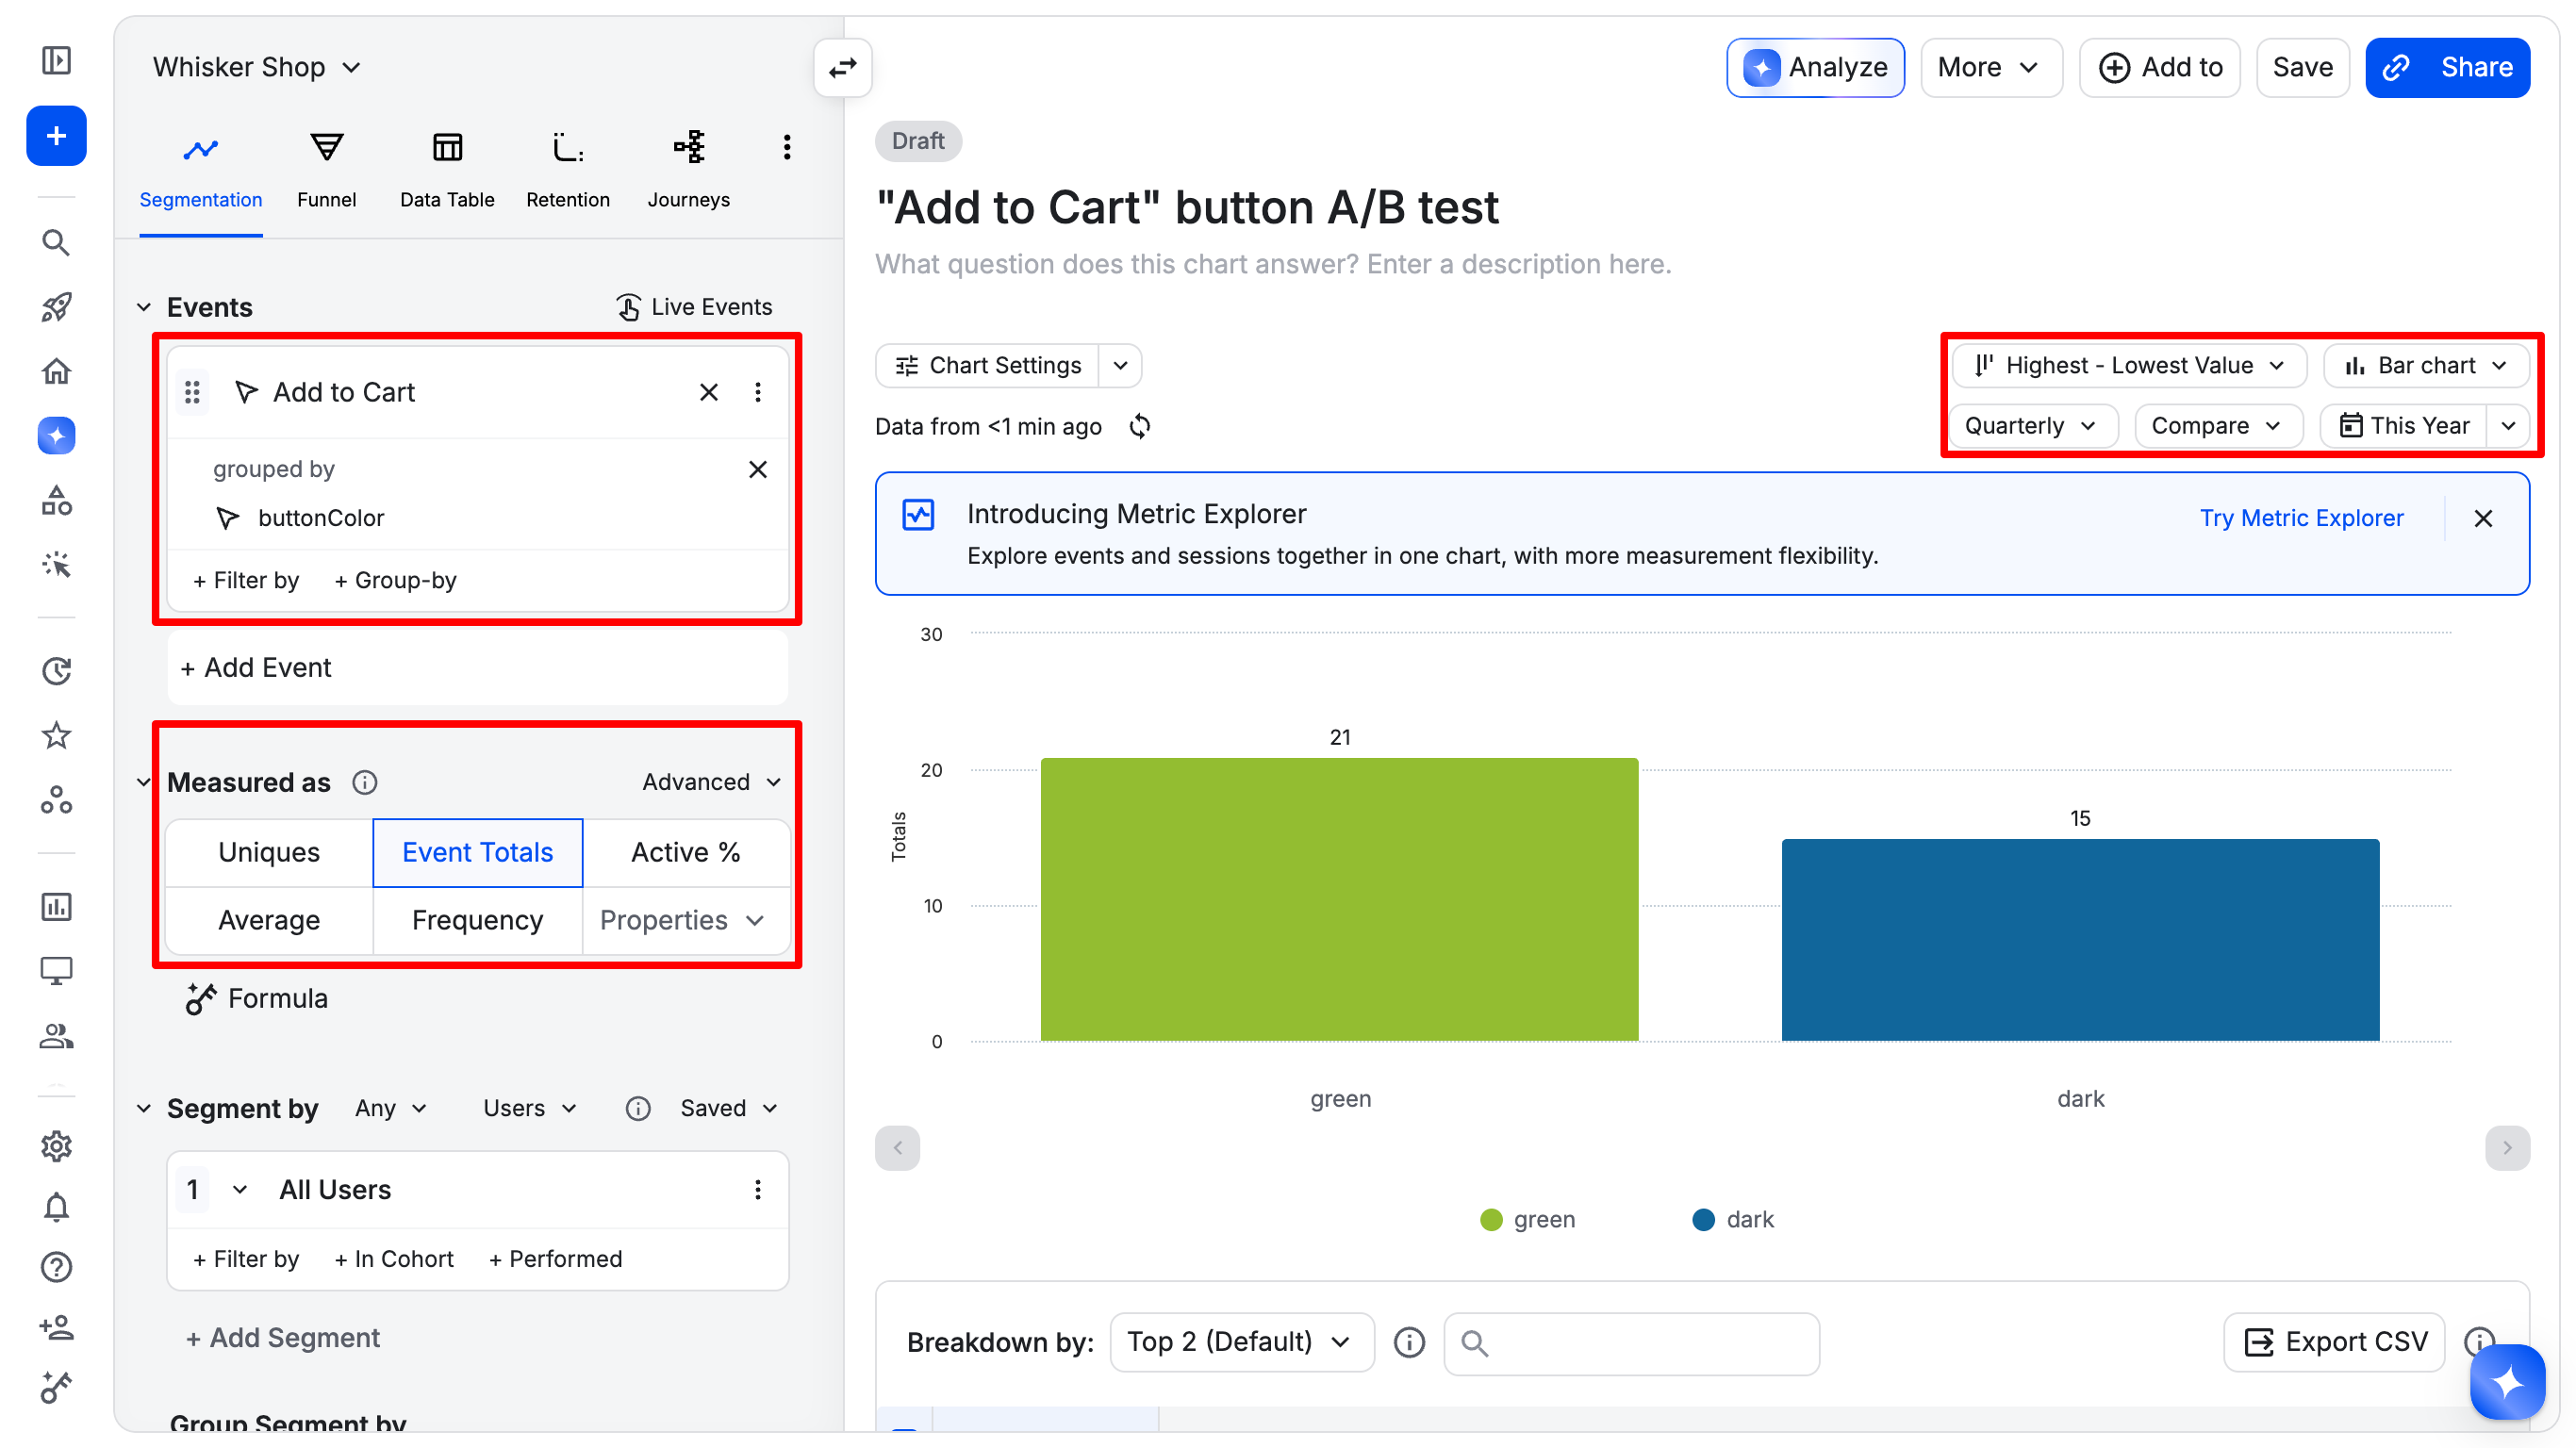
For quickly testing the integration, event totals are useful because they confirm that both variations are reaching Amplitude correctly. But raw totals shouldn't be used by themselves to decide which variation performed better.
For an actual A/B test, compare the conversion rate for each group: conversion rate = users who converted / users exposed to the variation.
For example, 60 clicks from 500 exposed users represents a 12% conversion rate, while 58 clicks from 400 exposed users represents a 14.5% conversion rate. Looking only at 60 vs. 58 would suggest the opposite conclusion.
You should also define the experiment's primary metric before starting, collect enough data, and consider statistical uncertainty before deciding that one variation performs better. Avoid stopping the experiment simply because one variation temporarily appears to be ahead.
Similarly, try not to change the variants or traffic allocation while collecting data. Changing the experiment midway can make its results harder to interpret.
Rolling back a variation
One advantage of using a feature flag system for experimentation is that the experiment remains operationally controllable. If you discover a functionality problem with Variation B or it causes an unacceptable regression, you don't need to redeploy the application. You can simply remove the percentage rule in ConfigCat to return all users to the control value.
That's different from adjusting an experiment simply because early results look unfavorable. Emergency rollback is useful for protecting users, while repeatedly changing an active experiment can compromise the quality of the data you're collecting.
A/B Testing Best Practices
Before applying the setup to a production experiment, keep a few principles in mind:
- Start with a clear hypothesis and one primary success metric.
- Use a stable user identifier so people remain in the same experiment group.
- Track exposure as well as conversion.
- Compare conversion rates rather than raw event totals.
- Avoid changing variants or percentage distribution midway through an experiment unless you need to stop it for operational reasons.
- Run the experiment long enough to collect meaningful data.
- Consider statistical uncertainty before drawing conclusions from small differences.
- Once the experiment is finished and you've made your rollout decision, clean up experiment-specific settings that are no longer needed.
The same basic approach also works for A/B/n testing. Instead of two predefined variations, you can create three or more and distribute users between them using ConfigCat percentage options.
Conclusion
We've built a simple A/B testing setup in ASP.NET Core where each tool has a clear responsibility: ConfigCat determines which variation a user sees, ASP.NET Core renders that variation, and Amplitude measures what happens afterward.
The important part isn't just serving two different button colors. A meaningful A/B test needs consistent user assignment, a predefined success metric, exposure and conversion tracking, and enough data to compare the groups properly.
From here, you can apply the same pattern to onboarding flows, checkout experiences, pricing pages, recommendations, UI changes, or other features where you want to measure user behavior before rolling out a change permanently.
Want to try it yourself? Create a Forever Free ConfigCat account and use percentage options to set up your first experiment.
You can stay up to date with ConfigCat on X, Facebook, LinkedIn, GitHub, and the News & Product Updates page.