Notifications - Webhooks
ConfigCat Webhooks can notify your applications when a feature flag or other Setting changes by calling a public HTTP endpoint on your end. This allows your applications to react almost immediately to updates. Webhooks add the speed of near real-time updates to the reliability of Polling, giving your applications a fast and robust way to stay in sync. To enable Webhooks, simply tell us which HTTP endpoint to call. ConfigCat will send a request to that URL whenever a change occurs.
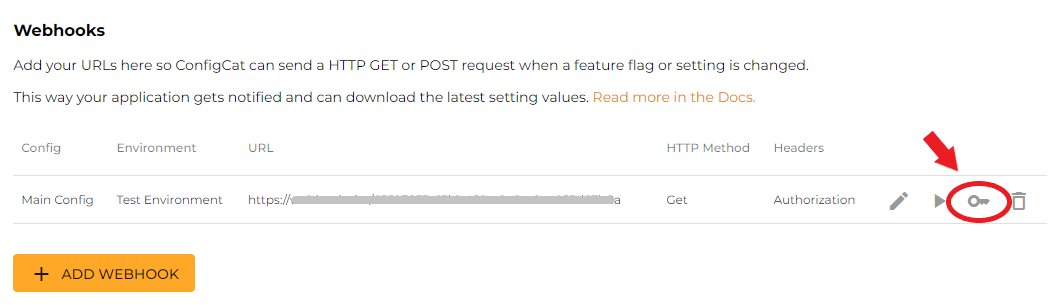
Adding a Webhook
Go to the Webhooks screen.
Click the + ADD WEBHOOK button.
Choose when webhook notifications should be sent by selecting the Config and Environment where changes should trigger the Webhook.
Define how to notify your system by setting the URL and the HTTP METHOD. This tells us which endpoint to call.
(Optional) Add custom HTTP headers and a request body if needed.
Request body with variables
You can customize the request body that will be sent with each Webhook call. ConfigCat will replace certain placeholders in the body with real values at runtime.
| Variable | Replaced with |
|---|---|
| ##ConfigName## | The name of the Config where the change happened. |
| ##ConfigId## | ID of the Config where the change happened. |
| ##EnvironmentName## | The name of the Environment where the change happened. |
| ##EnvironmentId## | ID of the Environment where the change happened. |
| ##URL## | A direct link to the Config in the ConfigCat Dashboard. |
| ##ChangeNotes## | The Mandatory notes added to the actual changeset. |
| ##ChangedBy## | The name and email address of the user who made the changes. |
| ##ChangeDetails## | Detailed change info in JSON format, including the name of the Setting or feature flag, old and new values and Targeting Rules. |
| ##ChangeDetailsTeams## | Change details formatted for Microsoft Teams. |
| ##ChangeDetailsSlack## | Change details formatted for Slack. |
The ##ChangeDetails## variable is replaced with a JSON array in the following format:
[
  {
    "settingKey":"myAwesomeFeature1",
    "event":"changed",
    "details":"\r\nmyAwesomeFeature1: false ➔ true"
  },
  {
    "settingKey":"myAwesomeFeature2",
    "event":"changed",
    "details":"\r\nmyAwesomeFeature2:\r\n  Rollout percentage items changed:\r\n    + 20% true\r\n    + 80% false"
  }
]
Testing your Webhook
Change some of your settings in the ConfigCat Dashboard.
Click SAVE & PUBLISH CHANGES.
Check if your Webhook was called correctly.
Developer Tip
- Running your Webhook on
localhost? Expose it to the public internet temporarily by using a tool like ngrok. This enables ConfigCat to call your webhook even in your local development environment. - Just interested in what ConfigCat sends? Try Webhhok.site. This allows you to catch HTTP requests and see their content without requiring your to run anything anywhere.
Verifying Webhook requests
To make sure the requests you receive are actually sent by ConfigCat, we strongly recommend verifying the signature included in the request headers. You can do this by comparing the received signature with one you compute using your signing key.
Each webhook request includes the following headers:
| Header | Description |
|---|---|
X-ConfigCat-Webhook-ID | A unique ID for the webhook request. This is different for every request. |
X-ConfigCat-Webhook-Timestamp | The time the request was sent, in Unix timestamp format (seconds since epoch). |
X-ConfigCat-Webhook-Signature-V1 | A comma-separated list of base64-encoded HMAC-SHA-256 signatures (one for each signing key). |
Currently, the latest (and the only) signature header version is V1. If the signing process changes in the future, new headers will be added with incremented version numbers.
Example request:
POST /path HTTP/1.1
Host: <your-host>
X-ConfigCat-Webhook-ID: b616ca659d154a5fb907dd8475792eeb
X-ConfigCat-Webhook-Timestamp: 1669580020
X-ConfigCat-Webhook-Signature-V1: RoO/UMvSRqzJ0OolMMuhHBbM8/Vjn+nTh+SKyLcQf0M=,heIrGPw6aylAZEX6xmSLrxIWVif5injeBCxWQ+0+b2U=
Content to sign
The signature is calculated from the content constructed by concatenating the webhook's id, timestamp, and raw body together.
const contentToSign = `${webhookId}${timestamp}${body}`;
| Content part | Description |
|---|---|
webhookId | The webhook's identifier received in the X-ConfigCat-Webhook-ID request header. |
timestamp | The timestamp value received in the X-ConfigCat-Webhook-Timestamp request header. |
body | The raw body of the received webhook request. If the webhook doesn't have a request body it can be left out. |
The signature calculation is sensitive to any changes on the signed content, so it's important to not change the request body before the verification.
Otherwise, the calculated signature could be completely different from the value received in the
X-ConfigCat-Webhook-Signature-V1 header.
Calculating signature
ConfigCat uses HMAC with SHA-256 to sign webhooks. You can retrieve the signing key(s) required for the signature calculation from the ConfigCat Dashboard's webhook page.
For key rotation purposes, you can generate a secondary signing key. In this case ConfigCat sends two signatures (one signed with the primary and one signed with the secondary key) in the X-ConfigCat-Webhook-Signature-V1 header separated by a comma (,):
X-ConfigCat-Webhook-Signature-V1: RoO/UMvSRqzJ0OolMMuhHBbM8/Vjn+nTh+SKyLcQf0M=,heIrGPw6aylAZEX6xmSLrxIWVif5injeBCxWQ+0+b2U=
- Node.js
- Python
- Ruby
- PHP
- Go
- .NET
- Java
const crypto = require('crypto');

// retrieved from the ConfigCat Dashboard
const signingKey =
  'configcat_whsk_VN3juirnVh5pNvCKd81RYRYchxUX4j3NykbZG2fAy88=';

// retrieved from the the X-ConfigCat-Webhook-Signature-V1 request header
const receivedSignature = 'Ks3cYsu9Lslfo+hVxNC3oQWnsF9e5d73TI5t94D9DRA=';

// retrieved from the the X-ConfigCat-Webhook-ID request header
const requestId = 'b616ca659d154a5fb907dd8475792eeb';

// retrieved from the the X-ConfigCat-Webhook-Timestamp request header
const timestamp = 1669629035;

// the webhook request's raw body
const body = 'examplebody';

const contentToSign = `${requestId}${timestamp}${body}`;

const calculatedSignature = crypto
  .createHmac('sha256', signingKey)
  .update(contentToSign)
  .digest('base64');

console.log(calculatedSignature == receivedSignature); // must be true
import hmac
import base64

# retrieved from the ConfigCat Dashboard
signing_key = "configcat_whsk_VN3juirnVh5pNvCKd81RYRYchxUX4j3NykbZG2fAy88="

# retrieved from the X-ConfigCat-Webhook-Signature-V1 request header
received_signature = "Ks3cYsu9Lslfo+hVxNC3oQWnsF9e5d73TI5t94D9DRA="

# retrieved from the X-ConfigCat-Webhook-ID request header
request_id = "b616ca659d154a5fb907dd8475792eeb"

# retrieved from the X-ConfigCat-Webhook-Timestamp request header
timestamp = 1669629035

# the webhook request's raw body
body = "examplebody"

content_to_sign = request_id+str(timestamp)+body

signing_key_bytes = bytes(signing_key, 'utf-8')
calculated_signature = base64.b64encode(hmac.new(signing_key_bytes, bytes(content_to_sign, 'utf-8'), 'sha256').digest())

print(calculated_signature.decode() == received_signature) # must be true
require 'openssl'
require 'base64'

# retrieved from the ConfigCat Dashboard
signing_key = "configcat_whsk_VN3juirnVh5pNvCKd81RYRYchxUX4j3NykbZG2fAy88="

# retrieved from the X-ConfigCat-Webhook-Signature-V1 request header
received_signature = "Ks3cYsu9Lslfo+hVxNC3oQWnsF9e5d73TI5t94D9DRA="

# retrieved from the X-ConfigCat-Webhook-ID request header
request_id = "b616ca659d154a5fb907dd8475792eeb"

# retrieved from the X-ConfigCat-Webhook-Timestamp request header
timestamp = 1669629035

# the webhook request's raw body
body = "examplebody"

content_to_sign = "#{request_id}#{timestamp}#{body}"

calculated_signature = Base64.strict_encode64(OpenSSL::HMAC.digest("sha256", signing_key, content_to_sign))

puts calculated_signature == received_signature # must be true
<?php

// retrieved from the ConfigCat Dashboard
$signing_key = "configcat_whsk_VN3juirnVh5pNvCKd81RYRYchxUX4j3NykbZG2fAy88=";

// retrieved from the X-ConfigCat-Webhook-Signature-V1 request header
$received_signature = "Ks3cYsu9Lslfo+hVxNC3oQWnsF9e5d73TI5t94D9DRA=";

// retrieved from the X-ConfigCat-Webhook-ID request header
$request_id = "b616ca659d154a5fb907dd8475792eeb";

// retrieved from the X-ConfigCat-Webhook-Timestamp request header
$timestamp = 1669629035;

// the webhook request's raw body
$body = "examplebody";

$content_to_sign = "{$request_id}{$timestamp}{$body}";

$calculated_signature = base64_encode(hash_hmac("sha256", $content_to_sign, $signing_key, true));

echo hash_equals($calculated_signature, $received_signature); // must be true
package main

import (
  "fmt"
  "crypto/hmac"
  "crypto/sha256"
  "encoding/base64"
)

func main() {
  // retrieved from the ConfigCat Dashboard
  signingKey := "configcat_whsk_VN3juirnVh5pNvCKd81RYRYchxUX4j3NykbZG2fAy88="

  // retrieved from the X-ConfigCat-Webhook-Signature-V1 request header
  receivedSignature := "Ks3cYsu9Lslfo+hVxNC3oQWnsF9e5d73TI5t94D9DRA="

  // retrieved from the X-ConfigCat-Webhook-ID request header
  requestId := "b616ca659d154a5fb907dd8475792eeb"

  // retrieved from the X-ConfigCat-Webhook-Timestamp request header
  timestamp := 1669629035

  // the webhook request's raw body
  body := "examplebody"

  contentToSign := fmt.Sprintf("%s%d%s", requestId, timestamp, body)

  hasher := hmac.New(sha256.New, []byte(signingKey))
  hasher.Write([]byte(contentToSign))

  calculatedSignature := base64.StdEncoding.EncodeToString(hasher.Sum(nil))

  fmt.Println(calculatedSignature == receivedSignature) // must be true
}
using System;
using System.Security.Cryptography;
using System.Text;

// retrieved from the ConfigCat Dashboard
var signingKey = "configcat_whsk_VN3juirnVh5pNvCKd81RYRYchxUX4j3NykbZG2fAy88=";

// retrieved from the X-ConfigCat-Webhook-Signature-V1 request header
var receivedSignature = "Ks3cYsu9Lslfo+hVxNC3oQWnsF9e5d73TI5t94D9DRA=";

// retrieved from the X-ConfigCat-Webhook-ID request header
var requestId = "b616ca659d154a5fb907dd8475792eeb";

// retrieved from the X-ConfigCat-Webhook-Timestamp request header
var timestamp = 1669629035;

// the webhook request's raw body
var body = "examplebody";

var contentToSign = $"{requestId}{timestamp}{body}";

using (var hmac = new HMACSHA256(Encoding.UTF8.GetBytes(signingKey)))
{
	var calculatedSignature = Convert.ToBase64String(hmac.ComputeHash(Encoding.UTF8.GetBytes(contentToSign)));

	Console.WriteLine(calculatedSignature == receivedSignature); // must be true
}
import javax.crypto.Mac;
import javax.crypto.spec.SecretKeySpec;
import java.util.Base64;
import java.io.UnsupportedEncodingException;
import java.security.NoSuchAlgorithmException;
import java.security.InvalidKeyException;

public class Main {
  public static void main(String[] args) throws NoSuchAlgorithmException, UnsupportedEncodingException, InvalidKeyException {
    // retrieved from the ConfigCat Dashboard
    String signingKey = "configcat_whsk_VN3juirnVh5pNvCKd81RYRYchxUX4j3NykbZG2fAy88=";

    // retrieved from the X-ConfigCat-Webhook-Signature-V1 request header
    String receivedSignature = "Ks3cYsu9Lslfo+hVxNC3oQWnsF9e5d73TI5t94D9DRA=";

    // retrieved from the X-ConfigCat-Webhook-ID request header
    String requestId = "b616ca659d154a5fb907dd8475792eeb";

    // retrieved from the X-ConfigCat-Webhook-Timestamp request header
    int timestamp = 1669629035;

    // the webhook request's raw body
    String body = "examplebody";

    String contentToSign = requestId + timestamp + body;

    Mac mac = Mac.getInstance("HmacSHA256");
    SecretKeySpec secretKeySpec = new SecretKeySpec(signingKey.getBytes("UTF-8"), "HmacSHA256");
    mac.init(secretKeySpec);
    String calculatedSignature = Base64.getEncoder().encodeToString(mac.doFinal(contentToSign.getBytes("UTF-8")));

    System.out.println(calculatedSignature.equals(receivedSignature)); // must be true
  }
}
Timestamp validation
To prevent replay attacks, you can check if the request was sent within an acceptable time window.
Compare the timestamp from the X-ConfigCat-Webhook-Timestamp header with your system's current time.
If timestamp is too old, you can safely reject the request.
Since the timestamp is part of the signed content, an attacker cannot modify it without invalidating the signature.
Retries
If ConfigCat detects that a Webhook request may not have been delivered successfully (for example, due to network issues or a non-2XX response), it will retry the request up to 5 times, using variable delays between attempts.
Connecting to Slack
A few steps to set up Slack and get a message when a setting changes:
In Slack, create an Incoming Webhook and copy the Webhook URL.
In ConfigCat, go to the Webhooks screen, and click + ADD WEBHOOK.
Paste Slack's Webhhok URL to ConfigCat's URL field.
Select POST as the HTTP METHOD.
Add the following request body:
{
  "text": "<##URL##|##ConfigName## - ##EnvironmentName##> changed in ConfigCat: \n\n##ChangeDetailsSlack##"
}
Connecting to Microsoft Teams
A few steps to set up Microsoft Teams and get a message when a setting changes:
In Microsoft Teams, create an Incoming Webhook and copy the Webhook URL.
In ConfigCat, go to the Webhooks screen, and click + ADD WEBHOOK.
Paste Microsoft Teams' Webhhok URL to ConfigCat's URL field.
Select POST as the HTTP METHOD.
Add the following request body:
{
  "@context": "https://schema.org/extensions",
  "@type": "MessageCard",
  "themeColor": "0072C6",
  "title": "##ConfigName## - ##EnvironmentName##",
  "text": "##ChangeDetailsTeams##",
  "potentialAction": [
    {
      "@type": "OpenUri",
      "name": "Open Config in ConfigCat Dashboard",
      "targets": [
        { "os": "default", "uri": "##URL##" }
      ]
    }
  ]
}