A/B Testing React Native Apps with Feature Flags

Suppose you have two variations of a software product, but you're not sure which one to deploy. That's the problem A/B testing solves. And in mobile development, running a clean A/B test is harder than it sounds because you can't just toggle a server-side flag and move on. You're dealing with bundle updates, app store review times, and users who haven't updated in months.
This guide shows how to run a proper A/B test in a React Native app using ConfigCat feature flags for the rollout and Amplitude for analytics. By the end, you'll have a working implementation, a real results-reading framework, and a clear picture of what to do when the test is over.
What Is an A/B Test
A/B testing is an experimentation method in which two app variations, commonly called A and B, are released to different groups of users to determine which is better to roll out. This approach reduces the risk of introducing bugs when the feature is permanently released, since only a subset of users can see and use it while feedback is collected. Typically, Variation A is used as a control or benchmark to compare Variation B to.
Why Feature Flags for A/B Testing in React Native
The standard mobile A/B testing approach involves shipping a separate build for each variant and waiting for app store review before it reaches users. That's slow, and it gives you no kill switch. If a variant misbehaves, rolling back requires waiting for another review cycle.
A feature flag framework gives you a better model. You ship one build with both variations already in the code. A flag determines which variant each user sees at runtime. You can start, pause, and end the test from a dashboard without touching your codebase.
This also means you can roll back immediately if Variation B causes problems. Flip the flag off, and every user reverts to Variation A within seconds.
Let's look at how to set up an A/B test experiment in a demo React Native app to decide if a new feature (Variation B) should be rolled out.
The Demo A/B Test Experiment
Consider the following scenario: On average, Variation A accounts for roughly 400 user sign-ups per month from 50% of users. After some market research, a team decides to run an experiment to determine whether the sign-up button text is influencing the number of clicks and whether changing the text would increase conversions.
Will changing the button text (as done in Variation B below) influence more user sign-ups?
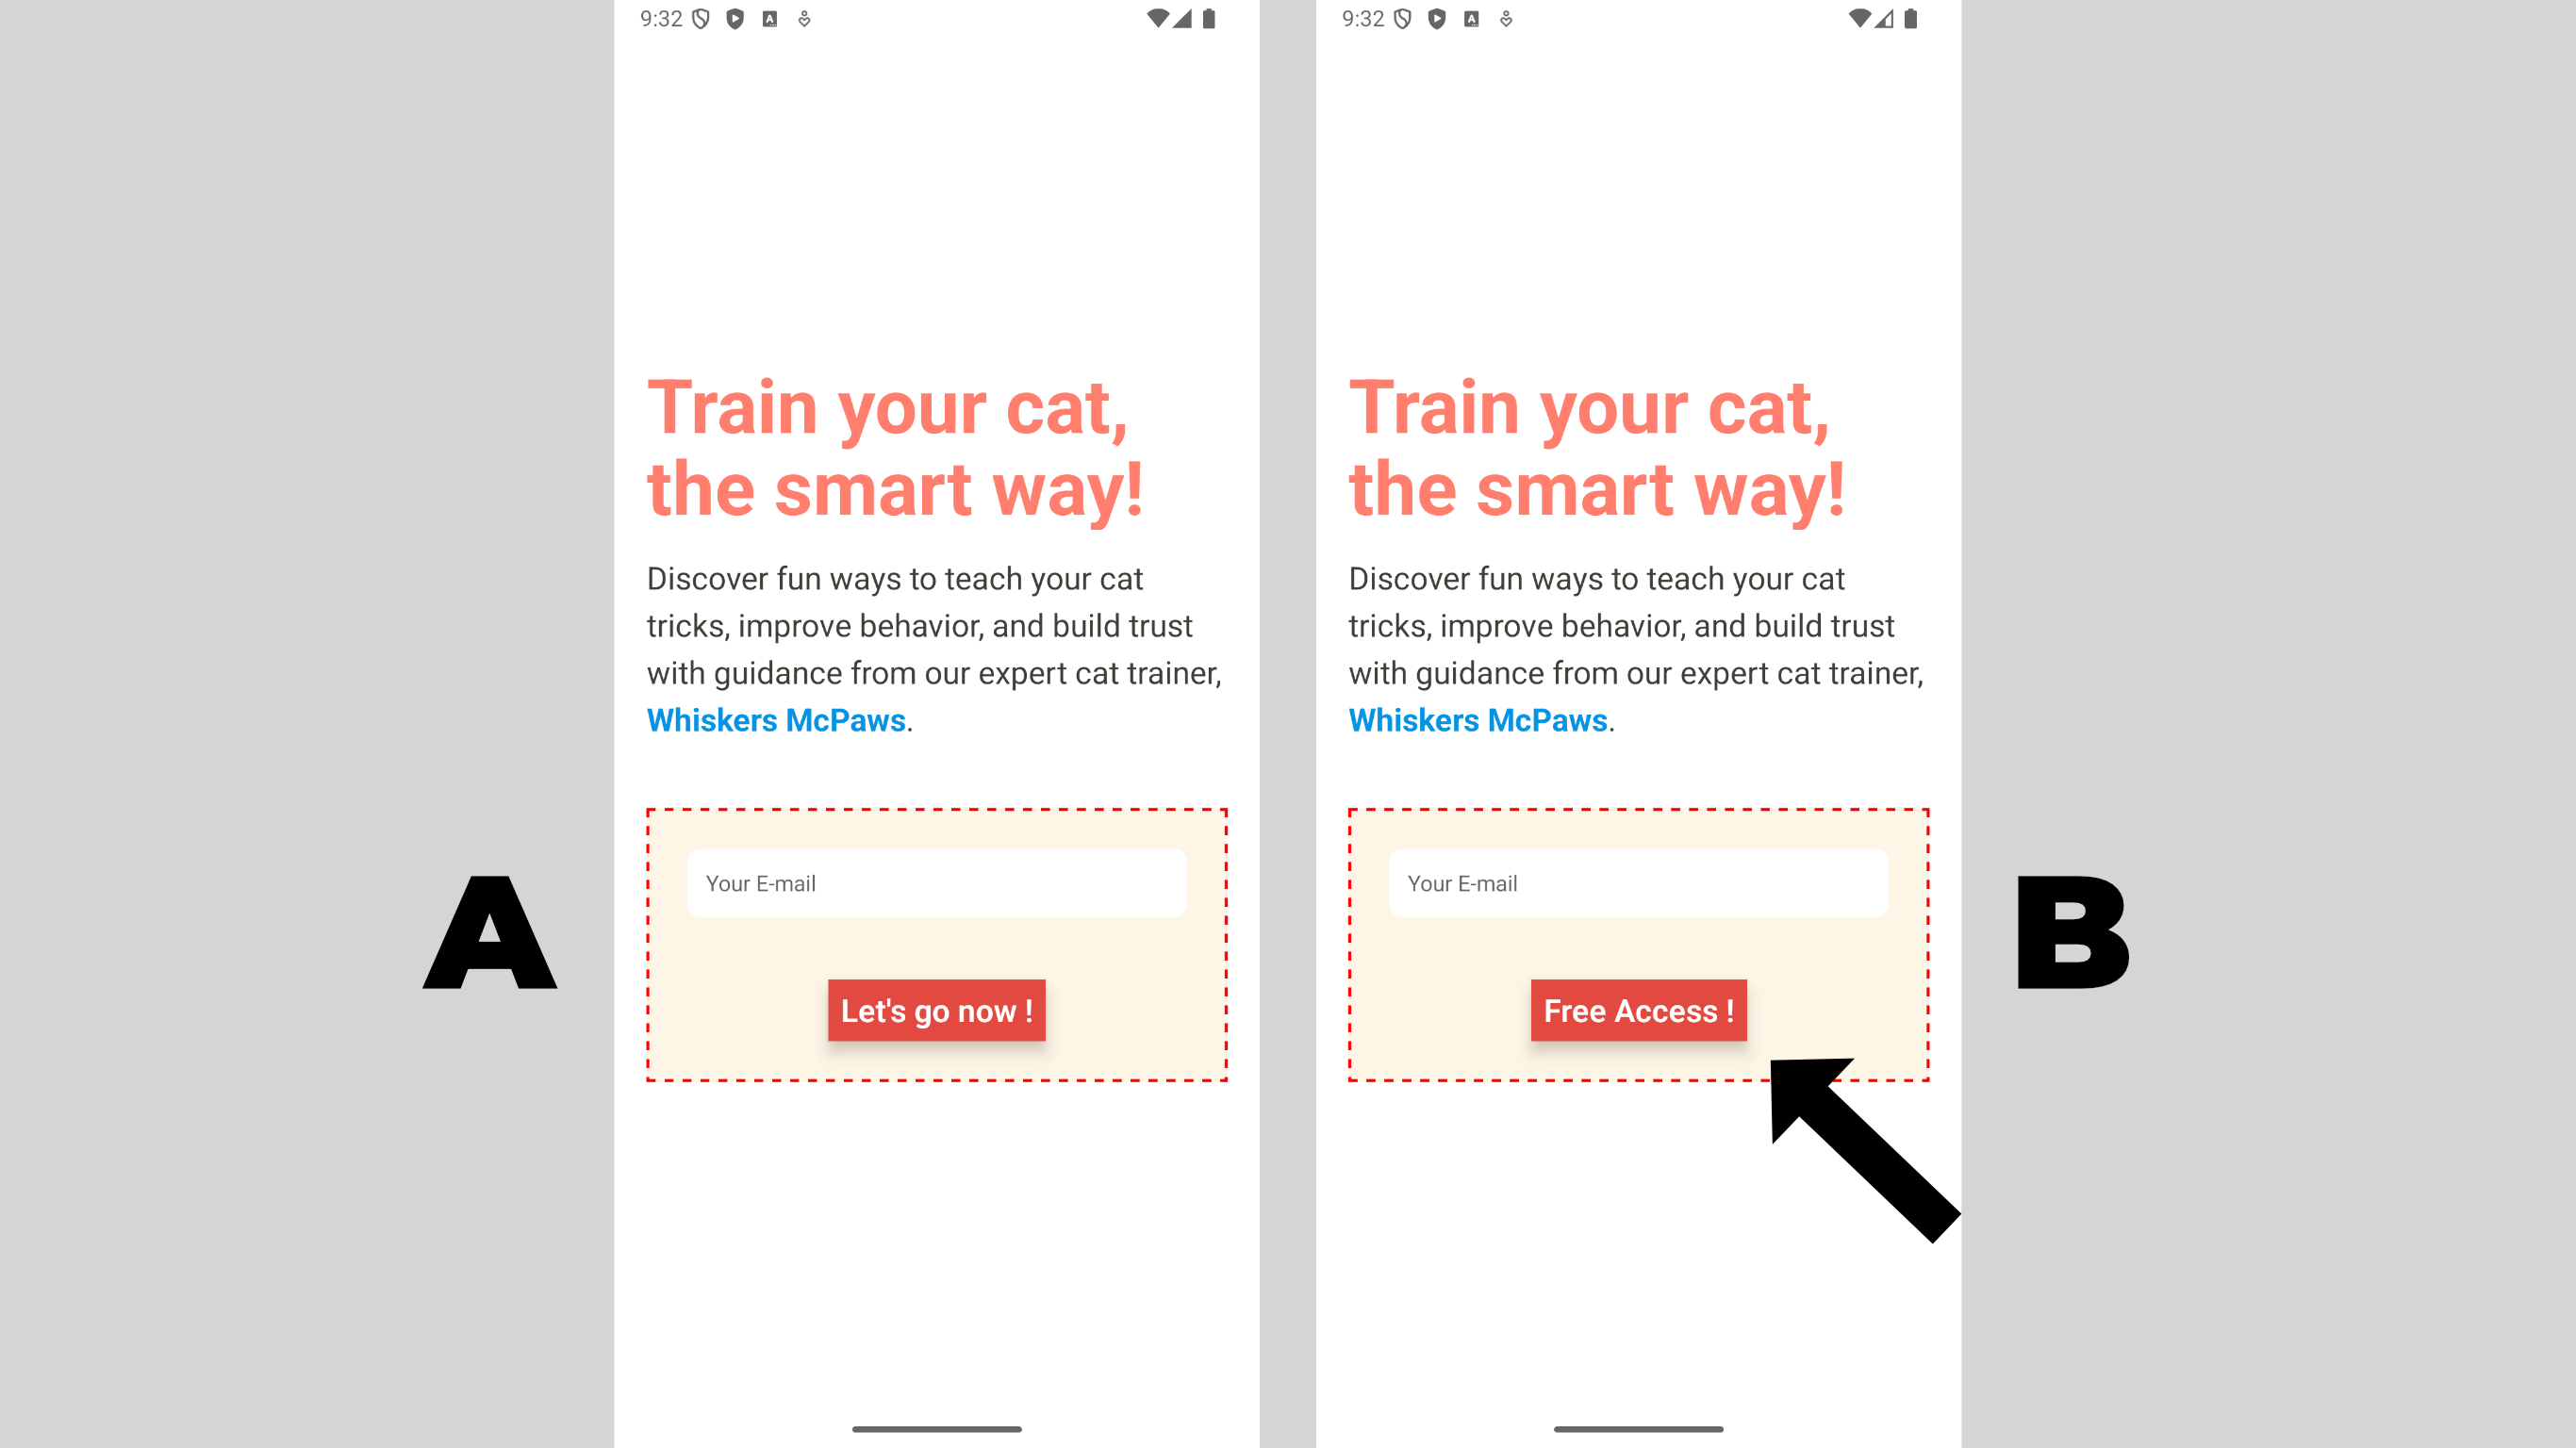
To move forward with the experiment, I'll use ConfigCat's Percentage Options to split the traffic so that 50% of users see Variation B, while the remaining 50% continue to see Variation A. Then I'll use Amplitude to track the sign-up events from both groups. At the end, we compare them and make a data-backed decision.
This is the same pattern teams use in production for experimentation and growth hacking with feature flags. A/B testing scenarios range from simple experiments, like testing the text on a button, to full onboarding-flow experiments, and the right feature flag tool keeps the setup straightforward.
Prerequisites
Before starting, you'll need:
- A React Native project
- A free ConfigCat account
- A free Amplitude account
- Node 22.11.0 or newer, and a working React Native development environment
Install the dependencies you'll need upfront:
npm install configcat-react @amplitude/analytics-react-native @react-native-async-storage/async-storage
configcat-react is the right choice for React Native projects. It provides the ConfigCatProvider wrapper and the useFeatureFlag hook, the same API used in React web apps, fully compatible with React Native. Under the hood, it uses ConfigCat's unified JavaScript SDK, which supports Browser, Node.js, React Native, and more from a single package.
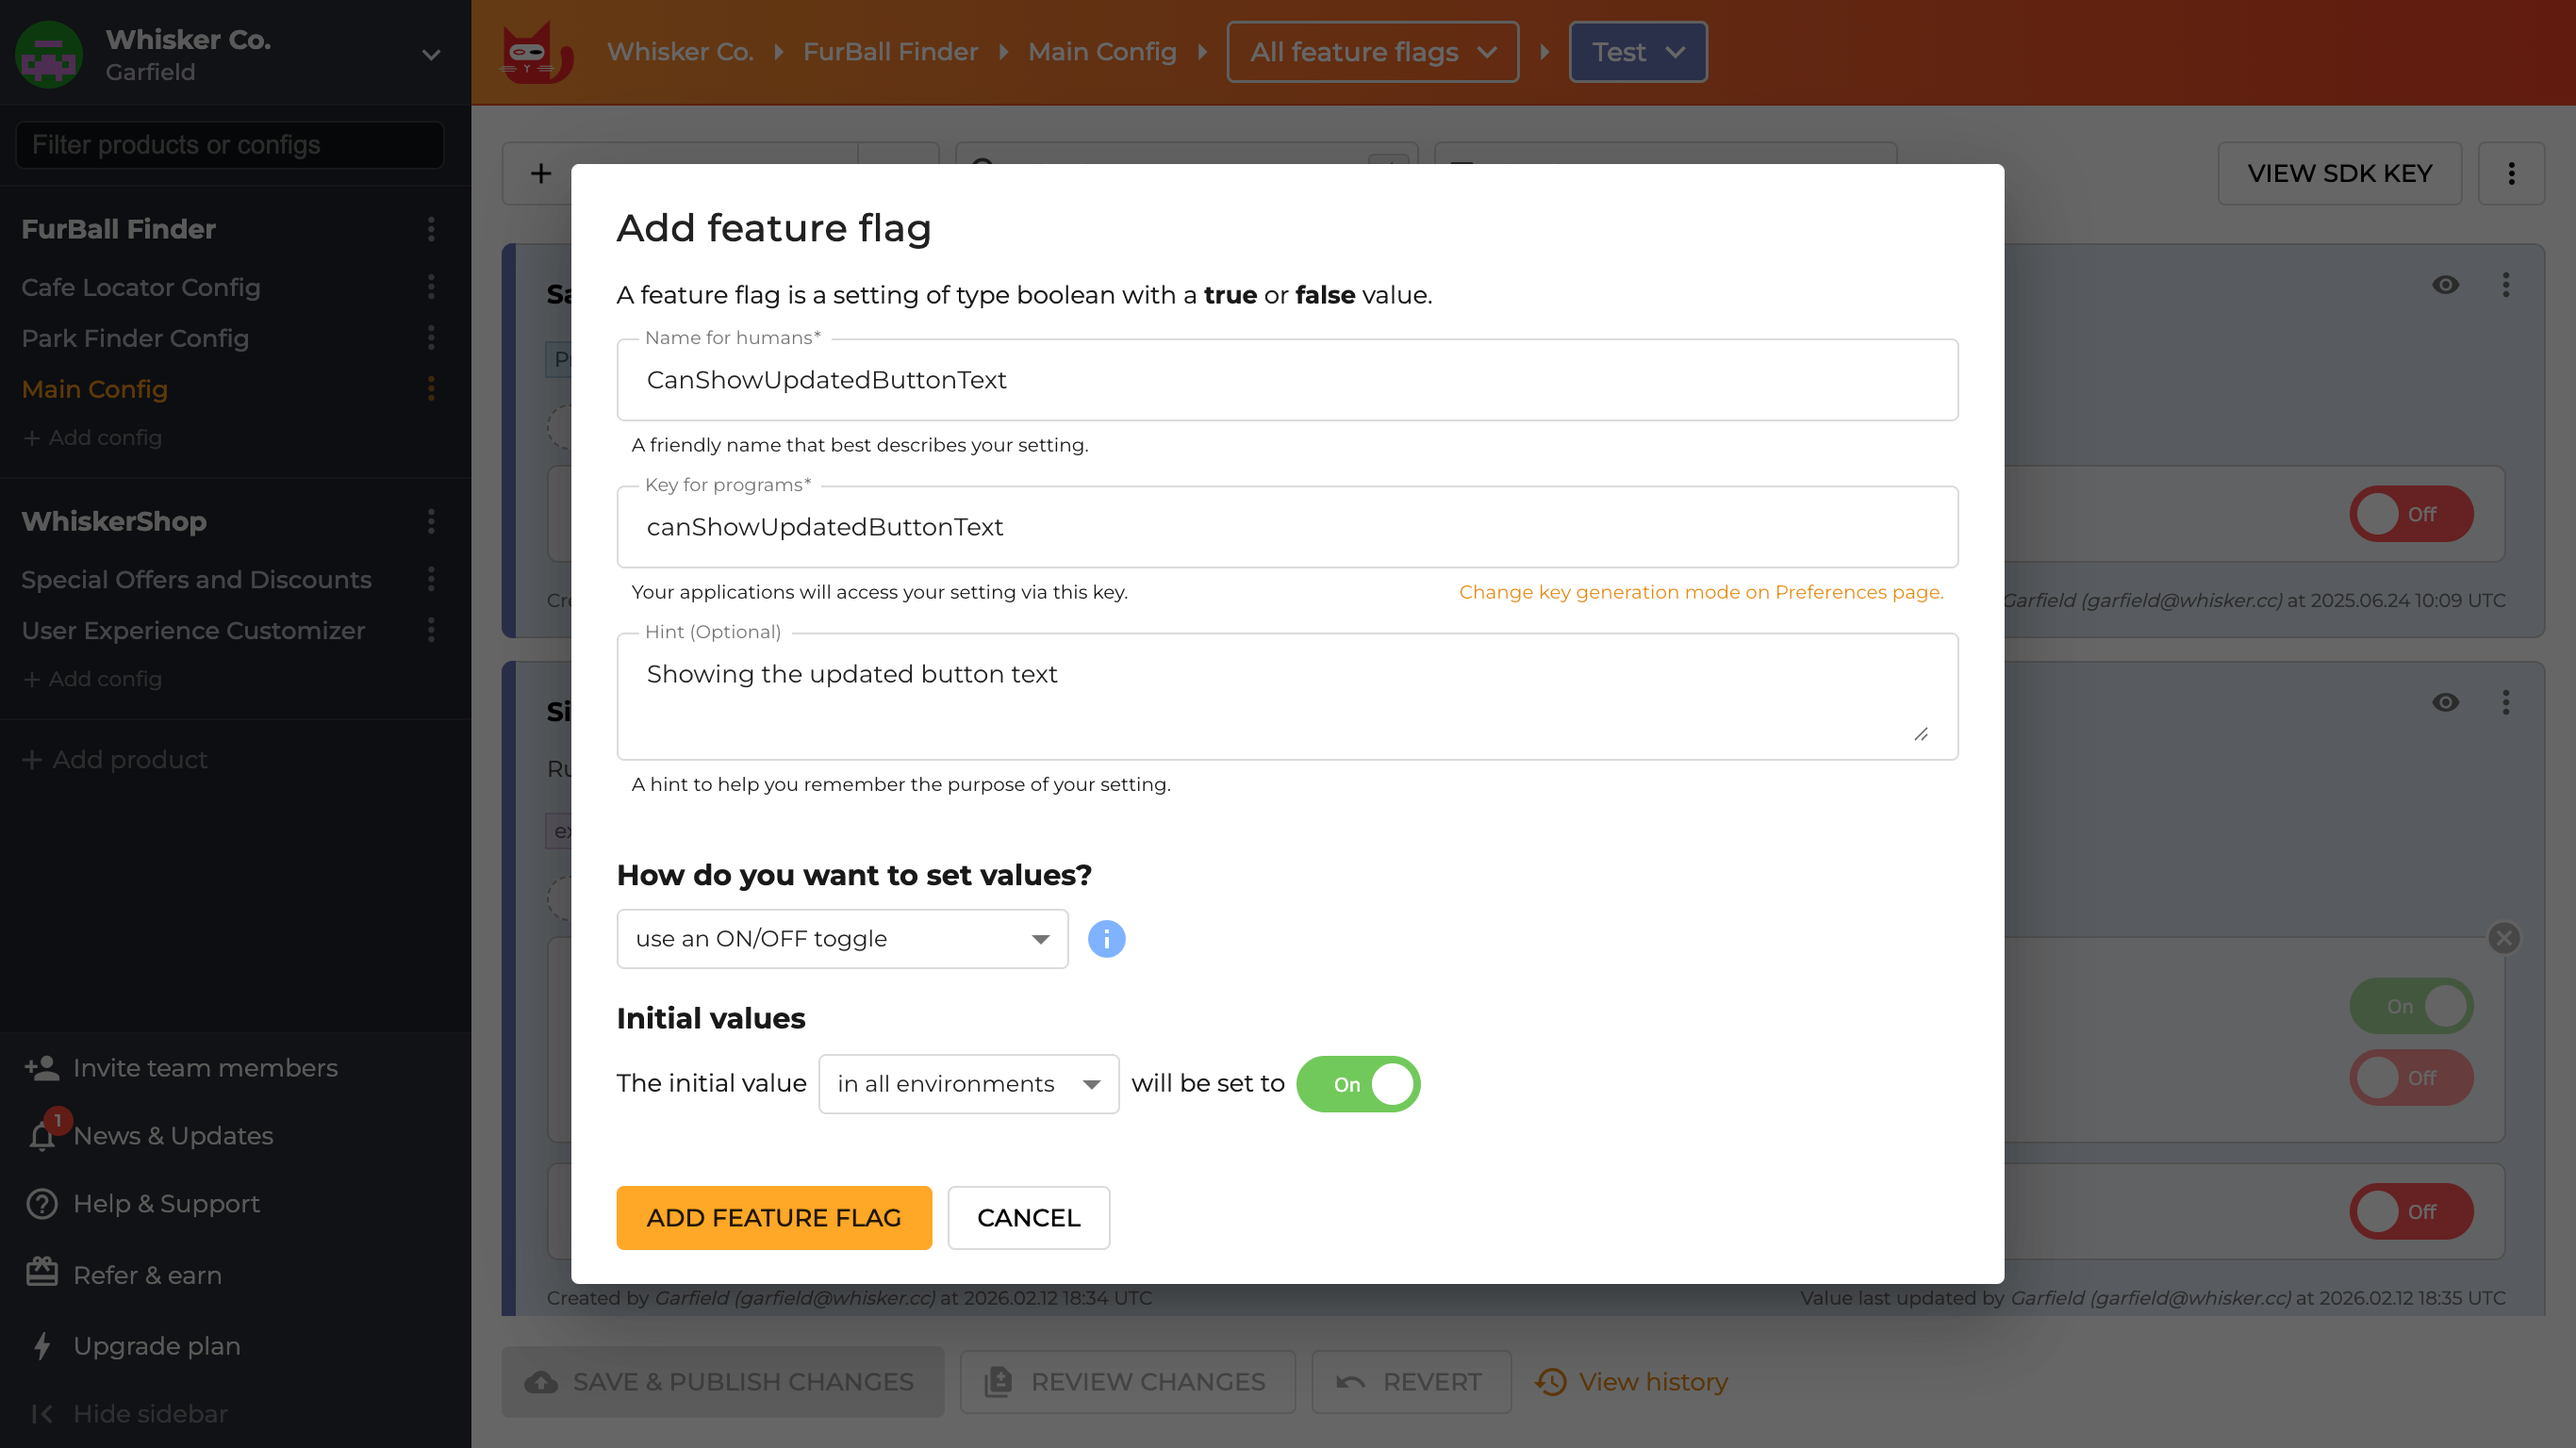
Step 1: Create a Feature Flag in ConfigCat
The feature flag is the control mechanism. It decides which variation each user sees, consistently, based on a percentage split.
Log in to the ConfigCat dashboard and create a new feature flag with the following details:
Once the flag is created, target 50% of the user base:
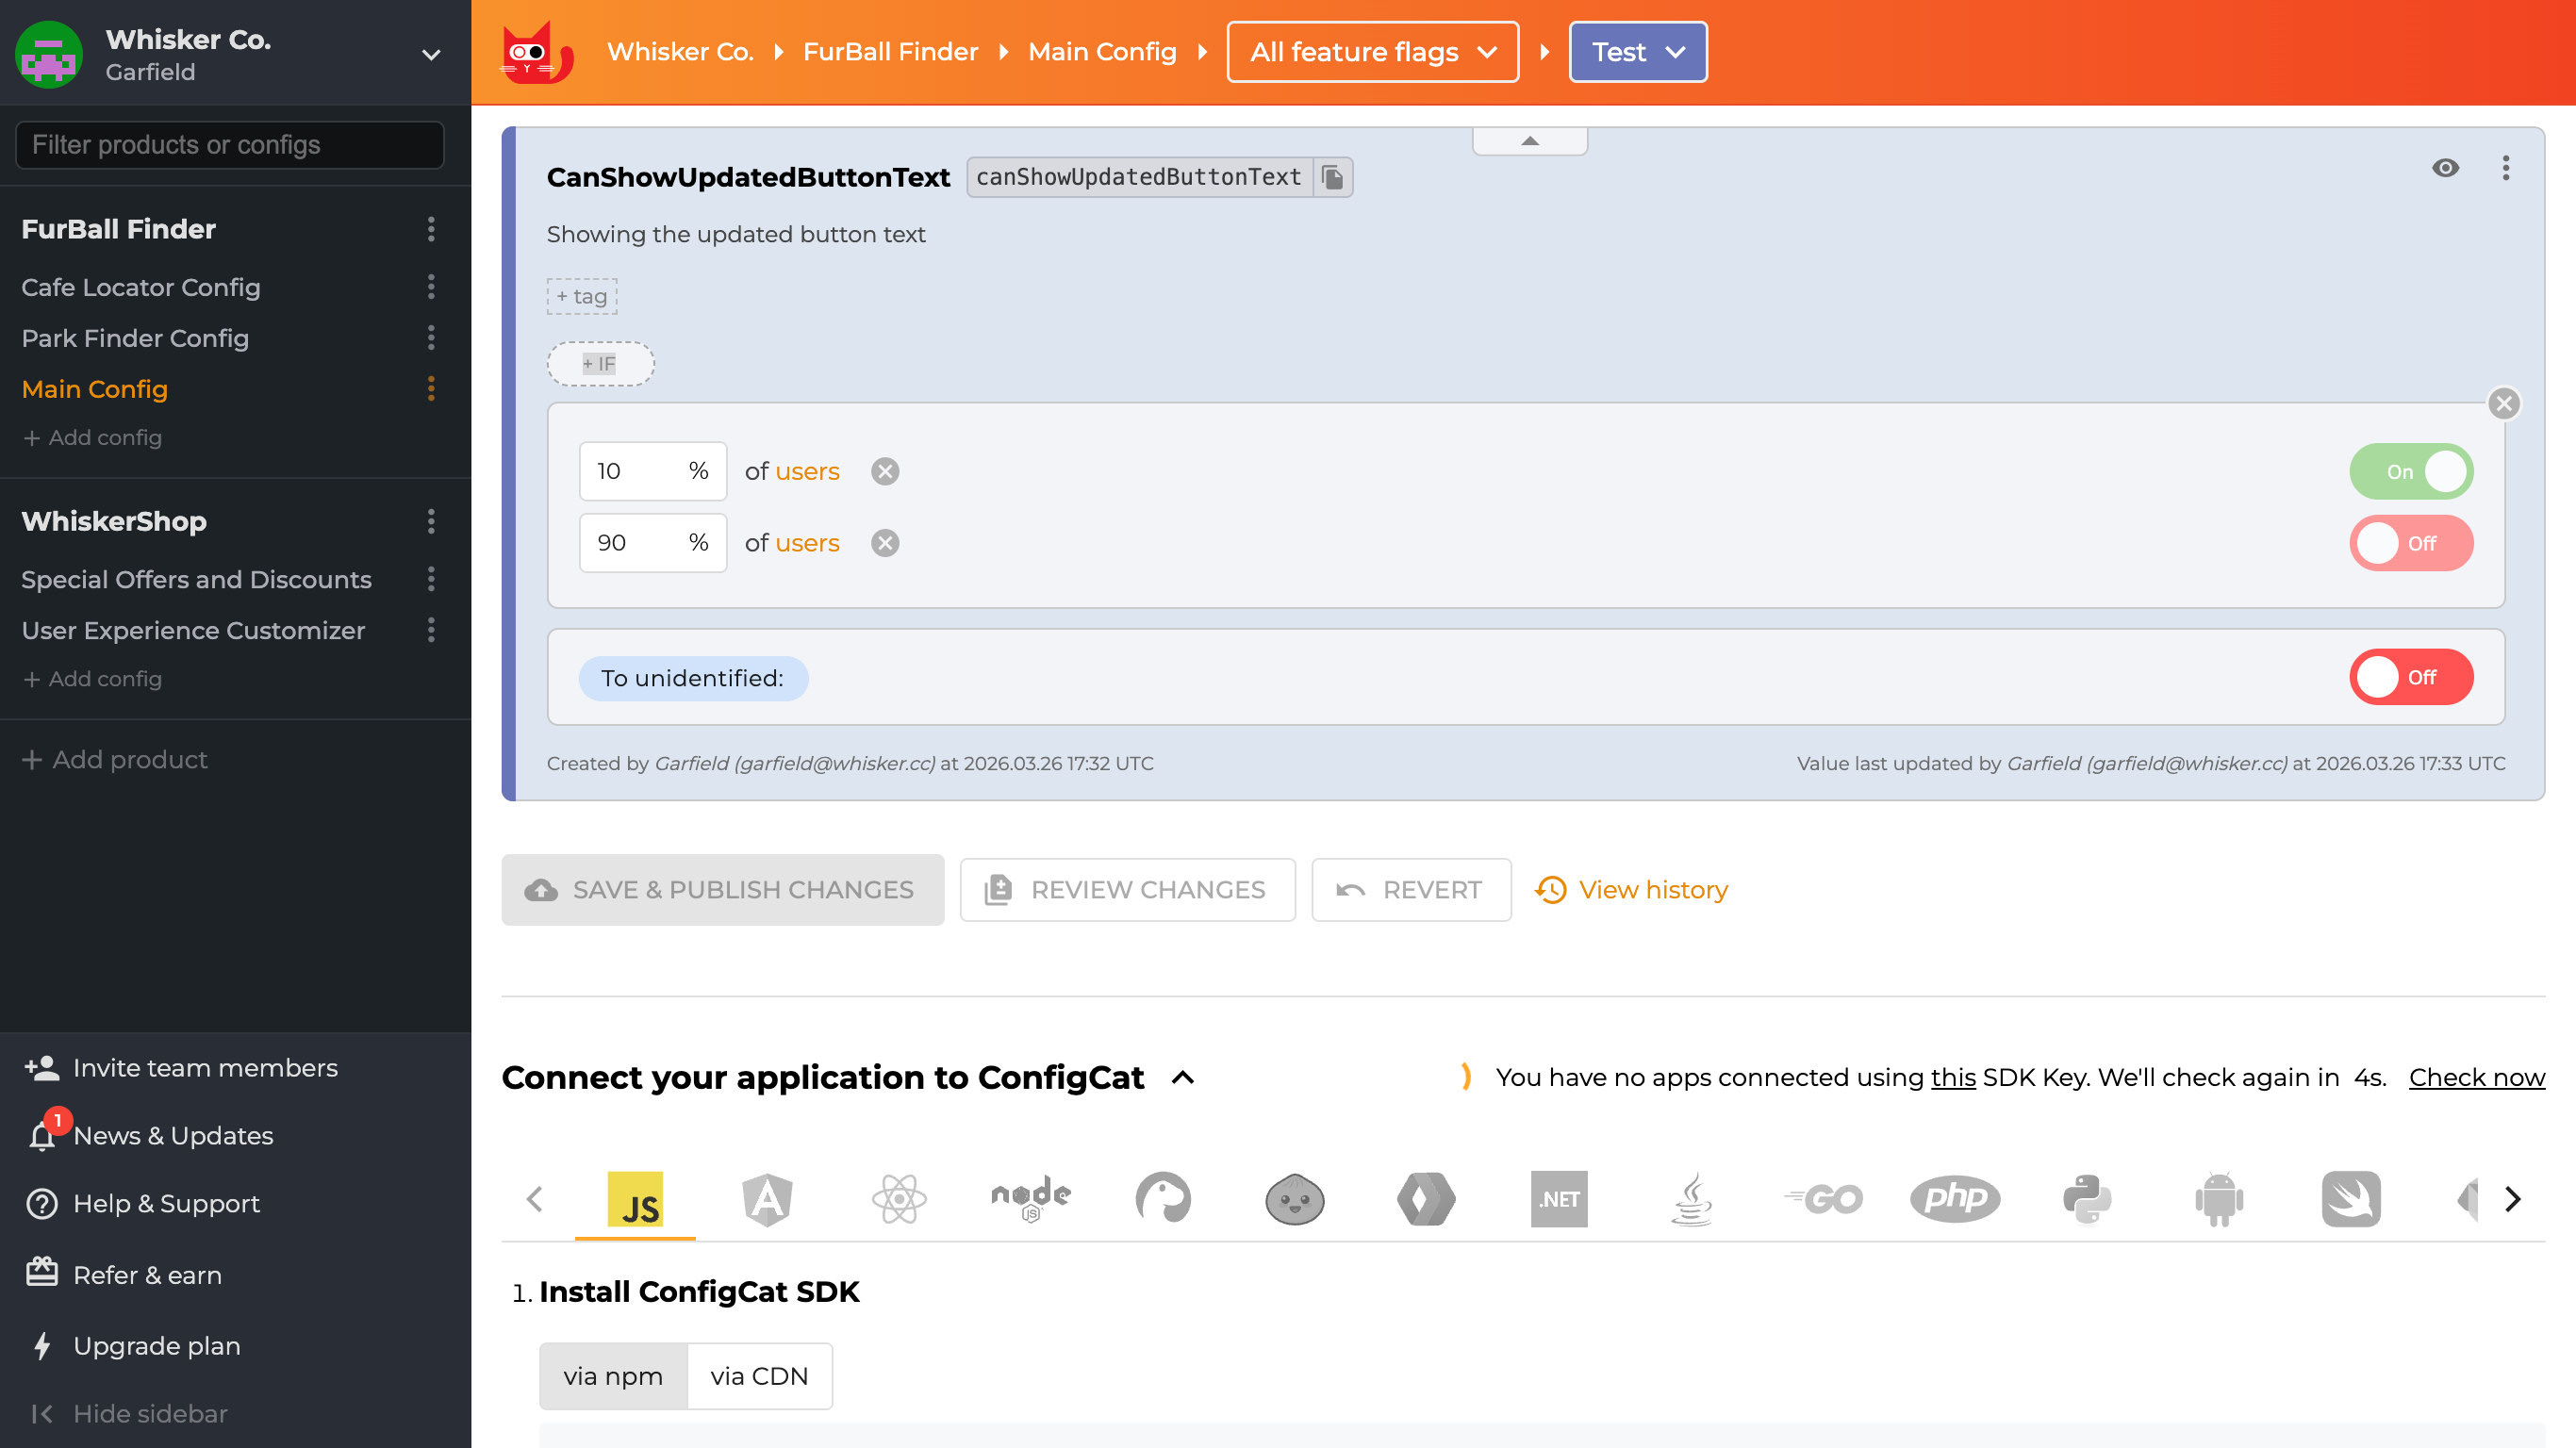
A 50/50 split gives you the fastest, most balanced read on the two variations, since each gets an equal share of traffic. And because everything runs behind a flag, if Variation B causes problems, you can turn it off immediately, and every user reverts to Variation A.
ConfigCat assigns users to each group consistently, meaning that the same user always sees the same variation in every session. This consistency is essential. If the same user saw different variations across visits, you couldn't attribute a conversion to either group reliably.
Step 2: Integrate ConfigCat into React Native
Before wiring up the A/B test logic, you'll need ConfigCat running in your React Native app. If you haven't done that yet, the guide Using Feature Flags in React Native walks through the full setup.
Step 3: Connect ConfigCat to Amplitude
To track every user sign-up event when the button is pressed, you'll use Amplitude's analytics platform. If you don't have an account yet, sign up for a free user account.
Once you're in, set up a data source so Amplitude knows where events are coming from:
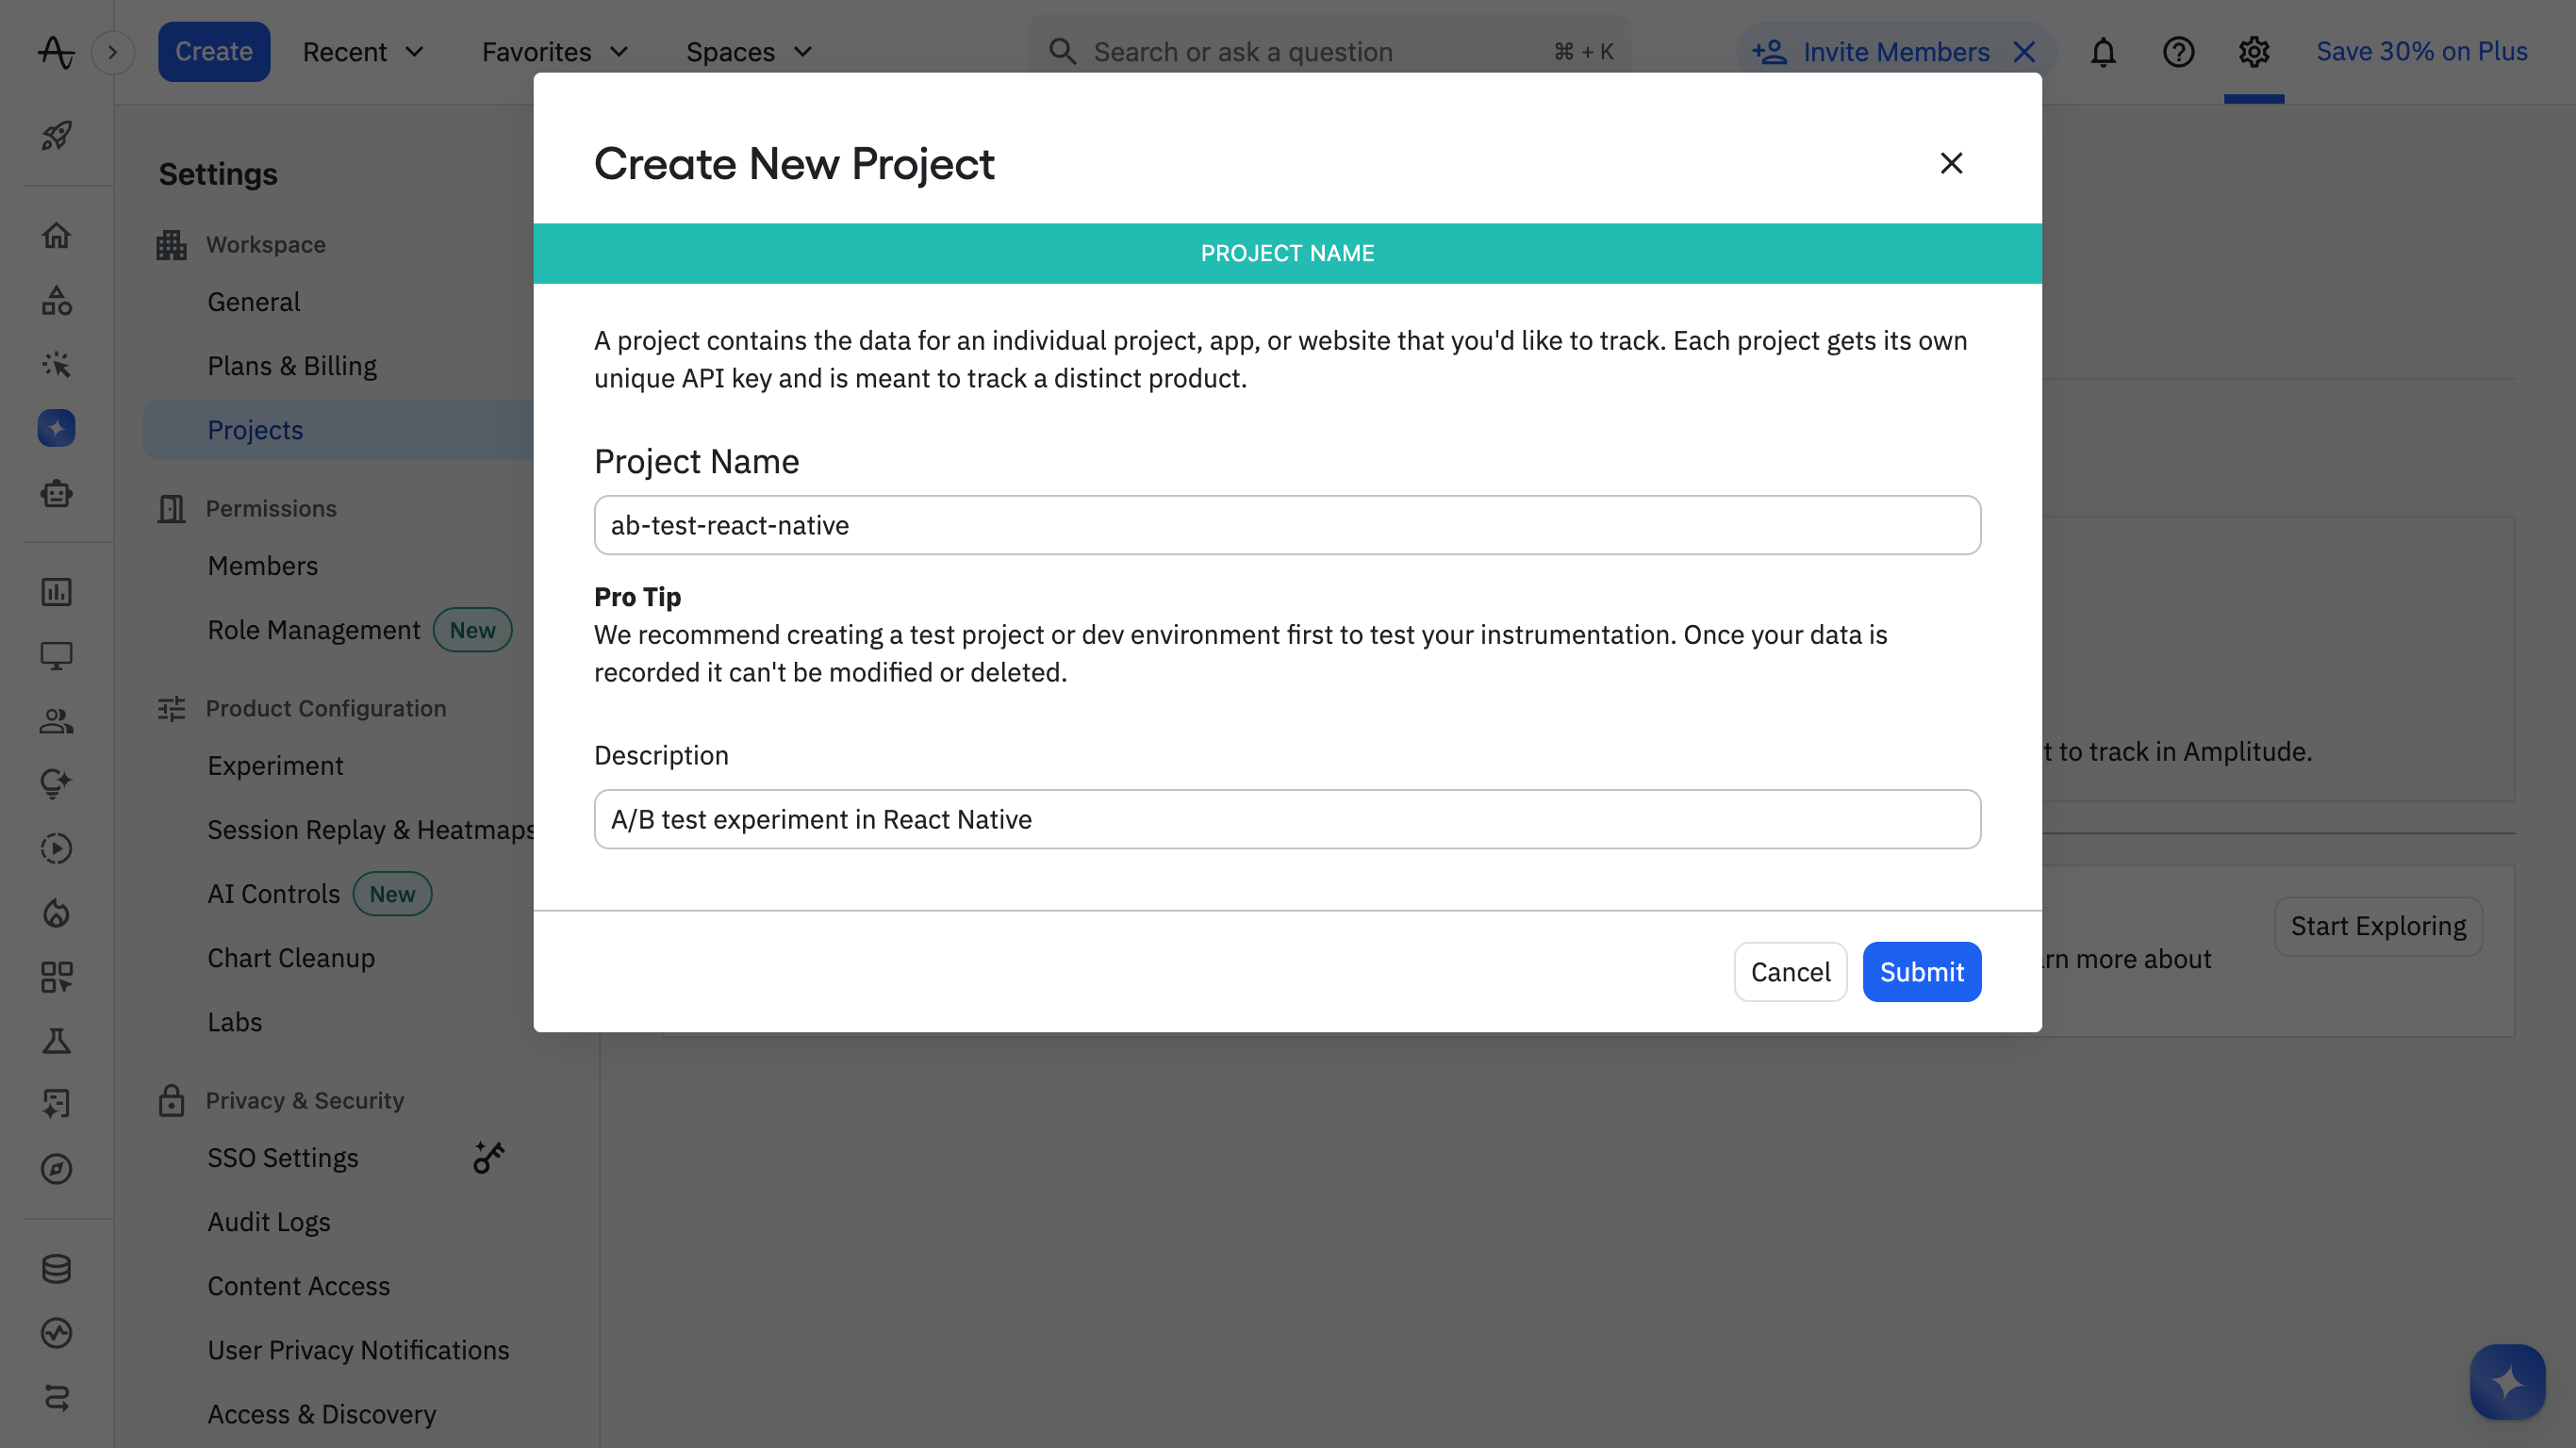
1. Create a new project in Amplitude for the test experiment:
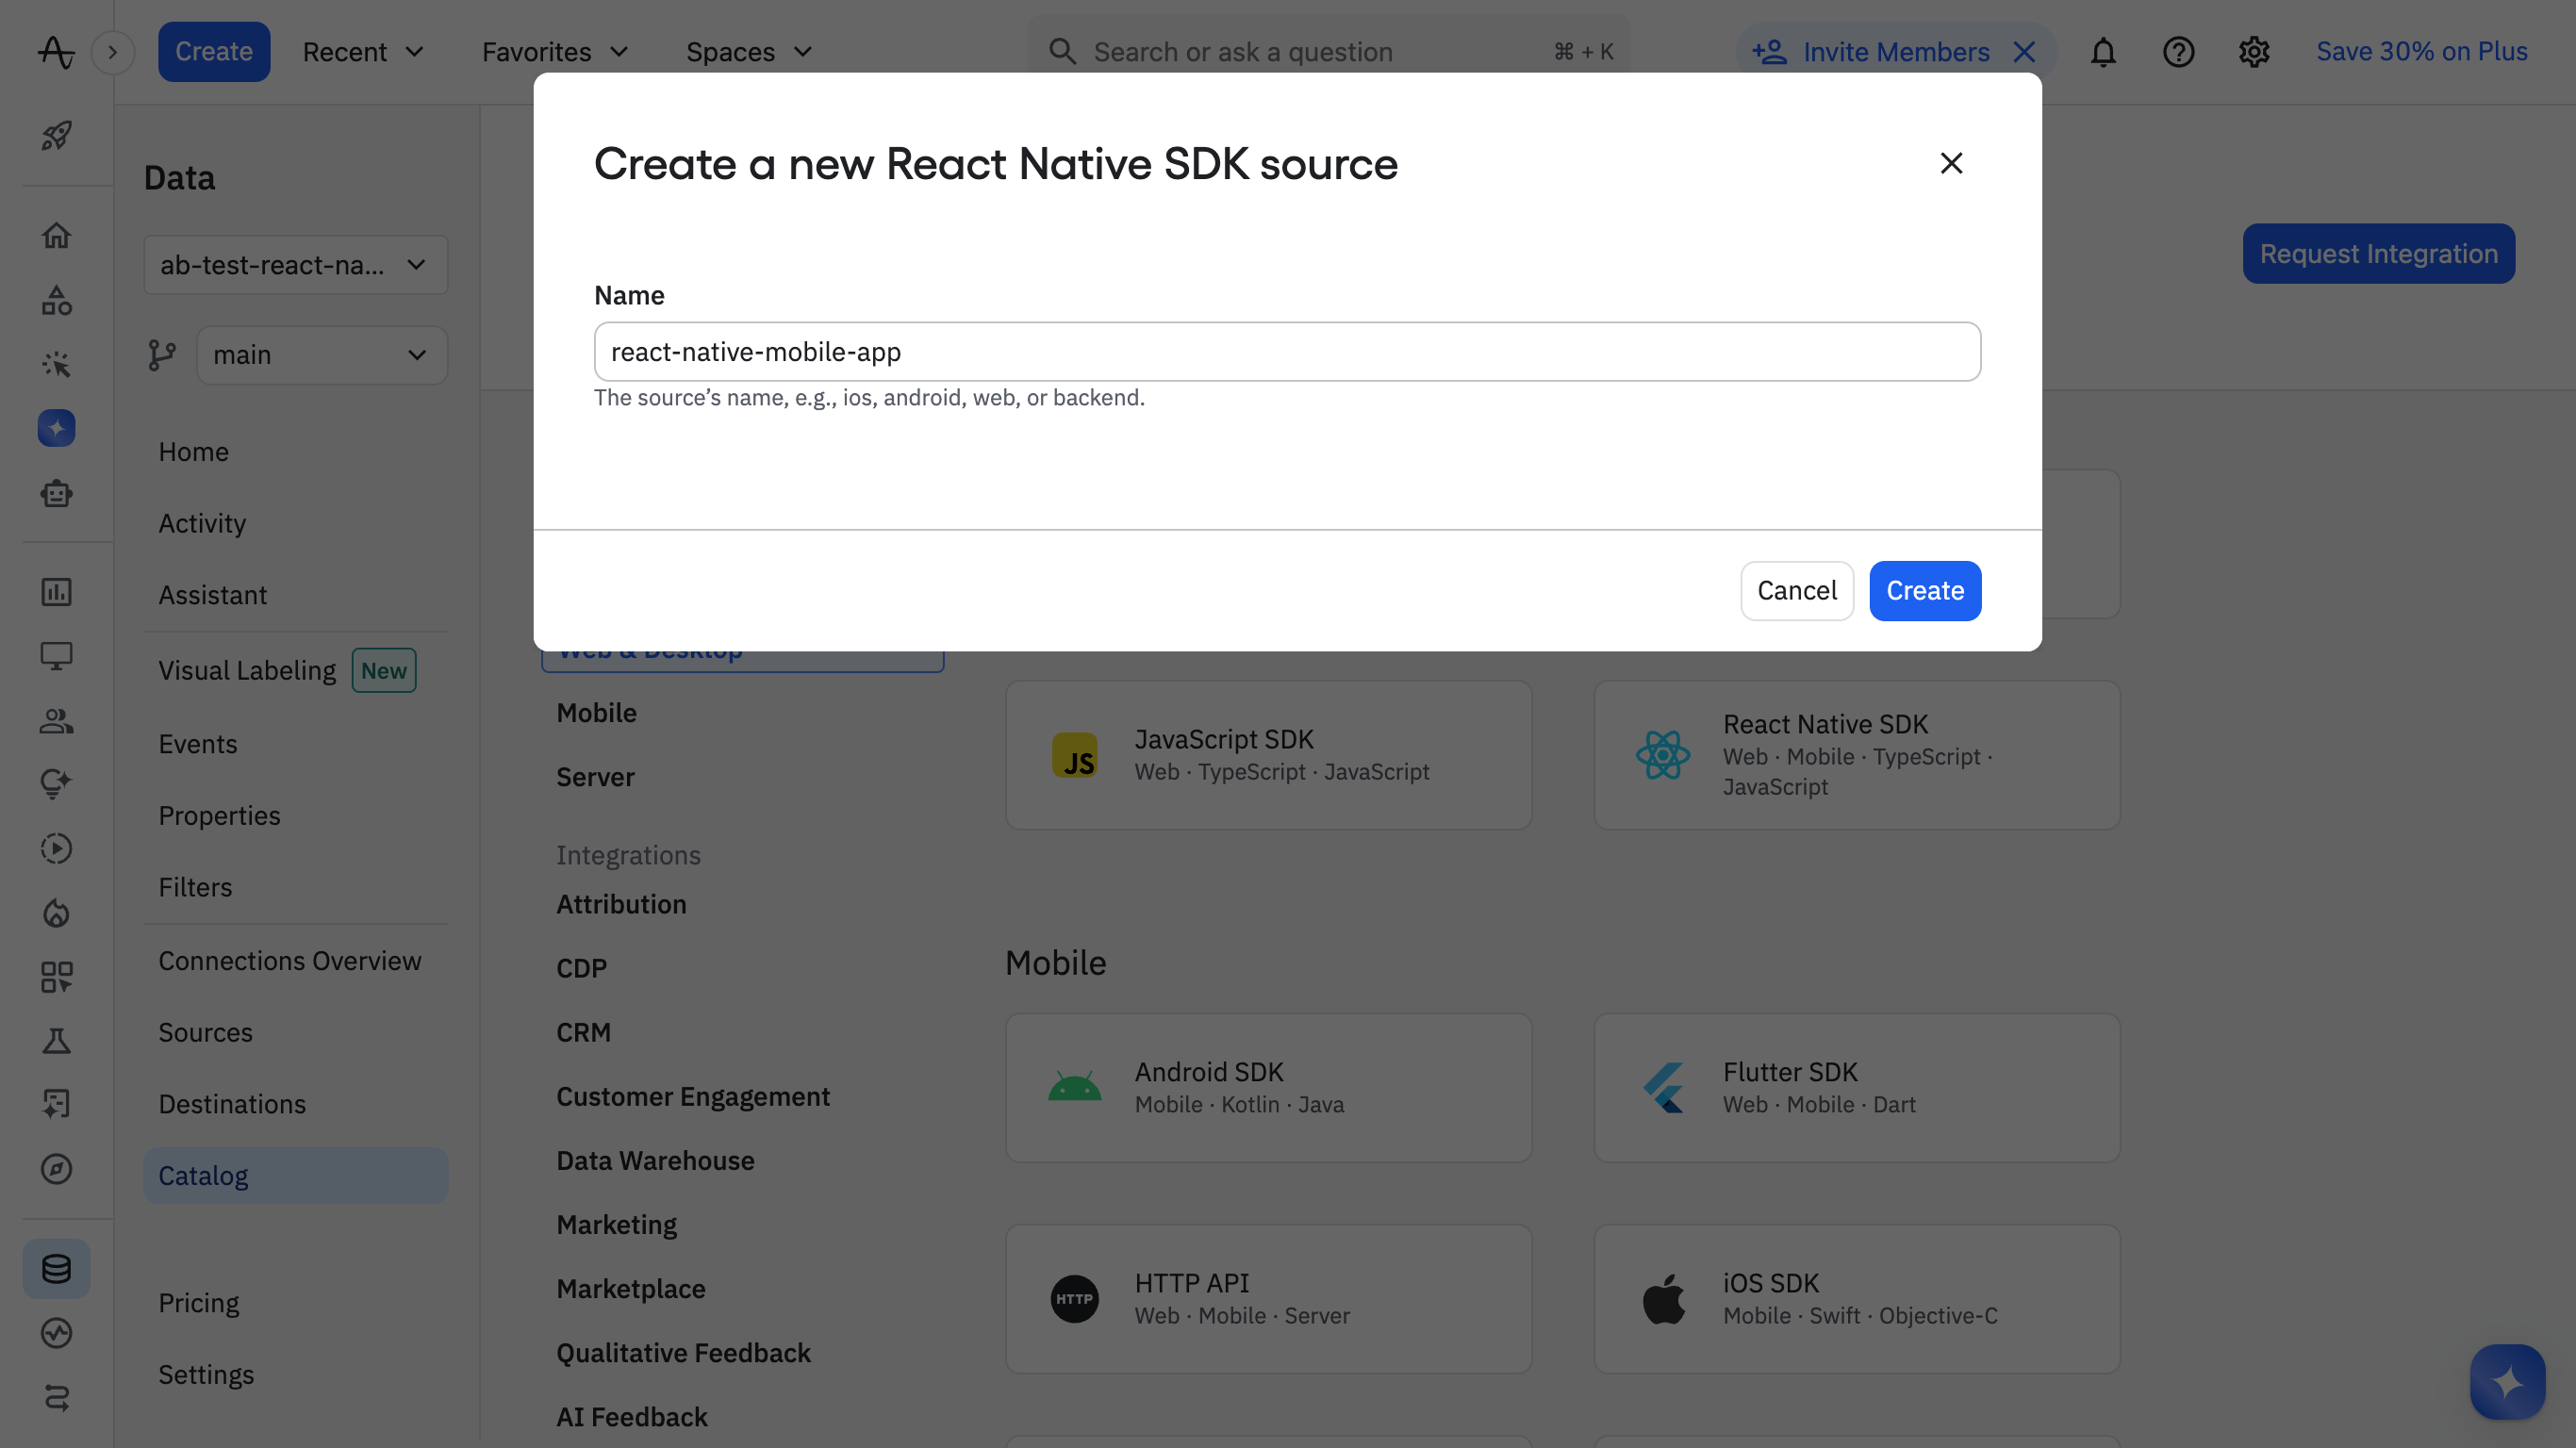
2. Add the Amplitude React Native SDK as a source for the project:
3. Create a reusable service for Amplitude which you can import and use throughout your app.
Step 4: Add a Sign-Up Event
Next, define the event you'll use as your primary conversion metric.
The feature flag controls which sign-up button text is shown, while Amplitude tracks which variant users click. In this example, the button text acts as the variant identifier. In a production setup, you may want to track an explicit variant property (e.g., "A" or "B") to make analysis clearer and more reliable.
Add the tracking call to your sign-up button, so each click sends an event to Amplitude:
import { IUser, useFeatureFlag } from "configcat-react";
import { Text, StyleSheet, Pressable } from "react-native";
import amplitude from "@/services/amplitude-service";

export function SignupButton() {
  // Generate and store a stable anonymous userId for A/B testing.
  let userId = localStorage.getItem("ab_user_id");
  if (!userId) {
    userId = crypto.randomUUID();
    localStorage.setItem("ab_user_id", userId);
  }

  const user: IUser = {
    identifier: userId,
  };

  const { value: canShowUpdatedButtonTextEnabled } = useFeatureFlag(
    "canShowUpdatedButtonText",
    false,
    user,
  );

  const buttonText = canShowUpdatedButtonTextEnabled
    ? "Free Access !"
    : "Let's go now !";

  const handleSignupButtonClick = (buttonText: string) => {
    // Record the click event, with the variant (buttonText)
    const eventProperties = { buttonText: buttonText };
    amplitude.track("SignupButton Clicked", eventProperties);
  };


  return (
    <Pressable
      style={styles.signupButton}
      onPress={() => handleSignupButtonClick(buttonText)}
    >
      <Text style={styles.signupButtonText}>{buttonText}</Text>
    </Pressable>
  );
}
Then confirm the event is flowing into Amplitude:
1. Return to the app and click the signup button a few times, then open the Events page in the left sidebar to see the event recorded.
2. Click the name of the event, then click the Add to plan button to add the event to your tracking plan.
Step 5: Set Up the Analysis Chart in Amplitude
To analyze the events and get real-time visual insights on each variation, I'll set up an Analysis chart.
1. Back on the Events page, select the event, then click the Create Chart button at the top right. This will create a new chart for analyzing the test results.
2. Add the SignupButton Clicked event to the Chart, set grouped by to buttonText, then select Bar chart:
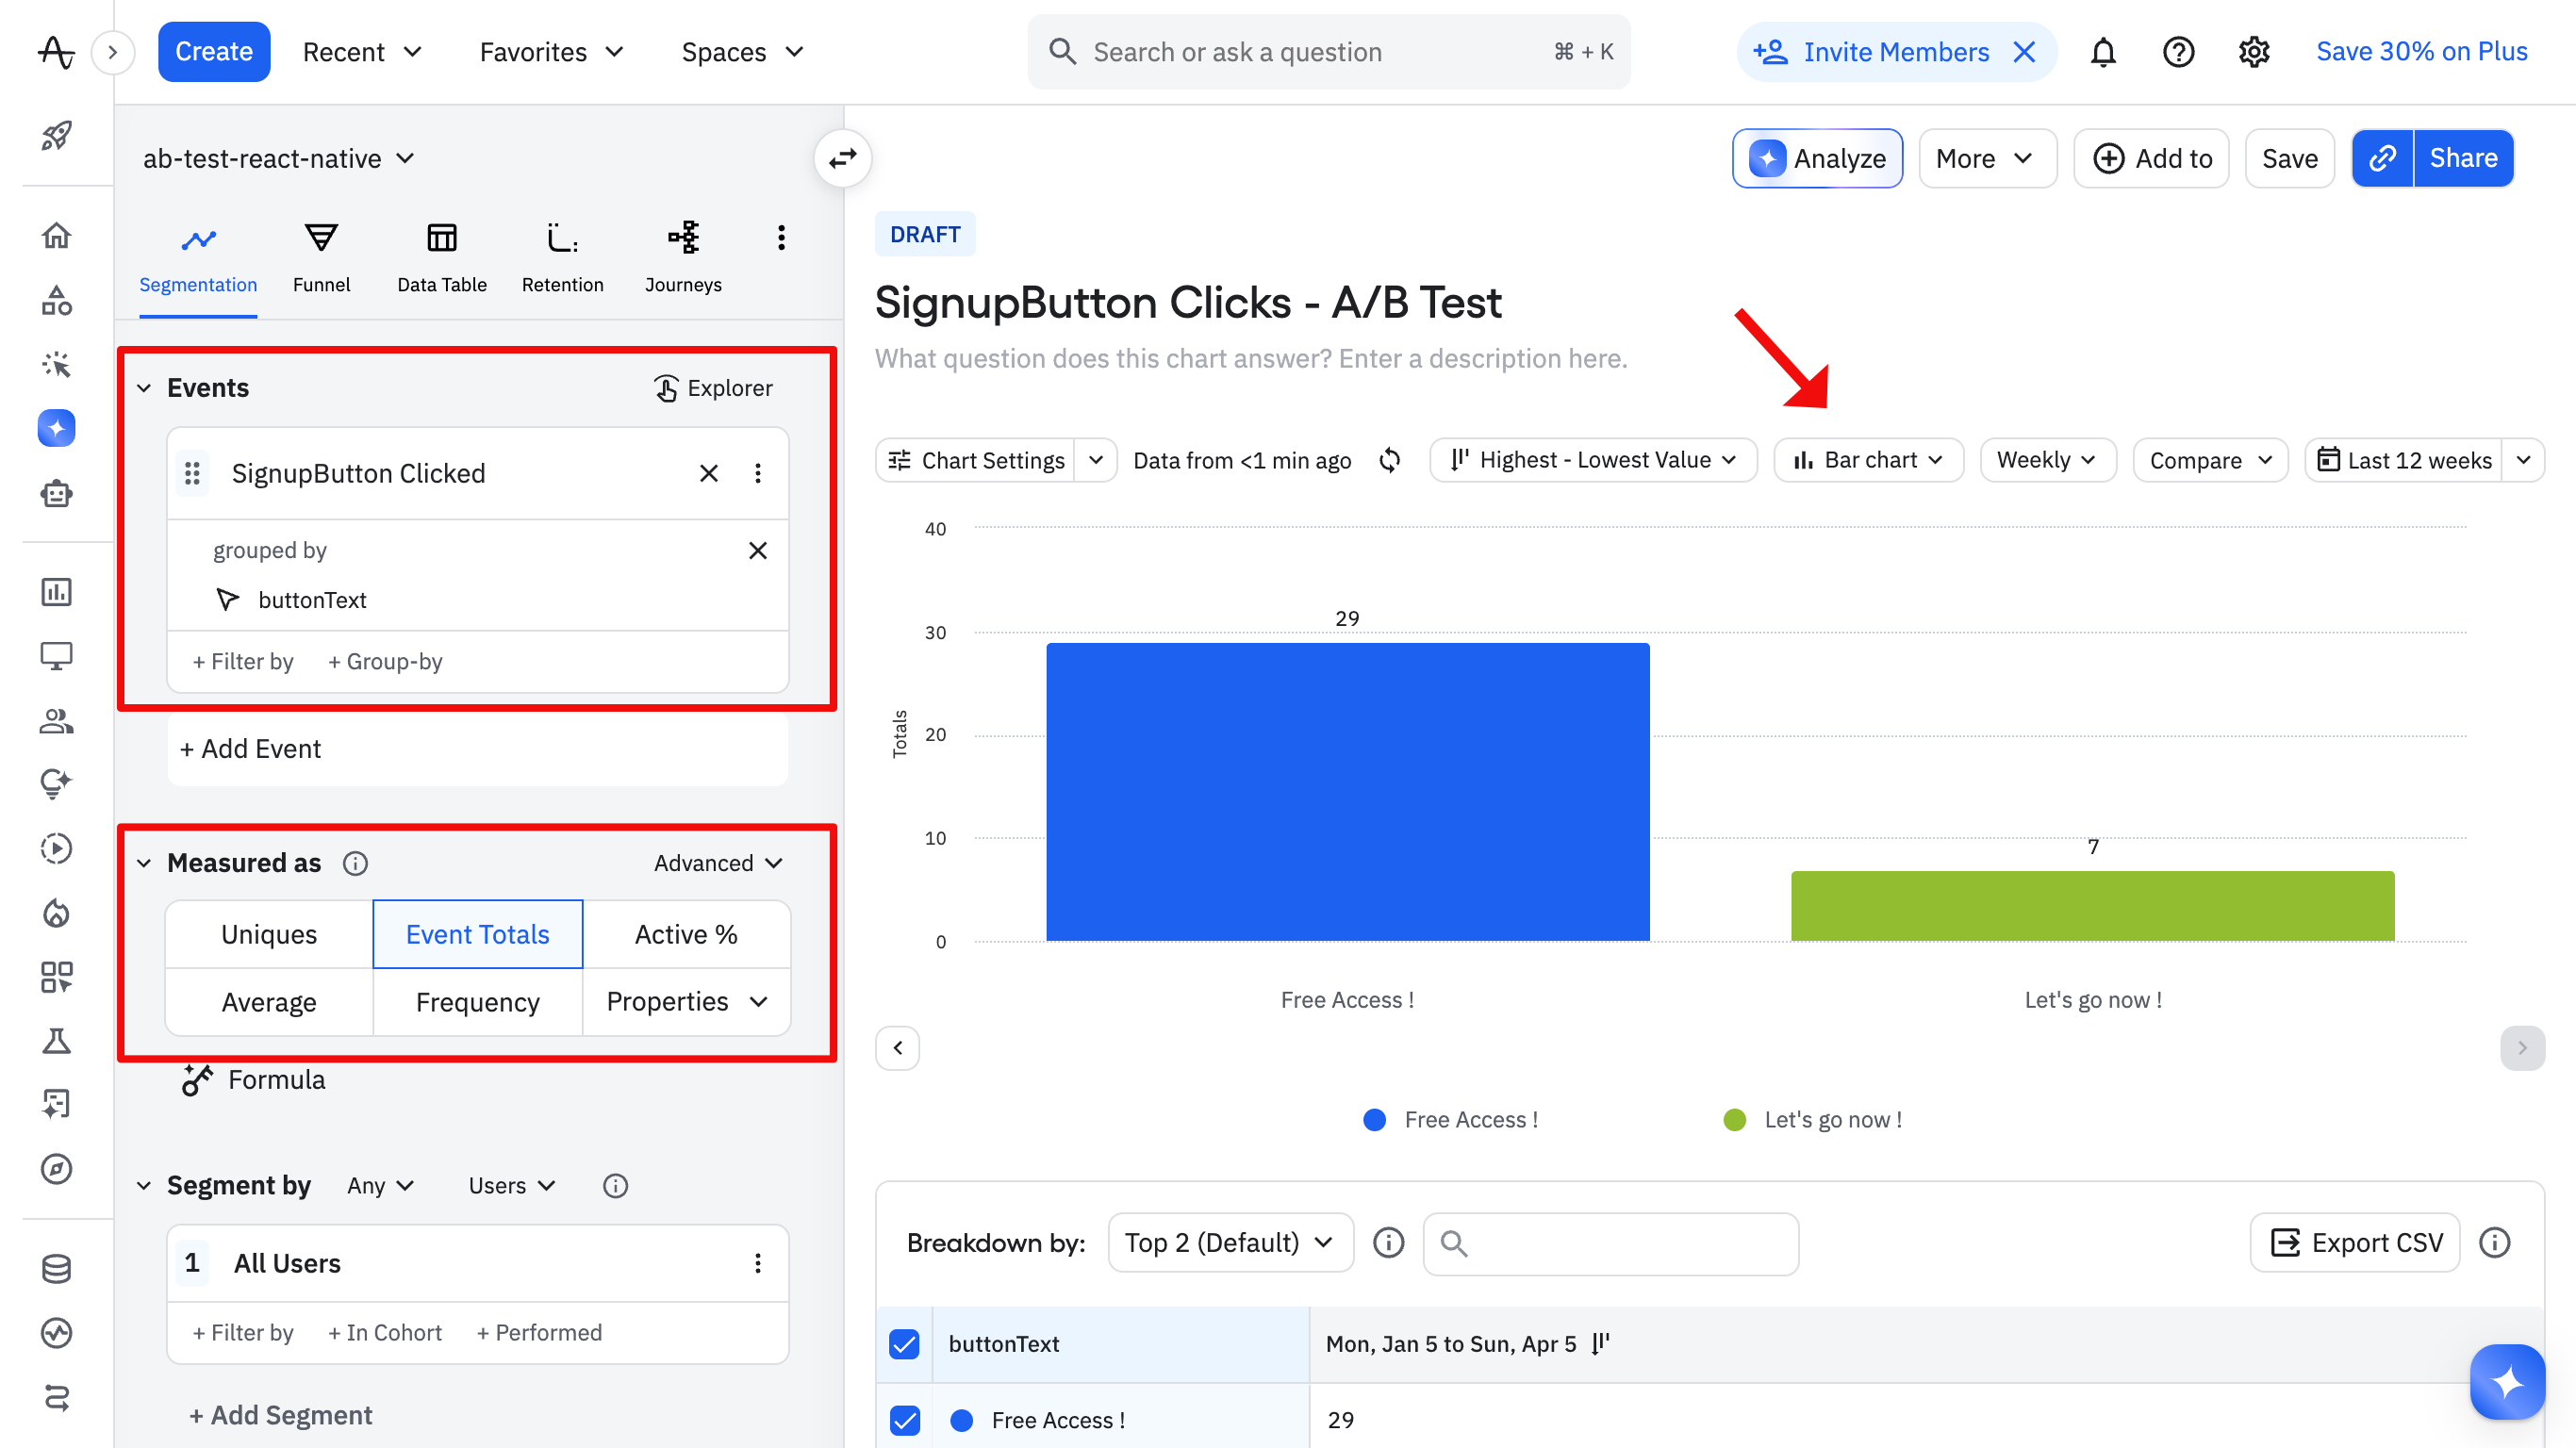
Check the chart daily while the test is running. You're not looking for a winner yet. You're watching for problems. A sudden drop in Variation B sign-ups could mean a UI bug or a confusing change that made things worse. Because you are using ConfigCat, you can turn the flag off immediately, and every user returns to Variation A without a redeployment.
Step 6: Reading the Results
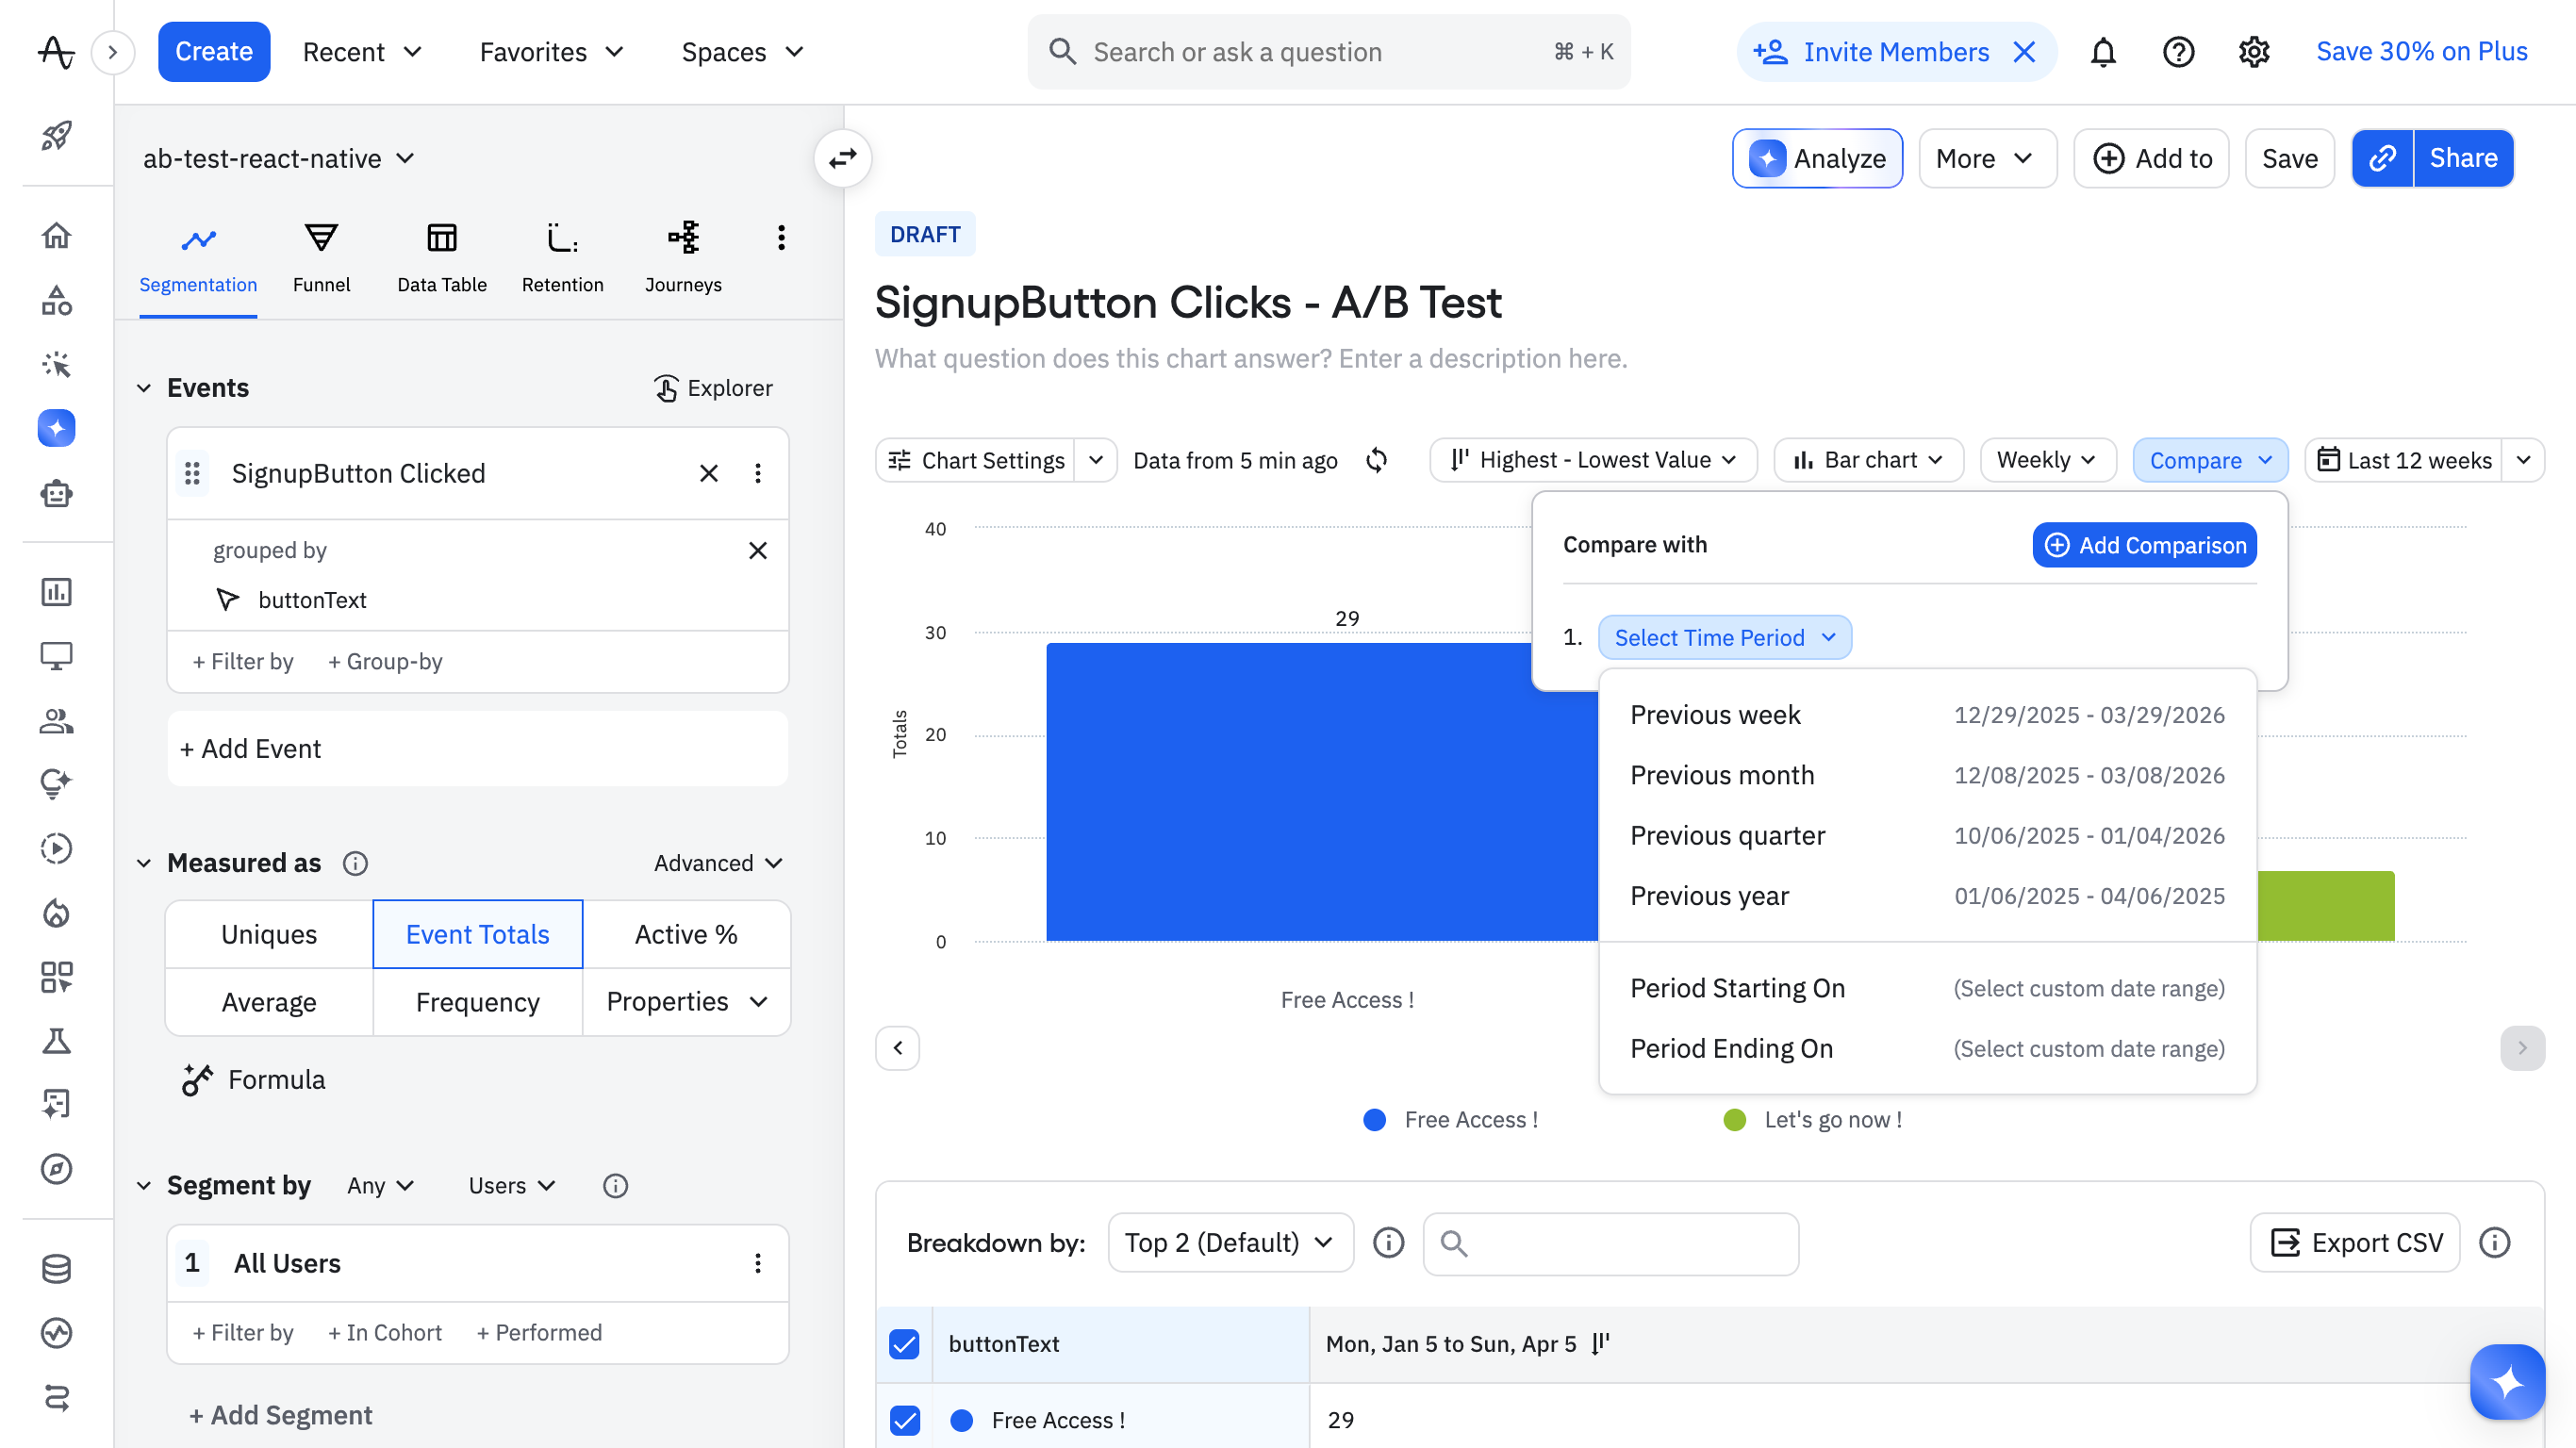
When your testing period is over, you'll need to compare the results you gathered with those from a past period. Amplitude provides an easy way to do this with the Compare dropdown button as shown below. This can help you make an informed decision about which variation to roll out or keep.
You can find the final app here.
Step 7: Ending the Test
Once you have a clear result, close the experiment cleanly. A flag that is never removed becomes a zombie flag, lingering in your codebase long after its purpose is gone and adding noise to every future debugging session.
If Variation B wins:
- In the ConfigCat dashboard, change the rule to serve
truefor 100% of users - Verify the full rollout for 24 to 48 hours before touching the code
- Deploy a code update that removes the flag and hardcodes the winning button text
- Delete the flag from the ConfigCat dashboard
- Archive the Amplitude chart for future reference
If Variation A wins or the results are inconclusive:
- Set the flag to
falsefor 100% of users in the dashboard - Deploy a code update that removes the flag while keeping the original button text
- Delete the flag from the ConfigCat dashboard
Either way, the flag gets deleted. Understanding feature flag lifespans and treating cleanup as part of the feature work rather than an afterthought are what keep a growing flag system manageable.
Step 8 (bonus): Track Feature Flag Exposure in Amplitude
ConfigCat exposes a flagEvaluated hook that fires every time a flag is evaluated for a user. You subscribe to it once at initialization, and it automatically sends an $exposure event to Amplitude Experiments for every evaluation. You don't need to manually track the variation on every button press or screen render; the hook handles it.
The $exposure event populates Amplitude Experiments automatically. The Identify call enriches every subsequent event for that user with the flag variant as a user property, so you can filter any existing chart by which variation they saw. The full integration details are in the ConfigCat Amplitude documentation.
Summary
A/B testing in React Native does not require a separate testing platform or app store submission for each variant. A feature flag framework gives you a cleaner model: ship one build, control the split from a dashboard, let the flagEvaluated hook handle exposure tracking automatically, and make decisions based on real user behavior.
The test in this guide was a button text change. The same code handles pricing page variants, onboarding flow experiments, checkout redesigns, and any other change where you have a clear hypothesis and a measurable outcome.
ConfigCat's Forever Free plan covers everything shown in this guide with no credit card required. It integrates in under 10 minutes, and ConfigCat's React SDK works in React Native out of the box. Your first A/B test can be live before your next standup.
To keep up with other posts like this and announcements, follow ConfigCat on X, Facebook, LinkedIn, and GitHub.