A/B Testing in Android Kotlin with ConfigCat and Amplitude

Releasing your digital product on the market is both an exciting and terrifying process. Whether you’ve created a mobile app or another type of software product, seeing it in the hands of real users is the ultimate achievement. But, simply building a wonderful product is not enough to ensure its long-term success. Over time, you’ll inevitably want to make changes and updates to your app.
But how can you be sure you’re making the right changes? It’s impossible to read your clients’ minds, but A/B testing might just be the next best thing. In this article, I’ll guide you through conducting an A/B test on an Android (Kotlin) application using ConfigCat’s feature flag management system and Amplitude.

What is A/B Testing?
A/B testing is a marketing and product development strategy that compares two extremely similar versions of a product to see which one performs better. The two versions, known as control and variant, must only differ by one element. Otherwise, while examining the data, you wouldn’t be able to tell which adjustment had which impact. The control, as the name implies, is frequently the current version of the program, whereas the variant is the modification we wish to implement.
In the case of a mobile application, such as the one we'll create in Kotlin, testing involves creating two versions of a screen and releasing both to users.
ConfigCat supports simple feature toggles, user segmentation, and A/B testing and has a generous free tier for low-volume use cases or those just starting out.
The Sample App
For this tutorial, we will work on a very simple page to see which button text performs better. Users of "my AwesomeApp" can listen to music, read books, and watch movies. A premium subscription exists, but few users browse the subscription information page. So I’ve decided that showing the subscription fee ($4.99) could encourage my customers to learn more about the premium plan. Because I’m not sure if it will drive growth, I’ve decided to A/B test my concept.
Follow along to create your own A/B test in Kotlin. If you want to see the completed app, you can check it out on GitHub here.

Prerequisites
Initializing the App
First things first, open Android Studio and create an Empty Activity using Kotlin and Gradle. Then, paste the following code into activity_main.xml:
<LinearLayout
    xmlns:android="http://schemas.android.com/apk/res/android"
    android:layout_width="match_parent"
    android:layout_height="wrap_content"
    android:orientation="vertical"
    android:padding="16dp">

    <TextView
        android:layout_width="match_parent"
        android:layout_height="wrap_content"
        android:text="Not enough entertainment?"
        android:textSize="24sp"
        android:textColor="#333"
        android:gravity="center"/>

    <TextView
        android:layout_width="match_parent"
        android:layout_height="wrap_content"
        android:text="We know there's never enough to watch, listen or read. But we might have an option. With a premium AwesomeApp account you get access to:"
        android:textSize="16sp"
        android:paddingTop="16dp"/>


    <TextView
        android:layout_width="match_parent"
        android:layout_height="wrap_content"
        android:text="• Over 100+ new books every month"
        android:textSize="16sp"
        android:paddingTop="8dp"/>

    <TextView
        android:layout_width="match_parent"
        android:layout_height="wrap_content"
        android:text="• Undiscovered, new artists right in your playlist"
        android:textSize="16sp"
        android:paddingTop="8dp"/>

    <TextView
        android:layout_width="match_parent"
        android:layout_height="wrap_content"
        android:text="• More than 300 new movies each month"
        android:textSize="16sp"
        android:paddingTop="8dp"/>

    <Button
        android:id="@+id/myButton"
        android:layout_width="match_parent"
        android:layout_height="wrap_content"
        android:text="Subscribe to Premium!"
        android:textSize="18sp"
        android:textColor="#fff"
        android:background="#333"
        android:padding="16dp"
        android:layout_marginTop="16dp"/>

</LinearLayout>
As you can see, this is a simple page with some premium plan details and a call to action for the user to subscribe now. This is the button we will run our A/B test on.
Now, heading to MainActivity.kt, we need to add a listener for when the button is clicked in the onCreate() function.
  val myButton: Button = findViewById(R.id.myButton)

  myButton.setOnClickListener {
            println("Button Pressed")
        }
By now, if you run your app, you should get a message in the console every time you press the button.
Connecting to ConfigCat
It’s time to create a feature flag and connect it to our button. If you’re not familiar with feature flags, I suggest reading this tutorial or checking out the ConfigCat Blog to learn more about how to use them on different platforms.
If you haven’t already, head over to ConfigCat, create a free account, login and navigate to the dashboard. Here you can create your new feature flag and set its value.
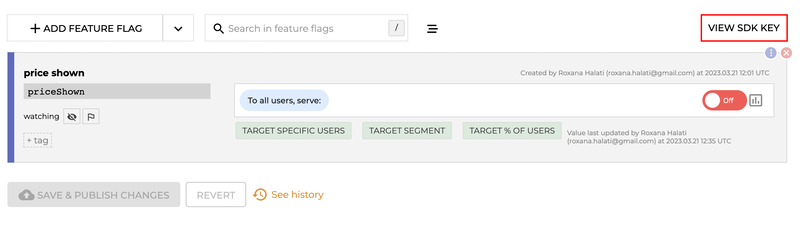
While you’re here, take a second to locate your SDK key, which you can find in the upper right corner of your screen, as you’ll be needing it in just a moment.
Then, go back to Android Studio and add the Kotlin SDK dependency in your build.gradle file. Don’t forget to re-sync your gradle afterward.
implementation 'com.configcat:configcat-android-client:8.+'
In MainActivity.kt, import the library and create the ConfigCat client using your unique SDK key, which you’ve located in the previous step.
import com.configcat.ConfigCatClient

class MainActivity : AppCompatActivity() {
    var client = ConfigCatClient.get("YOUR-SDK-KEY")

    override fun onCreate(savedInstanceState: Bundle?) {
        super.onCreate(savedInstanceState)
        setContentView(R.layout.activity_main)
	val priceShown = client.getValue(Boolean::class.java, "priceShown", false)
	System.out.println("priceShown's value from ConfigCat: " + priceShown);

val myButton: Button = findViewById(R.id.myButton)

        if(priceShown){
            myButton.text="Subscribe to Premium!"
        }
        else {
            myButton.text="Subscribe to Premium! $4.99"

        }
	...
}
Now, you’ve not only made a feature flag, but you’ve also linked it to the button’s text. When the flag is off, the button reads "Subscribe now!". When the flag is turned on, the button reads "Subscribe now! ($4.99)". Take a moment to verify that you’ve done everything correctly by toggling your flag in ConfigCat and running your app.
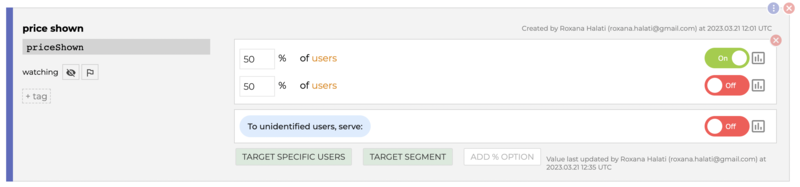
Because I want some of my users to see the control and others to see the variation, I need to make one more change to my flag. I enabled the TARGET % OF USERS and set it to 50/50, so that half of the people see the variant and half see the control.
Setting up Amplitude
Currently, I have no means of knowing who pressed what and which button performed better. This is where Amplitude comes in. Amplitude is a product analytics platform that helps developers understand user behavior and make feature decisions. In our case, we’re using Amplitude to track the way our users interact with the button.
Go to Amplitude and create a free account. You will be asked to select an SDK and be given instructions on how to connect to your app. You can follow the official tutorial, but I’ll still walk you through every step.
First, we need to import the SDK into our project, so add the following to your build.gradle.
implementation 'com.amplitude:analytics-android:1.+'
In your AndroidManifest.XML add the following line to give the necessary user permissions for Amplitude to work.
<uses-permission android:name="android.permission.INTERNET" />
Next, import the library and create the amplitude client in the onCreate() method. You’ll notice you once again need an SDK key. You can locate that in Amplitude Personal settings -> Projects -> YourProjectName.
val amplitude = Amplitude(
            Configuration(
                apiKey = "YOUR-SDK-KEY",
                context = applicationContext
            )
        )
Furthermore, you’re probably accustomed to every user having a unique ID. While Amplitude tracks this on its own, if you’re also tracking IDs, you can sync your own with amplitude like I did below.
Note: The data I use in this tutorial is mock data, as my application is not live anywhere. If you want to replicate this effect, you need to set this user ID. When gathering data, change this user ID a few times and run the app to simulate real users.
amplitude.setUserId("[email protected]")
In order to actually track the click event, add the following code in the button listener.
myButton.setOnClickListener {
            amplitude.track("Subscribe Button Pressed")
}
If I were to run the app now and press the button, Amplitude would receive information about the user, but I would only know who pressed the button, not what sort of button it was. I still need to add the flag’s value to the information sent to Amplitude. To do that, one more property needs to be added to the user.
val identify = Identify()
identify.set("flag", priceShown)
amplitude.identify(identify)
At this point, you can run the app and click the button. In a few seconds, the event will be logged into Amplitude. You can check that out by doing to User_Lookup in the primary menu.
Analyzing the Tracked Events
We’ve tracked events so far, but we aim is to determine which type of button was pressed more frequently. To do so, navigate to Data -> Create New -> Analysis -> Segmentation.
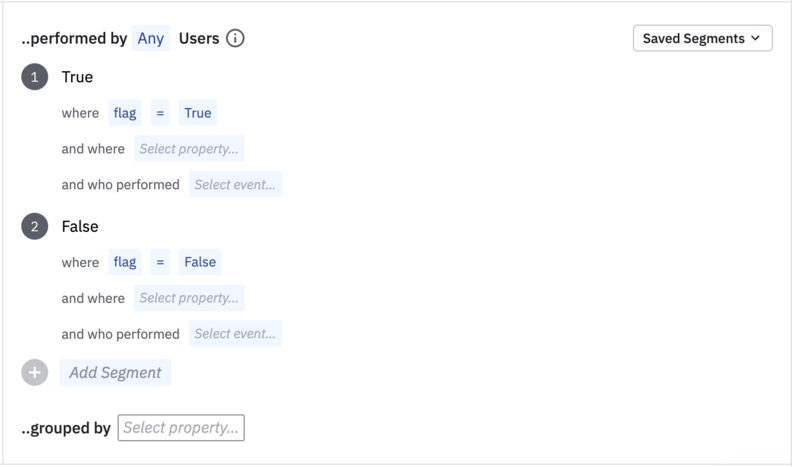
On this page, you can create an analysis that allows you to see which UI performed better. To do so, choose the event on the left side. In our case, the event is named “Subscription Button Pressed”. Then, on the right side, you need to create 2 cases - one in which the user’s feature flag is off and one where the flag is on. You can do so by replicating the setup from the image below.
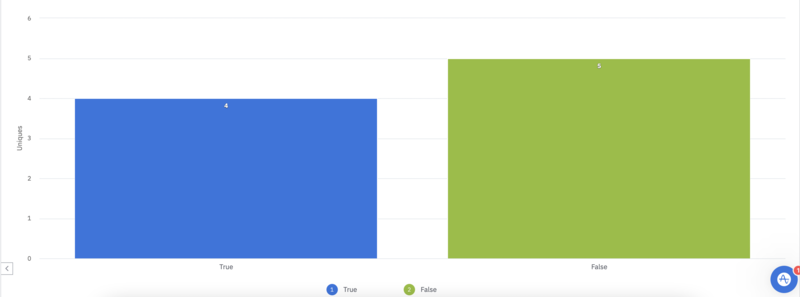
Scrolling below on this page should reveal a chart with your data. Looking at the graph generated in my case, it appears that showing the price did not cause more users to click on the button. That means this particular change would not lead to bigger sales. Turns out I was wrong in my assumption and this A/B test showed me just that, before I made the mistake of implementing it for good.
In practice, you should allow a few days to collect as much information as possible before making a decision.
Key Takeaways
With that, we’ve successfully ran an A/B test on our Kotlin application and made an informed decision about a possible feature change. To summarize, these are the steps you need to take:
- Set up an Android Kotlin application
- Create a ConfigCat account and create a flag
- Connect the flag to the feature you’re testing and turn
TARGET % OF USERSon - Create an Amplitude account and connect it to your app
- Track events from within your app
- Analyze the data in Amplitude
At first glance, this process was more complicated than it turned out to be. We were able to set up the test in just a few minutes, which in turn will provide us with invaluable information about our customers. As it turns out, A/B testing is an essential tool in mobile development that can help developers make informed decisions about structural changed to their application. Hopefully, this article helped you take your first steps into the world of user testing.
If you’d like to learn more about feature flags and how they can help in A/B testing and more, be sure check out ConfigCat Blog and follow ConfigCat on Facebook, Linkedin, Twitter and Github.