Implementing a Feature Using ConfigCat and LaunchDarkly
Feature flagging services have become a crucial part of software development. They simplify the release of new software features by removing the complexity of the feature flagging system and allowing developers to concentrate on their software. In this article, we'll examine the ways of adding a new feature to a React application and compare the use of feature flags by integrating two well-known feature flagging services, ConfigCat and LaunchDarkly, into the application.
What are feature flags and feature flag services?
Feature flags (also known as feature toggles) are a way to dynamically enable or disable specific functionality in software without making changes to code.
Feature flag services are platforms that provide a centralized management of feature flags and associated metadata. These services allow development teams to easily manage and deploy feature flags, monitor their usage and impact, and collaborate on flag management across the entire organization.
Introducing the College Campus Management System
As a demo application, we will use a college campus management system that keeps a record of students. This system has the capability to manage the student records by adding, removing, searching, and editing student information.
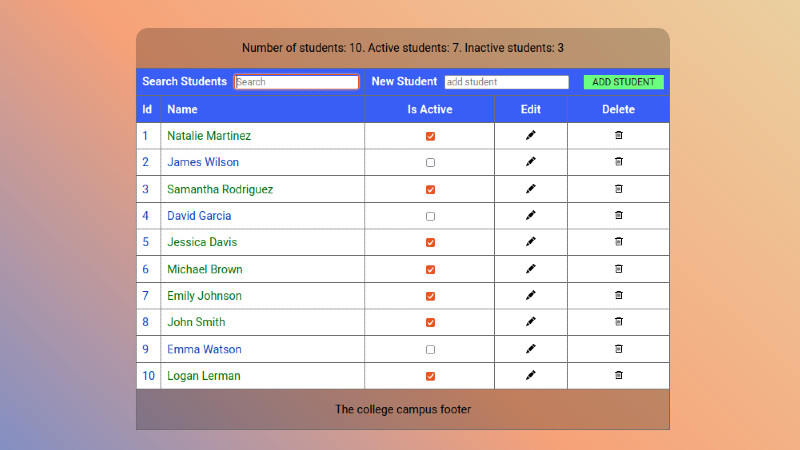
To showcase the use of feature flags, I will introduce a counting feature. The flag will dynamically update the "Student Record" heading with the total number of students and the sum of enrollment statuses for active and inactive students. The use of feature flags will allow controlled testing in a production environment, minimizing the risk of potential problems with the code.
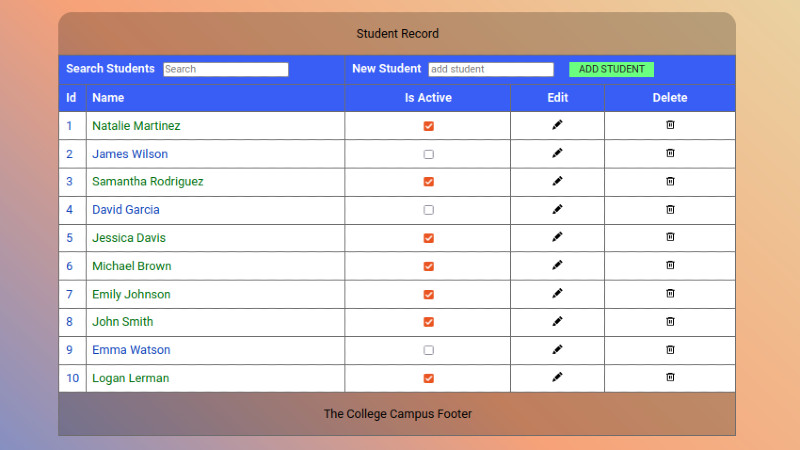
In the following sections, I will walk you through the initial layout of the application and the process of implementing the feature flag services. To manage the release, I'll enable user targeting to limit the feature to email addresses containing the @it.campus.com domain. By the end of this article, you will have a better understanding of how feature flags can be used to manage and release new software features in a safe and controlled manner.
To simplify the process of the feature flag implementation, I will first integrate ConfigCat, then make modifications to implement LaunchDarkly.
Note:
- I am using the global React Context to add interactivity to the Student Record table.
- I implemented the browser's local storage in the application to keep the record of students instead of connecting to an online database.
To create the project, I am using the Vite build tool.
To follow along, you will need:
- Knowledge of JavaScript and React
- Node.js installed on your computer
- A code editor. I prefer Visual Studio Code
- To scaffold the project, I am using NPM
After creating a directory on your system and opening your coding environment, you can run the following commands in the terminal:
npm create vite@latestnpm installnpm run dev
or you can clone the completed project containing both implementations from here.
If you are building the application from scratch, here is a sample of the data stored in the local storage.
[{"id":1,"isActive":true,"name":"Natalie Martinez"},{"id":2,"isActive":false,"name":"James Wilson"},{"id":3,"isActive":true,"name":"Samantha Rodriguez"}]
Preparing the application for feature flags
From the initial boilerplate, the App component received the global context and new child components building up the table:
import { DataProvider } from "./context/DataContext";
import TableHead from "./components/TableHead";
import TableBody from "./components/TableBody";
import TableFooter from "./components/TableFooter";

const App = () => {
  return (
    <main>
      <DataProvider>
        <table>
          <caption>Student List</caption>
          <TableHead />
          <TableBody />
          <TableFooter />
        </table>
      </DataProvider>
    </main>
  );
};

export default App;
To implement the new feature, I will create a new React component named "TableCaption" that adds the featured application functionality. This component will be conditionally rendered based on the feature flag value.
Let's have a quick look at the new component.
The featured "TableCaption" component
The "TableCaption" component holds all the new code within itself to prevent any negative impact on the rest of the application. From the global context, the component only listens for changes in the students variable, which ultimately contains the student record. This triggers a re-render and the application performs new calculations.
import DataContext from "../context/DataContext";
import { useContext, useEffect, useState } from "react";

const TableCaption = () => {
  const { students } = useContext(DataContext);
  const [countOfStudents, setCountOfStudents] = useState(0);
  const [countOfActiveStudents, setCountOfActiveStudents] = useState(0);
  const [countOfInactiveStudents, setCountOfInactiveStudents] = useState(0);

  useEffect(() => {
    const studentCount = JSON.parse(localStorage.getItem("students"));
    setCountOfStudents(studentCount.length);
    let activeCount = 0;
    let inactiveCount = 0;
    studentCount.forEach((student) => {
      if (student.isActive) {
        activeCount++;
      } else {
        inactiveCount++;
      }
    });
    setCountOfActiveStudents(activeCount);
    setCountOfInactiveStudents(inactiveCount);
  }, [students]);

  return (
    <>
        <caption>
          {countOfStudents
            ? `Number of students: ${countOfStudents}. Active students: ${countOfActiveStudents}. Inactive students: ${countOfInactiveStudents}`
            : "No students"}
        </caption>
    </>
  );
};

export default TableCaption;
To use this component in the application, I will introduce a new feature flag named "captionCounterFlag". With it, the "TableCaption" component is going to be conditionally used, and depended on the value of the feature flag.
Creating the feature flag with ConfigCat
-
Sign in to the ConfigCat Dashboard to create a new feature flag.
-
In the dashboard, you can add a feature flag by clicking the Add feature flag option.
-
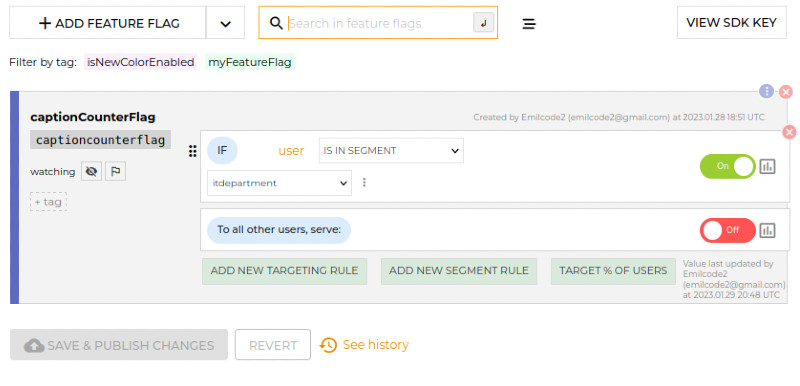
Create a feature flag with the following details:
- Name: captionCounterFlag
- Key: captioncounterflag
-
Click the ADD FEATURE FLAG button to create and save the feature flag.
-
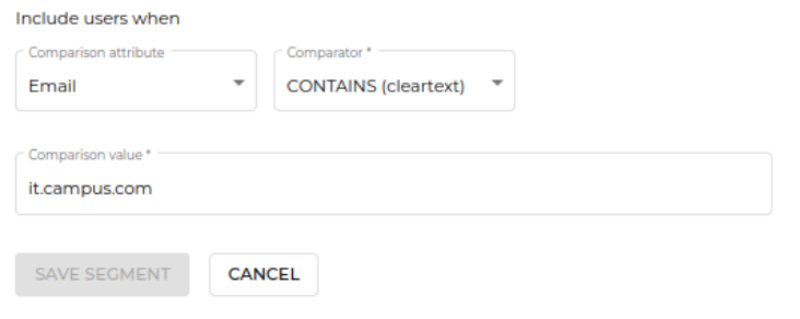
Add a new targeting rule by setting:
- the comparison attribute to
Email - the comparator to
Contains(cleartext) - save the segment
- the comparison attribute to
- Make sure to turn on the feature flag in your environment.
- Click on the
VIEW SDK KEYbutton on the top right to view the key.
Accessing the ConfigCat feature flag from the application
To install the ConfigCat SDK for React run the following command:
npm i configcat-react
Let's modify the "main.jsx" file to import the ConfigCat SDK:
import React from "react";
import { ConfigCatProvider } from "configcat-react";
import ReactDOM from "react-dom/client";
import App from "./App";
import "./index.css";

ReactDOM.createRoot(document.getElementById("root")).render(
  <React.StrictMode>
    <ConfigCatProvider
      sdkKey="YOUR-SDK-KEY"
    >
      <App />
    </ConfigCatProvider>
  </React.StrictMode>
);
The ConfigCatProvider component uses the "configcat-react" library. The provider is passed the SDK key for accessing the ConfigCat service, which wraps around the App component enabling feature management for the entire application.
Let's add the flag in the App component:
import { useFeatureFlag } from "configcat-react";
import { DataProvider } from "./context/DataContext";
import TableHead from "./components/TableHead";
import TableBody from "./components/TableBody";
import TableFooter from "./components/TableFooter";
import TableCaption from "./components/TableCaption";

const App = () => {
  const { value: captioncounterflagValue } = useFeatureFlag(
    "captioncounterflag",
    false,
    { identifier: "USER-ID", email: "[email protected]" }
  );

  return (
    <main>
      <DataProvider>
        <table>
          {captioncounterflagValue ? (
            <TableCaption />
          ) : (
            <caption>Student Record</caption>
          )}
          <TableHead />
          <TableBody />
          <TableFooter />
        </table>
      </DataProvider>
    </main>
  );
};

export default App;
The trick here is to pull in the configcat-react library in order to retrieve the value of the feature flag. The library uses a hook called "useFeatureFlag" to do this.
The hook takes three arguments:
- the name of the feature flag
- a default flag value
- and in this case, a hard-coded object that represents the user
The email of the user is used to evaluate the flag value. The result will then determine whether to display the "TableCaption" component or a simple caption element in a conditional statement.
That's it, run the application with npm run dev.
Creating the feature flag with LaunchDarkly
- Sign in to the LaunchDarkly Dashboard
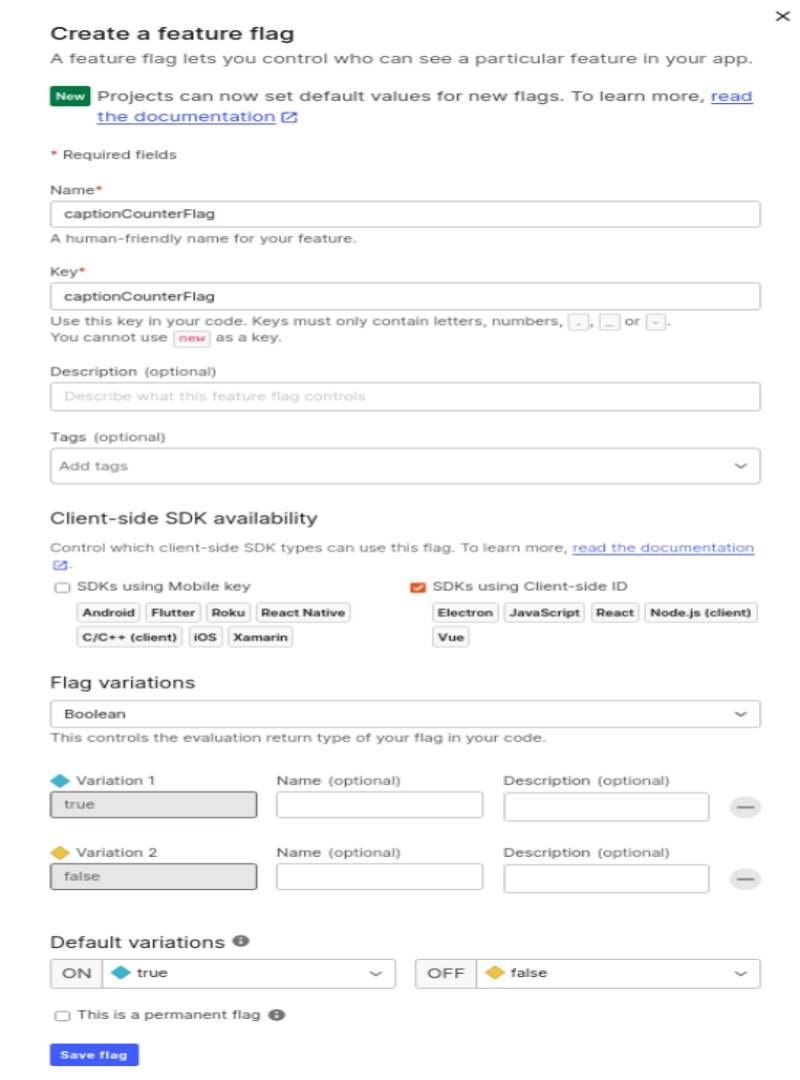
- In the dashboard, create a feature flag and fill in the following details:
- Name: captionCounterFlag
- Key: captionCounterFlag
- Check the
Client-side SDK availabilitywithSDKs using Client-side ID - Flag Variations:
Boolean - Default Variations:
On = trueandOff = false - Save the flag
- Select the targeting tab
- Switch the targeting toggle to ON
- Click on the
+Add rulesbutton - Add the following rules:
- if
emailcontains@it.campus.com - serve
true
- if
- Default rule:
- serve
false
- serve
- Click on the
Review and savebutton and theSave changesbutton

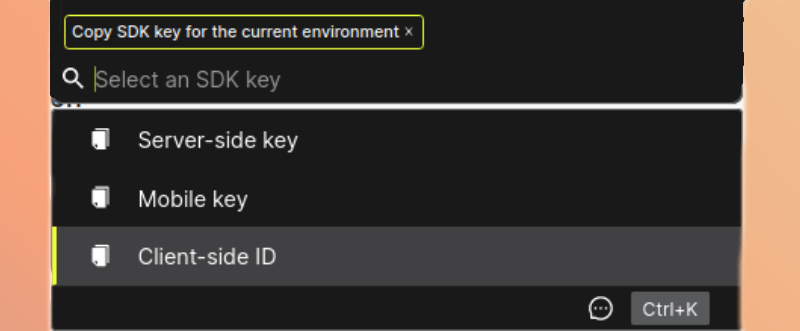
- To obtain the SDK key, press "Cmd + K" on a Mac or "Ctrl + K" on Windows. Choose the option
Copy SDK Key for the Current Environment, then select theClient Side IDoption.
Accessing the LaunchDarkly feature flag from the application
For the LaunchDarkly implementation, the "main.jsx" component will be reverted to the starting condition. Remove all elements connecting the application to ConfigCat.
import React from "react";
import ReactDOM from "react-dom/client";
import App from "./App";
import "./index.css";

ReactDOM.createRoot(document.getElementById("root")).render(
  <React.StrictMode>
      <App />
  </React.StrictMode>
);
Setting up the feature flag in the project has a few steps:
- To install the LaunchDarkly SDK for React, run the following command:
npm i launchdarkly-react-client-sdk
- In the
Appcomponent import thewithLDProviderfrom launchdarkly-react-client-sdk - Bring in the
useFlagshook which will help to evaluate the flag value. - At the bottom of the component's
export default, import thewithLDProviderto wrap the application with the LaunchDarkly provider. This is also where the user object is set, providing the email value necessary for evaluating the flag. - In the clientSideID add the SDK key, which was mentioned in the previous section.
- Deconstruct the "captionCounterFlag" flag from
useFlagshook to conditionally render between the new "TableCaption", and the old<caption>Student List</caption>component.
import { withLDProvider, useFlags } from "launchdarkly-react-client-sdk";
import { DataProvider } from "./context/DataContext";
import TableHead from "./components/TableHead";
import TableBody from "./components/TableBody";
import TableFooter from "./components/TableFooter";
import TableCaption from "./components/TableCaption";

const App = () => {
  const { captionCounterFlag } = useFlags();
  return (
    <main>
      <DataProvider>
        <table>
          {captionCounterFlag ? (
            <TableCaption captionCounterFlag={captionCounterFlag} />
          ) : (
            <caption>Student Record</caption>
          )}
          <TableHead />
          <TableBody />
          <TableFooter />
        </table>
      </DataProvider>
    </main>
  );
};

export default withLDProvider({
  clientSideID: "YOUR-SDK-KEY",
  context: {
    type: "user",
    key: "USER-ID",
    email: "[email protected]",
  },
})(App);
In the feature flag implementation using the LaunchDarkly SDK, the value of the flag is retrieved using the useFlags hook. The hook returns an object that has the value of the feature flag as a property. The feature flag value is then used to conditionaly render eather the "TableCaption" component or the caption element.
-
withLDProvider is a higher-order component importing the LaunchDarkly library, and it is used to provide the
Appcomponent with the necessary context and functionality to interact with the LaunchDarkly service. -
useFlags is a custom hook that retrieves all feature flags. It uses the
useContextprimitive to access the LaunchDarkly context established bywithLDProvider.
That's it, run the application with npm run dev. The application should behave the same way as it did with the ConfigCat implementation.
Summary of key differences
In the ConfigCat implementation, the useFeatureFlag hook is used to retrieve the feature flag value and render either "TableCaption" or a plain caption element.
The LaunchDarkly implementation uses the useFlags hook and accesses the feature flag as a property, which is later used as a value to render either "TableCaption" component or a plain "caption" element.
With ConfigCat, the App component is exported directly, and the application is wrapped with the SDK in the "main.jsx" file. With LaunchDarkly, the App component is exported wrapped in the withLDProvider higher-order component, which sets up LaunchDarkly.
I would like to mention some pros and cons of implementing feature flags on the client-side:
Pros:
- Easy to implement, especially if it's a small feature
- Easy to maintain component-level isolation, allowing changes to be made and tested independently.
- Easy to track and manage, as the flags are within the component code.
Cons:
- Improper implementation can lead to cluttered code and become difficult to manage as the application grows.
- Can be error-prone and require more testing.
The one important thing to take away is to keep the component decoupled from the rest of the application, and completely contained under the influence of the feature flag.
Overview of Feature Flag Services
When it comes to choosing a feature flag service, ConfigCat stands out with its forever free plan and fixed prices across five different pricing tiers. This means that users can enjoy all the benefits of the service without worrying about unexpected costs. ConfigCat offers client-side feature flag reads ranging from 5 million in the free plan to over 6+ billion per month in their Dedicated plan, offering options in between to fit different needs and usage levels. Another advantage of ConfigCat is its unlimited team size feature, allowing for seamless collaboration among team members without incurring additional charges. This makes it a great choice for teams of all sizes.
On the other hand, LaunchDarkly only offers three paid plans, and a 14-day trial period. Their client-side feature flag reads are based on the chosen plan and can range from 1,000 in the Starter Plan, to a custom amount agreed through LaunchDarkly sales in the Enterprise plan. While this customization is great if you have a specific feature flag read requirement in mind, it also means that your costs may fluctuate based on usage. The team size is charged per seat[^1], so larger teams may face increased costs. This could be a challenge for organizations with many team members, as they may need to allocate a significant budget to using the service.
[^1] Each team member who logs in with a unique email address counts as a seat.
Conclusion
Both ConfigCat and LaunchDarkly are feature flag services that are user-friendly, even non-technical users will find them easy to use. We saw this by using their support for email targeting, which allows you to target specific groups of users based on their email formats.
As a final note, we saw that utilizing feature flags saves time and ultimately makes your development process more efficient, allowing tests on the live application while controlling the acceptability of the new feature. Both ConfigCat and LaunchDarkly deliver excellent tools. The decision of whom to work with is ultimately up to you - ConfigCat or LaunchDarkly?
To see more awesome posts like this and other announcements, follow ConfigCat on Twitter, Facebook, LinkedIn, and GitHub.
